- 1 The feature adds value, especially to touch interface, by involving easy dragging and dropping with the use of touch mechanism greatly characterized for user friendly interfaces.
- 2 The tutorial is dedicated to the implementation of drag and drop in React Native with the help of PanResponder API emphasizing on a real-world example and clear instructions.
- 3 The PanResponder API found in the React Native deals with touch gestures – fundamental to drag-and-drop – by providing methods such as dragging and swiping to identify the gesture and respond.
Introduction to drag and drop
The drag and drop feature stands out as a widely embraced user interaction pattern, significantly enriching the user experience by granting them the ability to effortlessly maneuver elements through touch gestures. This tutorial embarks on a journey to unravel the implementation of drag and drop functionality within a React Native application, leveraging the versatile PanResponder API. As we delve into this tutorial, we’ll not only guide you through the process but also furnish you with a hands-on illustration, accompanied by an in-depth breakdown of each pivotal step.
With drag and drop, users can intuitively rearrange elements, simplifying complex tasks and fostering a more engaging and user-friendly interface. By focusing on React Native and the PanResponder API, we offer a practical, real-world example that demonstrates how to harness this feature effectively. This tutorial serves as a valuable resource for those eager to enhance their React Native applications with the power of touch-based element manipulation.
Understanding PanResponder in React Native
The PanResponder API is an essential tool for handling touch gestures in React Native drag and drop. It provides methods and callbacks to recognize and respond to touch interactions like dragging, swiping, and more.
To use PanResponder, you first need to create a PanResponder object. You can do this by calling the PanResponder.create() function. The PanResponder.create() function takes a few arguments, including:
- onStartShouldSetPanResponder: The user initiates this function when starting to drag an element. This function should return a boolean value that indicates whether or not to activate the PanResponder.
- onPanResponderGrant: The PanResponder activates this function. It can be To perform tasks, including setting the initial position of the element being dragged.
- onPanResponderMove: This function is used whenever they move the element is draggedon the screen. You can use this function to update the position of the element.
- onPanResponderRelease: The user can use this function to execute actions, including handling the element when it is dropped, among other actions and when releases the element being dragged.
Where Drag and Drop Actually Gets Used in Mobile Apps
It’s easy to treat drag and drop as a nice-to-have animation, but in most apps it’s solving a specific interaction problem: letting users express order or grouping without typing anything or hunting through a menu.
Form builders and dashboard tools are a good example — apps like form-creation software or admin panels often let users drag fields or widgets into place to design a layout visually. Music and video apps use it for queue management, where dragging a track up moves it next in line without needing a separate “move up” button. File manager apps use drag and drop to move items between folders, which is really a drop-zone problem rather than a simple positional one. Even onboarding flows sometimes use it — asking a user to drag items into categories as a lightweight way to collect preferences.
What’s worth noticing is that these aren’t all the same underlying problem. Reordering a queue or list means your code needs to know indexes, not just coordinates, so it can swap items when one is dragged past another. Moving something into a folder or category, on the other hand, is about detecting overlap between the dragged element’s position and a target container’s boundaries — typically handled with onLayout measurements rather than tracking motion alone. The example further down this post keeps things simple with a single free-floating draggable view, which is the right starting point for understanding PanResponder’s mechanics. If your actual use case involves reordering a list or dropping into specific zones, that’s the layer of logic you’ll need to add on top.
Write a message…
Implementing Drag and Drop in React Native: A Practical Example
Let’s implement drag and drop functionality using a practical example. We’ll create a draggable component that responds to touch gestures by allowing the user to drag it around the screen.
Step 1: Import Dependencies
Start by importing the necessary dependencies:
import React, { useState } from ‘react’;
import { View, Animated, PanResponder } from ‘react-native’;
Step 2: Create the Draggable Component
Define the draggable component using the functional component syntax:
Step 3: Use the Draggable Component
In your main component, use the Draggable list Component within your layout for rative native drag and drop:
const App = () => {

  return (

    <View style={styles.container}>

      {/* Other components */}

      <DraggableComponent />

      {/* Other components */}

    </View>

  );

};
Step 4: Style your Components
Add styles to your components to control their appearance:
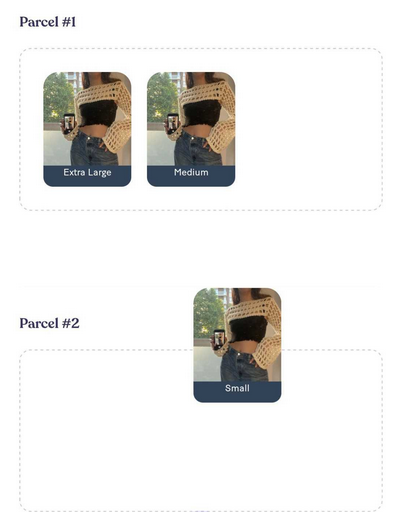
In this example, the DraggableComponent component uses the PanResponder component to implement drag and drop. The View component attaches the PanResponder component. It uses the onPanResponderMove function to update the position of the draggable content as the user drags it. The onPanResponderRelease function logs a message to the console when the user releases the Image component.
Best Practices for a Smooth Drag and Drop Experience
Getting drag and drop to technically work is one thing. Getting it to feel good under a user’s thumb is another, and that’s usually where teams spend the bulk of their time.
A few things worth paying attention to:
Use the native driver wherever you can. In the example above, useNativeDriver is set to false because we’re animating layout properties. Where possible, animate transform properties instead (translateX/translateY) so you can flip that to true — it offloads the animation to the native thread and avoids jank on lower-end Android devices.
Give the user visual feedback the moment a drag starts. A slight scale-up, a shadow, or a small opacity change on onPanResponderGrant tells the user “yes, this is now being dragged” before they’ve moved their finger at all. Without it, there’s a brief moment of uncertainty that makes the interaction feel unresponsive.
Set a drag threshold. Returning true unconditionally from onStartShouldSetPanResponder means even an accidental tap can trigger a drag. A common fix is to check the gesture’s movement distance and only activate the responder once it crosses a small threshold, say 5–10 pixels. This also helps PanResponder play nicer with ScrollView and TouchableOpacity components sitting nearby, which otherwise tend to compete for the same touch events.
Common Issues When Implementing Drag and Drop (And How to Fix Them)
A few problems come up often enough with PanResponder that they’re worth calling out ahead of time.
The element snaps back to its original position instead of staying where it was dropped. This usually means pan.flattenOffset() was left out of onPanResponderRelease, or is being called before the offset was actually set in onPanResponderGrant. Without flattening, the offset and the animated value stay separate, and the next drag starts from the wrong base position.
Dragging works but scrolling stops working on the same screen. This happens when a PanResponder-wrapped view sits inside a ScrollView and the responder claims the gesture too aggressively. Adjusting onMoveShouldSetPanResponder to check gesture direction — only claiming the responder for horizontal movement, say, and letting vertical movement pass through to the scroll view — usually resolves it.
The drag feels delayed or stutters on Android specifically. This is almost always tied to useNativeDriver: false combined with a complex view tree underneath the draggable element. Simplifying the component being dragged, or switching to transform-based animation so the native driver can be used, typically clears it up.
Innostax Mobile App Development Services
Enhance your React Native applications with Innostax’s comprehensive mobile app development services. Our expertise ensures that features like drag and drop are seamlessly integrated, providing a fluid and intuitive user experience across both iOS and Android platforms.
Our Services Include:
- Custom React Native Development: We build tailored solutions that incorporate advanced functionalities such as drag and drop, ensuring your app meets specific business requirements and user expectations.
- UI/UX Design: Our design team creates visually appealing and user-friendly interfaces that complement interactive features, enhancing overall engagement and usability.
- Performance Optimization: We ensure that interactive elements like drag and drop operate smoothly, delivering a responsive experience even with multiple simultaneous interactions.
- Comprehensive Testing: Rigorous quality assurance processes verify that all features function flawlessly across various devices and operating systems, maintaining high performance and reliability.
- App Maintenance and Support: Post-launch, we provide ongoing support and updates to keep your app up-to-date with the latest technologies and user preferences.
PanResponder vs. React Native Gesture Handler
PanResponder isn’t the only way to build drag and drop in React Native, and it’s worth knowing when to reach for something else.
React Native Gesture Handler is a separate library that handles gestures at the native level rather than through React Native’s JS bridge. In practice, this means smoother performance for complex interactions, especially on Android, and better interoperability with other gesture-based components like swipeable lists.
PanResponder has the advantage of being built into React Native itself, so there’s no extra dependency to install or link. For a single draggable element, like the example in this post, that simplicity is usually enough. Where PanResponder starts to strain is with multiple simultaneous gestures, nested scrollable areas, or drag-and-drop between several drop zones — Gesture Handler tends to handle those cases with noticeably less custom logic.
If you’re building something as focused as the example above, sticking with PanResponder is a reasonable call. If you’re building a Kanban board, a swipeable card stack, or anything with several interactive gesture regions on one screen, it’s worth the extra setup to bring in Gesture Handler instead.
Accessibility Considerations for Drag and Drop
Drag and drop is a fundamentally visual, motor-driven interaction, which makes it one of the easier patterns to accidentally lock out users who rely on screen readers or switch controls. It’s worth building in a few accommodations from the start rather than retrofitting them later.
The first issue is that PanResponder gestures aren’t inherently exposed to assistive technology. A screen reader user swiping through your app with VoiceOver or TalkBack won’t be able to “grab” an element the way a sighted, mouse-or-finger user can. The practical fix is to always pair a draggable element with a non-drag alternative — buttons like “Move up,” “Move down,” or “Move to In Progress” that perform the same reordering logic your onPanResponderRelease handler already contains. This means separating your state-update logic (the function that actually reorders the array or changes an item’s group) from the gesture-handling code, so both paths — drag and button tap — can call into the same function.
Labeling matters too. Set accessibilityLabel and accessibilityHint on the draggable component itself, describing both what the element is and what action is available — something like “Task card, double tap and hold to reorder” — so a screen reader user at least knows the option exists even if they use the button alternative instead.
Color and motion also deserve a second look. If your drag feedback relies only on a color shift (say, a card turning blue when it’s active), that’s invisible to color-blind users and easy to miss for anyone with low vision. Pairing the color change with a shadow, scale, or border change covers more cases without much extra work. Similarly, if your app targets users sensitive to motion, check whether AccessibilityInfo.isReduceMotionEnabled() returns true and simplify or shorten your drag animations accordingly.
Testing Your Drag and Drop Implementation
Drag and drop is one of those features that looks fine in a quick manual check and then breaks in ways nobody noticed until a user reports it — an element that drops in the wrong spot, a gesture that only works on the first try, a reorder that silently fails on Android but not iOS. A bit of structured testing goes a long way here.
Manual testing should cover more than just “does dragging work.” Try dragging fast versus slow, releasing mid-gesture, and dragging an element partially off-screen — these edge cases surface bugs that a single careful drag-and-drop rarely does. It’s also worth testing what happens when a user starts a drag and then a re-render happens mid-gesture, since state resets during an active PanResponder gesture are a common source of the “snap back to start” bug mentioned earlier in this post.
For automated coverage, unit tests can verify the logic that runs after a drag completes — the array reordering function, the drop-zone detection function — independently of the gesture itself, since PanResponder’s touch simulation doesn’t translate well into typical unit test frameworks like Jest. This is another reason it helps to separate your “what happens when an item moves” logic from your “how the touch gesture is detected” logic, as mentioned in the accessibility section — it makes the former testable on its own.
For true gesture-level testing, end-to-end frameworks like Detox can simulate swipe and long-press gestures on a real or virtual device, which gets closer to how an actual drag would behave than a unit test can. It won’t catch every subtlety of PanResponder’s touch handling, but it’s useful for confirming that a drag-and-reorder flow doesn’t break after a code change elsewhere in the app.
Conclusion
Congratulations on your achievement! You’ve adeptly integrated React Native’s drag and drop functionality into your application, skillfully harnessing the power of the PanResponder API in synergy with the React Native Gesture Handler with drag and drop mobile react. Through a deep comprehension of PanResponder callbacks and their thoughtful implementation in the DraggableComponent, you’ve empowered users with seamless touch interactions, enabling them to effortlessly drag elements across the screen.
This accomplishment serves as a solid foundation for expanding your app’s capabilities with drag and drop mobile react. You can now explore advanced features like setting data, employing keyExtractor for better item identification, and implementing sophisticated item manipulation. These enhancements promise to elevate your app’s usability and user experience to new heights, making it even more engaging and user-friendly. As you embark on this journey, we wish you happy coding and look forward to witnessing your application’s continued growth and success!