- 1 Critical Role of Caching: Caching is the best way to enhance the performance of Node as a result of which caching is a very important feature. js applications by preventing redundant arithmetic calculations, culling database calls.
- 2 Redis for Efficient Caching: Redis that is a fast in-memory data store improves Node. Memory management optimized: In this process, the most frequently used data and minimalized latency or delay in the js app’s performance are stored.
- 3 Performance Benefits: inclusion of Redis caching in Node . With js projects, website response enhances, the consumption of resources is minimal, and the best version of user experience is achieved.
Introduction to Cache Optimization
Efficient web development hinges on the critical aspect of performance optimization. Within this context, caching emerges as an indispensable technique for enhancing the responsiveness and speed of Node.js applications. Caching enables the avoidance of repetitive and resource-intensive computations, as well as the reduction of the need for frequent database queries. Redis, a robust in-memory data store, takes center stage in our exploration of caching in the realm of Node.js in this blog post.
Redis, renowned for its lightning-fast data retrieval, provides a potent solution for storing frequently accessed data in memory. This blog post will comprehensively delve into the mechanics of caching with Redis, demonstrating how it can dramatically enhance the overall efficiency of your Node.js applications. By mitigating the need for costly and time-consuming operations, caching minimizes latency, resulting in a more seamless and responsive user experience. In this article, we’ll uncover the practical applications and benefits of Redis caching, offering web developers valuable insights into optimizing their Node.js projects.
What is Redis?
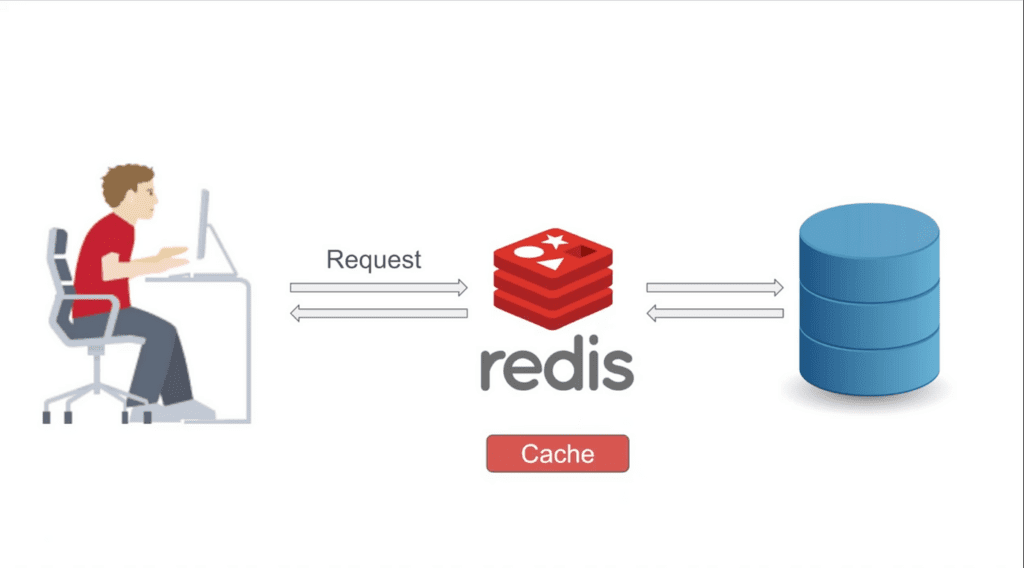
Redis is an open-source, in-memory data structure store that can be used as a cache, message broker, and more. It is known for its exceptional speed and versatility, making it an excellent choice for caching in Node.js applications.
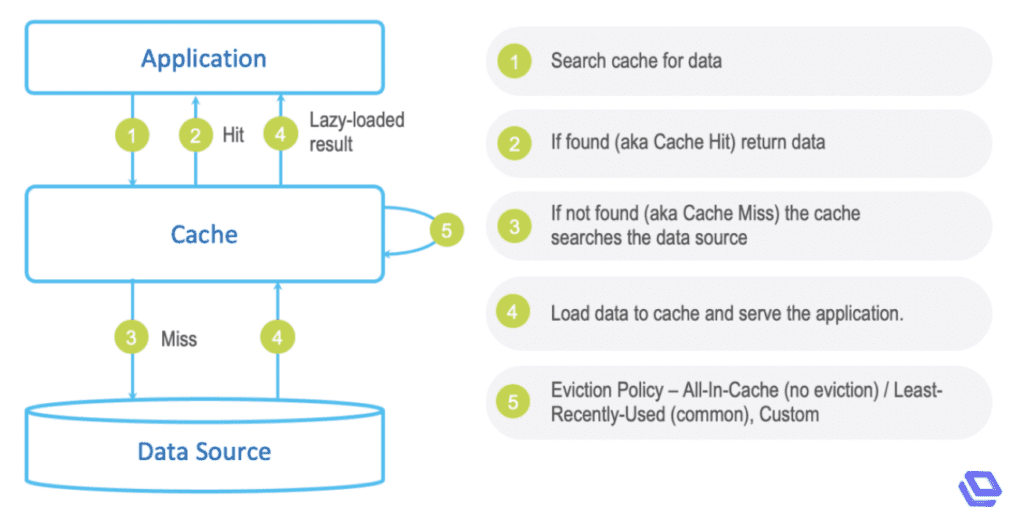
What is Caching?
Keeping copies of files in a cache or other temporary storage space allows users to access them more quickly. Let’s examine the purpose of caching now that we are aware of what it is.
Why do we cache?
You don’t want your application to take too long to respond to users’ requests given the abundance of lightning-fast services and options available to users on the Internet today; otherwise, you run the risk of users switching to a competitor and having your bounce-rate increase rather than your revenue.
Below are a few of the reasons we cache:
- To save cost: Optimize your images and videos, use a CDN, and cache static assets.
- To reduce app response time: Optimize your database queries, reduce the number of requests, and use a CDN and caching solution.
Setting up the Project
First, create the directory for the project using the mkdir command:
1 2 3 | mkdir redis-demo cd redis-demo npm init -y |
1 2 3 4 5 6 7 8 9 10 11 12 13 | Output: { "name": "redis-demo", "version": "1.0.0", "description": "", "main": "index.js", "scripts": { "test": "echo \"Error: no test specified\" && exit 1" }, "keywords": [], "author": "", "license": "ISC" } |
Next, you will install the following packages:
1 | npm install express axios redis |
Create a simple server by using the below code snippet:
Create an index.js file in the root folder and write the below code in the file.
1 2 3 4 5 6 | const express = require('express'); const app = express(); const PORT = process.env.PORT || 3000; app.listen(PORT, () => { console.log(`Server started at port: ${PORT}`); }); |
Before running the server, please add the start script in package.json file
1 2 3 4 5 6 7 8 9 10 11 12 13 14 15 16 17 | { "name": "redis-demo", "version": "1.0.0", "description": "", "main": "index.js", "scripts": { "start": "node index.js", "test": "echo \"Error: no test specified\" && exit 1" }, "keywords": [], "author": "", "license": "ISC", "dependencies": { "axios": "^1.5.0", "express": "^4.18.2" } } |
Run the command npm start
Connect Mock APIs to fetch Data
We will retrieve information from a fictitious API called JSONPlaceholder in this part. This API is excellent for retrieving fictitious data.We will retrieve photos information by providing the id in this API call. Please use the code below as a guide, update the index.js file.
1 2 3 4 5 6 7 8 9 10 11 12 13 14 15 16 17 18 19 20 21 22 23 | const express = require('express'); // added axios as HTTP client const axios = require('axios'); const app = express(); const PORT = process.env.PORT || 3000; // added Fake API const MOCK_API = "https://jsonplaceholder.typicode.com/photos/"; //API Call app.get('/user/:id', async (req, res) => { const id = req.params.id; try { const response = await axios.get(`${MOCK_API}?id=${id}`); const user = response.data console.log("User successfully retrieved from the API"); res.status(200).send(user); } catch (err) { res.status(500).send(err); } }) app.listen(PORT, () => { console.log(`Server started at port: ${PORT}`); }); |
The Axios package is needed in the code above, and we also create MOCK_API for a fictitious API URL. Email is passed as a parameter in the API request, and the user’s information is filtered out and returned in the response.
Step 1: Install Redis server –
- Windows:
– Download the Redis Windows installer from the official website
– Run the installer to install Redis on your system.
– Open the Command Prompt and Run the command redis-cli to start the Redis server. - macOS:
– Install Redis using Homebrew by running the command brew install redis.
– Start the Redis server by running the command redis-server.
1 2 3 4 5 | wget http://download.redis.io/redis-stable.tar.gz tar xvzf redis-stable.tar.gz cd redis-stable make make install |
Step 2: Start Redis server
After that, you can run the command
1 | redis-server |
Redis Installation guide
Step 3: Create a Redis client instance
After installing the Redis package, we need to install and create the Redis client.
1 2 | const redis = require('redis'); const redisClient = redis.createClient(6379); // The default port of Redis is 6379 |
Step 4: Create middleware to handle caching
Then, using the Redis database, we created one route. In this path, we will first determine whether the data is available in Redis. If the data is in Redis, it is retrieved from there; otherwise, it is retrieved from the API.
1 2 3 4 5 6 7 8 9 10 11 12 13 14 15 16 17 18 19 20 21 22 23 24 25 26 27 28 29 30 31 32 33 34 35 36 37 38 39 40 41 | const redis = require('redis'); const redisClient = redis.createClient(6379); const express = require('express'); // added axios as HTTP client const axios = require('axios'); const app = express(); const PORT = process.env.PORT || 3000; // added Fake API const MOCK_API = "https://jsonplaceholder.typicode.com/photos/"; //API Call app.get('/photos/:id', async (req, res) => { const id = req.params.id; try { redisClient.get(id, async (err, response) => { // console.log(response); if (response) { console.log("User successfully retrieved from cache"); res.status(200).send(JSON.parse(response)); } else { const response = await axios.get(`${MOCK_API}?id=${id}`); const user = response.data; console.log(`${MOCK_API}?id=${id}`) redisClient.setex(id, 600, JSON.stringify(user)); console.log("User successfully retrieved from the API"); res.status(200).send(user); } }) } catch (err) { res.status(500).send({ error: err.message }); } }) app.listen(PORT, () => { console.log(`Server started at port: ${PORT}`); }); |
Folder structure
1 2 3 4 | redis-demo/ ├── index.js ├── package.json ├── package-lock.json |
Conclusion
In conclusion, we’ve explored the powerful world of cache optimization in Node.js with Redis. By incorporating Redis as a caching solution, you can significantly boost the performance of your Node.js applications, reducing database loads and response times. We’ve learned how to set up Redis, implement caching strategies, and leverage it to store and retrieve frequently used data efficiently. Optimizing cache is not just a technical choice; it’s a strategy that can greatly enhance user experiences, minimize resource utilization, and improve the scalability of your applications. With Redis and the knowledge you’ve gained in this blog, you are well-equipped to take your Node.js projects to the next level. Happy coding and optimizing!