


- 1 Understand the basics of Liquid, including objects, tags, and filters to dynamically customize your Shopify store.
- 2 Learn how to create reusable code snippets and optimize your theme for better performance.
- 3 Implement advanced customizations like conditional content, product loops, and personalized cart pages.
- 4 Liquid connects Shopify store data with the theme's HTML, making it easier to display dynamic and personalized content.
- 5 Objects, tags, and filters form the foundation of Liquid and help developers control how store data is displayed.
Overview of Shopify and Liquid
Shopify is an e-commerce platform that allows the user to build company webstores. With the many prebuilt theme varieties in Shopify, being able to customize your own theme will make a store unique and further personalize your brand. Such customizations have their key in Liquid-Shopify’s templating language. Liquid will enable shop owners and developers to create dynamic content, manipulate data, and control how it is to be shown in a Shopify theme.
In this blog, we will start with the basics of Shopify theme customization using Liquid by taking you through the main concepts supported by code snippets and real examples. Whether you’re a developer or a Shopify merchant looking to give an individual look to your online store, with the help of this guide, you’ll learn how you can customize your Shopify theme using Liquid.
1. Understanding Liquid
Liquid is an open-source templating language created by Shopify. It’s the glue between the data in your store and the HTML that presents that data, making it possible to render dynamic content with ease. Syntax in Liquid is comprised of HTML and CSS with a little bit of logic; thus, it is pretty easy to learn if you know any front-end web development.
Liquid includes:
- Objects: These are variables that hold the contents of your store. Examples include products, collections and customer information. An example would be {{ product.title }} which returns the title of a product.
- Tags: Tags control the logic of the flow in your templates. Conditions, loops, and filters can be used along with tags in Liquid. Example: {% if customer %}Hello, {{ customer.name }}{% endif %} prints out a greeting message to customers who are logged in.
- Filters: Filters modify the output of objects. Given example, {{ product.price | money }} will format the product’s price and display it with a currency symbol.
2. Setup Up for Customization
Before going into the discussion about customization, you need to be fitted with how setup of theme files in Shopify and code editor which you will use. The very basic Shopify theme structure is composed of
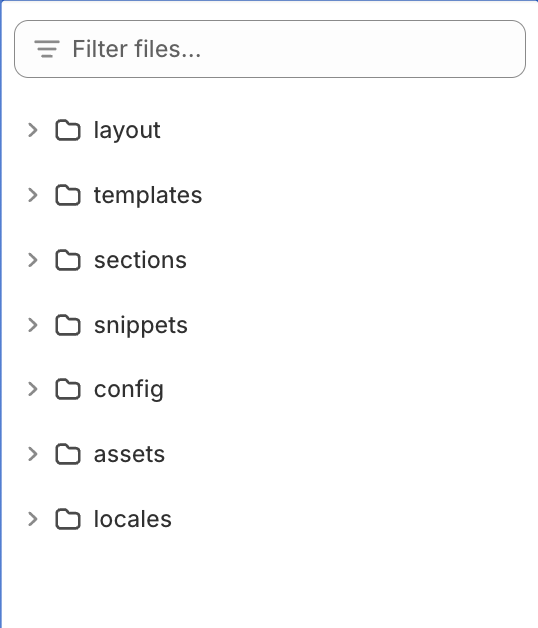
- Templates: These can be found in the folder called “Templates”. In this folder, a series of page-specific files define the layout. For instance, (e.g., product.liquid, index.liquid)
- Sections: These are blocks of reusable content and are kept in the “Sections” folder. They come in very handy when you want to dynamically change a number of edits on other pages. (e.g., header.liquid, footer.liquid).
- Snippets: Small, reusable code files stored in the “Snippets” folder. You can include snippets within other Liquid files using the {% include ‘snippet-name’ %} tag.
- Assets: This includes stylesheets, JavaScripts, and images for your theme.
To edit a Shopify theme, you can either use the online Code Editor available in the Shopify admin or download theme files and use a local development environment with the Shopify CLI installation.

3. Making Basic Customizations with Liquid
Ok. Let’s get moving with a couple of basic customizations, just to get your store customized with your personal touch.
a. Adjust the Layout of the Front Page
You may want to customize your front page to show specific products, collections, or even promotion banners. For simplicity, now, let’s assume a basic example to show a featured product on your front page.
Open the index.liquid file of your theme and insert the next code so that you can have a featured product show up:
{% assign featured_product = all_products['your-product-handle'] %}

<div class="featured-product">
  <h2>Featured Product: {{ featured_product.title }}</h2>
  <img src="{{ featured_product.featured_image | img_url: 'large' }}" alt="{{ featured_product.title }}">
  <p>{{ featured_product.description }}</p>
  <a href="{{ featured_product.url }}">Shop Now</a>
</div>
The code above will assign the variable featured_product with a particular product from your store and then return its title, image, description, and a link to the product page. You need to replace ‘your-product-handle’ with the actual product handle of the product in your store.
b. Show Product Information
Liquid allows you to output a range of product information in your Shopify theme. By editing the product.liquidemplate you are able to change exactly how and where product information is shown.
Using the following code you can, for example, output the product information for title, price and variants:
<h1>{{ product.title }}</h1>
<p>{{ product.description }}</p>
<p>Price: {{ product.price | money }}</p>

{% for variant in product.variants %}
  <p>{{ variant.title }}: {{ variant.price | money }}</p>
{% endfor %}
The above code will loop through all the available variants of the product and print its respective title and price.
4. Advanced Customizations Using Liquid
a. Conditionals for Selective Customizing
Conditionals in Liquid is how you dynamically show – or not show – certain blocks of content based on certain conditions. Suppose you want to customize your product page to show some message when a product is out of stock:
{% if product.available %}
  <p>This product is in stock and ready to ship!</p>
{% else %}
  <p>Sorry, this product is currently out of stock.</p>
{% endif %}
Similarly, you can apply conditionals on discounting or showing messages to only a certain group of customers; for example, wholesale customers.
b. Looping Through Collections and Products
With Liquid loops, you are able to show many products or collections dynamically within your Shopify store. Suppose you want to show some products from one particular collection; you can use the following code for it:
A single collection can be iterated with like so:
{% assign collection = collections['your-collection-handle'] %}

<h2>{{ collection.title }}</h2>
<ul>
  {% for product in collection.products %}
    <li>
      <a href="{{ product.url }}">{{ product.title }}</a> - {{ product.price | money }}
    </li>
  {% endfor %}
</ul>
This will output all products within the defined collection in a listed format. This would replace ‘your-collection-handle’with the handle of whatever collection you want.
c. Customizing the Cart Page
The cart page is a very important part of the customer journey – and Liquid can refresh it. You may want to display your own messages, or upsell suggestions if there are certain items in the cart.
{% if cart.item_count > 0 %}
  <p>You have {{ cart.item_count }} items in your cart.</p>
  <p>Subtotal: {{ cart.total_price | money }}</p>

  <h3>You might also like:</h3>
  <ul>
    {% for product in collections['related-products'].products %}
      <li>
        <a href="{{ product.url }}">{{ product.title }}</a> - {{ product.price | money }}
      </li>
    {% endfor %}
  </ul>
{% else %}
  <p>Your cart is empty.</p>
{% endif %}
It would have shown the total number of items in the cart, the cart sub-total, and some upsell product suggestions from a certain collection named ‘related-products’.
5. Creating Reusable Code with Snippets
Liquid eliminates duplicated code because you can declare code snippets which you can reuse. For example, you can declare a snippet that renders a product card, then include that snippet in several templates.Create a new file in the Snippets folder like product-card.liquid, and paste the following code in:
<div class="product-card">
  <h3>{{ product.title }}</h3>
  <img src="{{ product.featured_image | img_url: 'medium' }}" alt="{{ product.title }}">
  <p>{{ product.price | money }}</p>
  <a href="{{ product.url }}">View Product</a>
</div>
You can now include this snippet throughout multiple templates, like your collection or homepage template, with:
{% for product in collection.products %}
  {% include 'product-card' %}
{% endfor %}
This helps you to keep cleaner and more organized code and will save you a lot of hassle when the time to update your theme comes.
6. Optimizing Your Shopify Theme for Performance
While working on Shopify theme customization, one should never forget about performance optimization of a theme. By using Liquid, caching, or image load optimizations, it’s possible to cut down the page load time.
For example, the img_url filter fetches the image of the right size for the device:
<img src="{{ product.featured_image | img_url: 'small' }}" alt="{{ product.title }}">
Also, you can use the {% include %} tag but you should do so rarely because it may slow down page rendering considerably.
7. Debugging and Testing Your Liquid Code
When you work with Liquid, debugging is a must. Shopify has a few built-in utilities such as “theme preview” that allows you to test changes before going live. You can also use {{ debug }} for debugging Liquid variables.
Example
Let’s say you want to see what’s inside this variable. You’ll use
{{ product | json }}This would output the product object in JSON and can be used for debugging when customizing.
8. Customizing Shopify Navigation with Liquid
Navigation plays a vital role in the online shopping process. A good menu design helps to ensure that all the website’s sections and categories are properly presented to avoid long and fruitless search for products and services by the buyers. Liquid can be used to display navigation elements and build menus that will match the unique design of a Shopify theme.
For example, a theme can loop through a Shopify menu and generate links based on the menu items configured in the admin panel:
{% for link in linklists.main-menu.links %}
  <a href="{{ link.url }}">{{ link.title }}</a>
{% endfor %}
The solution can help maintain navigation according to the store’s menu structure. The users get a possibility to update their menu items from Shopify dashboard without editing theme code.
The liquid programming language can also be used to create a callout link, additional content modules, and other variations of navigational elements. It is particularly useful when a store’s menu needs to remain as simplified as possible while having numerous categories and subcategories.
9. Using Metafields for More Flexible Store Content
Shopify metafields provide another useful way to extend a theme beyond the standard product and collection information. They allow merchants to store additional data that is specific to their business, such as product specifications, care instructions, technical details, or custom promotional content.
Liquid can access these values and display them directly in the theme. This means developers do not need to hard-code the same information into individual templates.
For example, a product metafield can be displayed using a simple Liquid reference:
{{ product.metafields.custom.product_details }}
This is especially essential when it comes to different types of products that need to have different information displayed. For example, clothing may require specification about the materials and sizes while the electronic goods may need more technical specifications.
In addition, when such a function is available, the users who do not have technical expertise will be able to edit the necessary fields without having to edit the code.
Once the theme is set up, the user will be able to make the desired changes in the Shopify admin panel rather than liquid files which is significantly easier and more flexible.
10. Personalizing Store Content with Liquid
One of the useful aspects of Liquid is that content does not always have to be identical for every visitor. Conditions can be used to control what appears on a page based on available store data.
For example, a theme can show different content depending on whether a customer is logged in, whether a product is available, or whether a particular collection contains products. This allows developers to create more relevant shopping experiences without building completely separate page templates.
A simple example is showing a message to logged-in customers:
{% if customer %}
  <p>Welcome back, {{ customer.first_name }}!</p>
{% else %}
  <p>Sign in to see your account details.</p>
{% endif %}
The same reasoning can be applied to the creation of banners for promotion or announcements, availability, or elements specific to the customer, and other aspects of the shopping experience. However, it is necessary to remember that conditions should remain simple and understandable. The appearance of too many nested logical functions will make the file of the theme extremely difficult to debug and adjust.
11. Keeping Customized Shopify Themes Maintainable
Theme customization is not only about making the store appealing but also ensuring that its code is easily scalable in the future. This way, modifications and updates can be made faster when new products are added, the brand is relaunched, or new features are introduced.
Building variations of the code that perform similar functions as snippets can considerably reduce the amount of code in different files. Instead of modifying every liquid file with new elements, a developer would update a snippet and make it available in every part of the store’s code.
Another important convention for theme customization is seen in naming. An element’s title can say a lot about its role and location. Hence, a snippet file with a name describing what it does would be easier to identify and modify later than a randomly assigned string of characters. Similarly, liquid variables and conditions should also be clearly named.
The last convention worthy of consideration is the theme’s code modification. Ideally, a customization should not entail the unnecessary addition or alteration of code. Where possible, the liquid file should also be updated with a specific function in mind. Otherwise, small amendments that address a particular issue may create problems elsewhere. It should also be noted that this approach may become more challenging as the Shopify store grows and additional features are added.
A properly customized theme should be easily modified later. This way, even if a business owner wants to completely change the look and feel of the store, it will not involve tremendous effort and time. In this regard, theme customization is highly advised to be focused on making the store easily modified in the future.
12. Testing Customizations Before Going Live
Even a minor Liquid code change may break Shopify’s storefront and impact the display of products, collections, or cart content. Testing alterations before finalizing them and publishing on the live site allows addressing the issues in a timely manner.
A duplicate version of the theme makes it possible to try out new elements and alterations in a safe environment. One can experiment with variations, view different templates, and preview products in progress before making changes permanent. In addition, testing different themes, app extensions, and snippets helps ensure that the preferred content display type works correctly and does not require additional customization.
The areas not under inspection may also require attention since a single snippet update may affect multiple sections. For example, if a theme has a specific product card type, changes to this element may impact other parts of the website, such as collection pages and search results.
Furthermore, different theme views may need alterations. In particular, product images, description, layout, and other elements appear differently on desktop and mobile versions of the website. It is recommended to preview changes on both views to ensure that no display-related issues will occur.
After testing and previewing, one can finalize alterations and publish them on the live site. Having a duplicate version of the theme or a previous build makes it possible to roll back changes if a critical error occurs.
13. Choosing the Right Level of Shopify Theme Customization
Not all Shopify stores require a liquid customization of an end-to-end basis. The level of the owner’s implication should be determined by the expected result or the degree of control that one wants to achieve and maintain. The liquid coding tweaks for minor adjustments to a site, for example, changes to the product details or the addition of a promotional section, are limited.
On the contrary, advanced stores require a liquid customization service to include sections, incorporate dynamic content and improve product pages with unique content and message sizes. Besides, it is advised to undertake liquid coding if the company intends to make the theme responsive and versatile enough to accommodate additional products and pages in the future.
Thus, it is imperative to consider the possible extent of modifications and the possible need for further enhancements while choosing a Shopify theme. A skilled Shopify designer would structure and organize the liquid code so that all theme’s sections and snippets are systematized and easily accessible. This way, the code can be quickly edited or amended if the need arises.
The customization should not be overdone and a professional Shopify designer would propose cost-effective and maintenance-friendly liquid coding tweaks and amendments.
Final Tips:
- Always backup your theme before making significant changes.
- Test new customizations on a duplicate theme to avoid breaking your live store.
- Explore the Shopify Liquid documentation for more advanced use cases.
Conclusion
Liquid allows the Shopify store owner or developer to extend the functionality of a theme using dynamic and fully customized content. Learning to manipulate the Liquid objects, tags, and filters allows you to hone the Shopify store’s look and feel to your business’ specific needs.
It also allows Liquid to do everything from simple customizations-like changing the layout of the homepage-to more advanced techniques that show related products or customize the cart page. The more comfortable you get, the more advanced features you will know: show customer-specific content, filter products, and keep your store flexible and scalable.
This will be a good way to learn the Liquid language, which Shopify uses and, in turn, build that truly personalized ecommerce experience where functions and user experiences are better delivered.
To learn more about Shopify and its capabilities, check out shopify’s official website .
For additional insightful articles and information, please reach out to us.