WooCommerce handles your store. Zapier connects it to everything else. Together, they automate the repetitive tasks that eat up your day — order notifications, inventory updates, customer emails, and more. No coding needed. Set it up once and let it run.
- 1 Connecting WooCommerce with Zapier makes business operations easier and reduces the time taken to accomplish certain activities such as order management and customer engagement.
- 2 WooCommerce integrates with applications in a simple way through user-friendly “Zaps” eliminating the need for coding.
- 3 Zapier with WooCommerce thus improves the flow of stocks, customers, and information, thereby increasing the efficiency of business activities and customer satisfaction.
Introduction to Zapier
Zapier is a powerful automation tool that connects various apps and platforms, allowing them to work together seamlessly. One of the platforms that can greatly benefit from Zapier woocommerce web development integration is the popular e-commerce plugin for WordPress. In this article, we’ll explore how integrating WooCommerce Zapier can revolutionize your workflow, save you time, and improve your business operations.
In the fast-paced world of e-commerce, efficiency and streamlined processes are key. With a multitude of tasks that need to be managed, from order processing to customer communication, finding ways to automate and integrate different systems can greatly enhance your business’s productivity and customer satisfaction. This is where Zapier along with Zapier experts comes in.
What is Zapier?
Zapier is an automation tool. It connects apps so they can work together without manual effort.
It works through a simple concept called Zaps. A Zap has two parts:
- Trigger — something that happens in one app
- Action — something that happens automatically in another app
Example: A new order is placed in WooCommerce (trigger). Zapier adds the customer to your email list (action). All without you lifting a finger.
Zapier supports thousands of apps. These include tools for e-commerce, marketing, CRM, social media, and more.
Why Integrate Zapier with WooCommerce?
Running a WooCommerce store involves a lot of moving parts. Zapier brings them together.
Here is what the integration helps you do:
- Faster Order Processing New orders trigger automatic follow-ups. Notify customers, update inventory, and create shipping labels — all without manual steps.
- Better Customer Communication Connect WooCommerce to your email tool or CRM. Send automated order confirmations, shipping updates, and personalized recommendations.
- Accurate Inventory Management Link WooCommerce to your inventory tool. Stock levels update automatically with every new order.
- Easier Accounting Connect WooCommerce to QuickBooks or Xero. Order and payment data transfers automatically. No manual entry. Fewer errors.
- Useful Data Insights Connect WooCommerce to analytics tools. Track customer behavior, sales trends, and site performance in one place. performance. This data can inform your marketing strategies and help you make data-driven decisions.
Setting Up WooCommerce-Zapier Integration
Setting up is straightforward. Follow these steps:
Step 1 — Create a Zapier Account Sign up at zapier.com. Choose a plan that fits your automation needs.
Step 2 — Choose a WooCommerce Trigger Create a new Zap. Select WooCommerce as the trigger app. Choose your trigger event, such as “New Order.”
Step 3 — Connect WooCommerce Follow the prompts to link your WooCommerce store. You will need your WooCommerce API credentials. These can be generated from your WordPress dashboard.
Step 4 — Set Up Actions Choose what happens after the trigger. Options include:
- Send order details to your CRM
- Add customers to an email list
- Update inventory levels
Step 5 — Configure Action Details Map the fields between WooCommerce and your target app. Zapier walks you through each step.
Step 6 — Test and Activate Run a test to make sure everything works. Once approved, turn the Zap on.
Let’s generate a zap to comprehend the creation and triggering process of Zaps.
We will create a zap for adding new customer details to a google sheet. Follow the steps below:
- Initiate the process by clicking the “Create a zap” button
- Proceed by selecting the “trigger” option and then search for and pick “WooCommerce.”
- For the event, choose “Customer.”
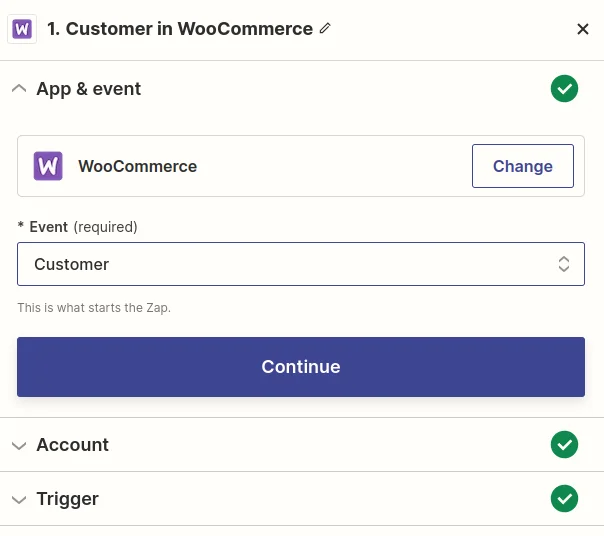
- Continue onward, and if you haven’t connected your WooCommerce web development account previously, do so now.
- Now, opt for the trigger rule labeled as “Customer created.”
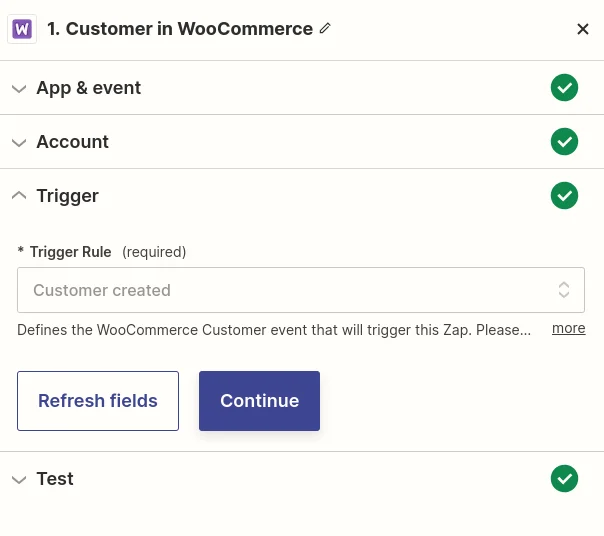
- Click “continue,” which allows you to test your triggers.
- Next, introduce another step. Select “Google Sheets” as the application, and for the event, choose “Create Spreadsheet row.“
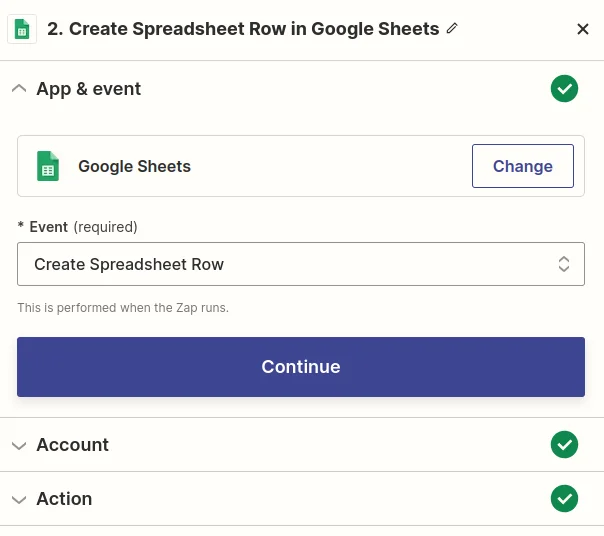
- Start by creating a Google sheet and adding a header for the specific fields that require population within the sheet. You can also create numerous sheets or fields if necessary.
- Continue the process and connect your Google account.
- Progress further by clicking “continue.” This part might be a bit tricky. You’ll need to specify the drive in which your sheet was generated, provide the sheet’s name, and indicate the spreadsheet.
- Once you’ve completed the aforementioned field entries, the headers you established within the spreadsheet will be automatically retrieved.
- Now, all you need to do is select the fields you want to link to each header. Once completed, the process finishes.

- At this point, you’re ready to either test or publish the Zap. When new customers are generated, all the corresponding customer details will be populated within the designated sheet.
Common Automation Examples
The real value of WooCommerce and Zapier comes from combining multiple Zaps. Here are some popular setups:
WooCommerce + Helpdesk Tool Order details are sent to your support team automatically. When a customer contacts you, the agent already has the order info.
WooCommerce + SMS Service Customers receive text updates after placing an order. Fewer calls to support. Better customer experience.
WooCommerce + Loyalty Program Database Points are added to customer accounts automatically after each order. No manual tracking needed.
WooCommerce + Email Service Abandoned cart reminders are sent automatically. You control the timing and the message. More personalized than WooCommerce’s built-in feature.
None of these require coding or technical skills. Just identify the task and build the Zap.
Common Pitfalls to Avoid
Automation is reliable. But a few setup mistakes can cause problems.
Incorrect Webhook Settings This can lead to duplicate orders or requests. Always use Zapier’s built-in test mode before activating a Zap.
No Error Notifications Zap errors appear in your account. But they are easy to miss. Set up an alert — for example, a Slack message — when a Zap fails.
Automating Too Much at Once Start small. Automate one or two tasks first. Check that they work correctly. Then expand.
This approach keeps things manageable. One broken Zap will not take down your entire workflow.
Use Multi-Step Zaps Carefully
A single WooCommerce trigger can lead to several actions. For example, a new order could:
- Add the customer to a CRM.
- Create a record in Google Sheets.
- Notify the fulfillment team.
- Send relevant information to an accounting system.
Multi-step workflows are useful when several teams depend on the same event. However, adding too many actions to one Zap can make troubleshooting more difficult. Keep each workflow focused on a clear business process.
Plan for Failed Automations
No automation should be treated as completely maintenance-free. API changes, expired connections, missing fields, or temporary service issues can cause a Zap to fail.
Review your Zap history regularly and decide what should happen when an action cannot be completed. For important workflows, consider adding an internal notification so your team knows when an automation requires attention.
For example, if an order fails to reach your fulfillment system, someone should be able to identify the issue before it affects the customer.
Best Practices for Managing WooCommerce Zaps
A few simple practices can make automated workflows easier to manage over time:
- Give each Zap a clear name: Make it obvious what triggers the workflow and what it does.
- Document important workflows: Record why a Zap exists and which business process depends on it.
- Review connected accounts: Check API credentials and app connections periodically.
- Test changes before publishing: A small change to a field mapping can affect downstream actions.
- Avoid duplicate workflows: Multiple Zaps responding to the same event can create duplicate records or notifications.
- Review usage regularly: Monitor task consumption so unexpected increases do not disrupt your automation strategy.
As the number of workflows grows, organization becomes increasingly important. A few well-documented Zaps are easier to maintain than dozens of overlapping automations created without a clear structure.
Conclusion
WooCommerce and Zapier work better together. The integration removes repetitive manual tasks from your day. Orders get processed faster. Customers stay informed. Inventory stays accurate.
Start with one Zap. See how it works. Then build from there. The time savings add up quickly.