- 1 Critical Role of Caching: Caching is the best way to enhance the performance of Node as a result of which caching is a very important feature. js applications by preventing redundant arithmetic calculations, culling database calls.
- 2 Redis for Efficient Caching: Redis that is a fast in-memory data store improves Node. Memory management optimized: In this process, the most frequently used data and minimalized latency or delay in the js app’s performance are stored.
- 3 Performance Benefits: inclusion of Redis caching in Node . With js projects, website response enhances, the consumption of resources is minimal, and the best version of user experience is achieved.
Introduction to Cache Optimization
Efficient web development hinges on the critical aspect of performance optimization. Within this context, caching emerges as an indispensable technique for enhancing the responsiveness and speed of Node.js applications. Caching enables the avoidance of repetitive and resource-intensive computations, as well as the reduction of the need for frequent database queries. Redis, a robust in-memory data store, takes center stage in our exploration of caching in the realm of Node.js in this blog post.
Redis, renowned for its lightning-fast data retrieval, provides a potent solution for storing frequently accessed data in memory. This blog post will comprehensively delve into the mechanics of caching with Redis, demonstrating how it can dramatically enhance the overall efficiency of your Node.js applications. By mitigating the need for costly and time-consuming operations, caching minimizes latency, resulting in a more seamless and responsive user experience. In this article, we’ll uncover the practical applications and benefits of Redis caching, offering web developers valuable insights into optimizing their Node.js projects.
What is Redis?
Redis is an open-source, in-memory data structure store that can be used as a cache, message broker, and more. It is known for its exceptional speed and versatility, making it an excellent choice for caching in Node.js applications.
Redis vs Memcached: Which One Should You Actually Use?
If you have done any research on caching solutions you may have stumbled onto Memcached as the other major player in the field. It is worth asking yourself the question before investing all your time and effort into Redis for your projects.
The simplest answer is that Memcached is slightly easier to use for basic cases and has better performance characteristics for simple key-value string storage. However, Redis has other data structures besides simple strings, including lists , hashes , sets , sorted sets and even geospatial indexes. If you think you may need anything more complex than a simple key-value pair storage solution, Redis is the obvious choice.
For more involved applications, Redis also has persistence options to avoid losing data in case of a system failure, while Memcached does not have those options. If you are planning to scale up your application in the future, Redis has official clustering support while Memcached requires more involved client-side partitioning to do the same.
In short, for a basic cache for an average Node.js application Redis is unlikely to be outright wrong, but is less common due to it being more complex and having more features than are needed for many small applications.Node.js developers using Express and similar frameworks are strongly advised to use Redis as their primary caching solution.
What is Caching?
Keeping copies of files in a cache or other temporary storage space allows users to access them more quickly. Let’s examine the purpose of caching now that we are aware of what it is.
Why do we cache?
You don’t want your application to take too long to respond to users’ requests given the abundance of lightning-fast services and options available to users on the Internet today; otherwise, you run the risk of users switching to a competitor and having your bounce-rate increase rather than your revenue.
Below are a few of the reasons we cache:
- To save cost: Optimize your images and videos, use a CDN, and cache static assets.
- To reduce app response time: Optimize your database queries, reduce the number of requests, and use a CDN and caching solution.

Common Caching Strategies You Should Know
Common Caching Approaches Overview
Before proceeding to code, let’s learn about different approaches to implement caching. The example above uses the Cache aside strategy. However, there are several other strategies that seem useful in different scenarios.
First, we should distinguish between cache aside, write-through, write-Behind, and read-through strategies. Let’s begin with the cache aside approach.
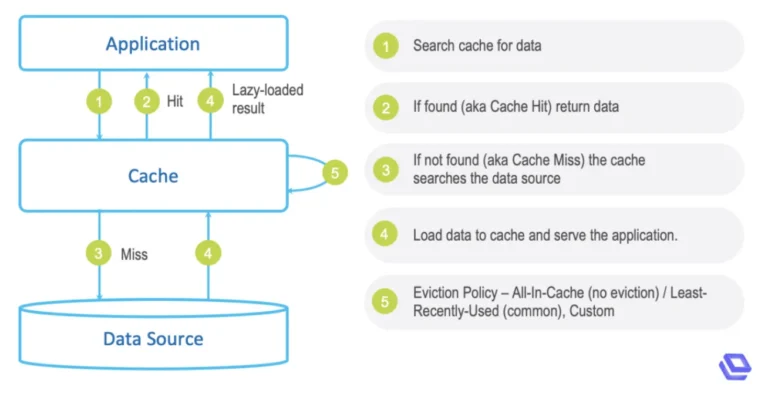
Cache Aside (Lazy Loading)
This is the approach we have used in our example above. Using Cache Aside, the application will first check the cache for the required data. If the data is not present in the cache, the request will be sent to the database, where the required information will be extracted and placed in the cache for future use.
Write-through Approach
Using this approach, every time data needs to be read from the database, it will be first written to the cache, and then, in the same query, it will be read from the database directly. This strategy ensures that the data in the cache and the database are consistent but may have a higher latency.
Write-behind Approach (Write-back)
This approach is similar to the write-through strategy, with the significant difference that in the write-behind method, the database will be updated asynchronously, that is, not in the same query. This approach will be much faster for users but carries the risk of data loss in case of a server crash.
Read-through Approach
It is similar to the cache aside strategy, but in this case, queries to the database will be handled directly by the cache. Therefore, the cache aside method is different from the read-through method. To implement it, a particular caching service should be used, which will be able to handle queries to the database.
Based on the information above, I can conclude that the easiest strategy to implement in Node.js with Redis is the cache aside strategy, which is why it is the most common strategy for small and medium-sized applications.
Setting up the Project
First, create the directory for the project using the mkdir command:
mkdir redis-demo
cd redis-demo
npm init -y
Output:
{
"name": "redis-demo",
"version": "1.0.0",
"description": "",
"main": "index.js",
"scripts": {
"test": "echo \"Error: no test specified\" && exit 1"
},
"keywords": [],
"author": "",
"license": "ISC"
}
Next, you will install the following packages:
npm install express axios redis
Create a simple server by using the below code snippet:
Create an index.js file in the root folder and write the below code in the file.
const express = require('express');
const app = express();
const PORT = process.env.PORT || 3000;
app.listen(PORT, () => {
console.log(`Server started at port: ${PORT}`);
});
Before running the server, please add the start script in package.json file
{
    "name": "redis-demo",
    "version": "1.0.0",
    "description": "",
    "main": "index.js",
    "scripts": {
        "start": "node index.js",
        "test": "echo \"Error: no test specified\" && exit 1"
    },
    "keywords": [],
    "author": "",
    "license": "ISC",
    "dependencies": {
        "axios": "^1.5.0",
        "express": "^4.18.2"
    }
}
Run the command npm start
Connect Mock APIs to fetch Data
We will retrieve information from a fictitious API called JSONPlaceholder in this part. This API is excellent for retrieving fictitious data.We will retrieve photos information by providing the id in this API call. Please use the code below as a guide, update the index.js file.
const express = require('express');
// added axios as HTTP client
const axios = require('axios');
const app = express();
const PORT = process.env.PORT || 3000;
// added Fake API
const MOCK_API = "https://jsonplaceholder.typicode.com/photos/";
//API Call
app.get('/user/:id', async (req, res) => {
    const id = req.params.id;
    try {
        const response = await axios.get(`${MOCK_API}?id=${id}`);
        const user = response.data
        console.log("User successfully retrieved from the API");
        res.status(200).send(user);
    } catch (err) {
        res.status(500).send(err);
    }
})

app.listen(PORT, () => {
    console.log(`Server started at port: ${PORT}`);
});
The Axios package is needed in the code above, and we also create MOCK_API for a fictitious API URL. Email is passed as a parameter in the API request, and the user’s information is filtered out and returned in the response.
Step 1: Install Redis server –
- Windows:
– Download the Redis Windows installer from the official website
– Run the installer to install Redis on your system.
– Open the Command Prompt and Run the command redis-cli to start the Redis server. - macOS:
– Install Redis using Homebrew by running the command brew install redis.
– Start the Redis server by running the command redis-server.
wget http://download.redis.io/redis-stable.tar.gz
tar xvzf redis-stable.tar.gz
cd redis-stable
make
make install
Step 2: Start Redis server
After that, you can run the command
redis-server
Redis Installation guide
Step 3: Create a Redis client instance
After installing the Redis package, we need to install and create the Redis client.
const redis = require('redis');
const redisClient = redis.createClient(6379); // The default port of Redis is 6379
Step 4: Create middleware to handle caching
Then, using the Redis database, we created one route. In this path, we will first determine whether the data is available in Redis. If the data is in Redis, it is retrieved from there; otherwise, it is retrieved from the API.
const redis = require('redis');
const redisClient = redis.createClient(6379);
const express = require('express');
// added axios as HTTP client
const axios = require('axios');

const app = express();
const PORT = process.env.PORT || 3000;

// added Fake API
const MOCK_API = "https://jsonplaceholder.typicode.com/photos/";

//API Call
app.get('/photos/:id', async (req, res) => {
    const id = req.params.id;

    try {
        redisClient.get(id, async (err, response) => {
            // console.log(response);
            if (response) {
                console.log("User successfully retrieved from cache");
                res.status(200).send(JSON.parse(response));
            } else {
                const response = await axios.get(`${MOCK_API}?id=${id}`);
                const user = response.data;
                console.log(`${MOCK_API}?id=${id}`)
                redisClient.setex(id, 600, JSON.stringify(user));
                console.log("User successfully retrieved from the API");
                res.status(200).send(user);
            }
        })
    } catch (err) {
        res.status(500).send({
            error: err.message
        });
    }
})

app.listen(PORT, () => {
    console.log(`Server started at port: ${PORT}`);
});
Best Practices When Caching with Redis in Node.js
Getting caching to “work” is one thing. Getting it to hold up in production is another. A few things worth keeping in mind as you build on top of the example above:
- Set a sensible TTL. In the code above, we used 600 seconds (10 minutes) with
setex. That number shouldn’t be arbitrary — think about how often your underlying data actually changes. Caching stock prices for 10 minutes is a mistake; caching a blog post’s metadata for 10 minutes is probably fine. - Namespace your keys. Using raw IDs as keys (like we did with
idabove) works for a demo, but in a real app you’ll want something likephotos:${id}oruser:${id}:profile. This avoids collisions once you’re caching more than one type of data. - Handle cache stampedes. If a popular cache key expires and a burst of requests all hit the database at once trying to refill it, that’s a stampede. Techniques like locking or staggered expiry times help avoid this at scale.
- Don’t cache everything. It’s tempting to cache every route once you see how much faster it feels, but data that changes on every request, or that’s rarely requested twice, isn’t worth the memory overhead.
- Use the async Redis client properly. Newer versions of the
redisnpm package (v4+) use promises instead of callbacks. If you’re starting a new project today, it’s worth usingawait redisClient.get()instead of the callback style shown in older tutorials, since it plays much more nicely with async/await patterns elsewhere in your codebase.
Mistakes That Are Easy to Make (and Easy to Avoid)
There are several common mistakes that should be avoided while working with Redis and Node.js at first:
Improper handling of connection errors that may arise while establishing a link with the Redis server. If the connection is not established, and the application is trying to continue to work, it will face serious problems as an error in one of the essential modules will lead to the improper functioning of the entire application. In addition, it is necessary to exclude the possibility of a complete loss of data when interacting with external services since Redis was designed as a caching layer and not as a basic database.
Caching of incorrect data. The most common example of the wrong use of caching is an attempt to store data in the cache even if the request to the source of this data ended with an error. This leads to the fact that any subsequent requests will receive erroneous data until the end of the time period set for the life of the cache.
Inability to invalidate data in a timely manner. When changes are made to the source of information, all related data must be removed from the cache so that subsequent requests to it bring the correct data. This problem occurs when a person changes some of the data on the server, but the application continues to receive old information from the cache until the end of the time period previously set for its life.
Using Redis as a database, not as a cache. Although Redis is indeed suitable for use as a database, this practice is not recommended because it can lead to unexpected results due to the use of unsuitable data structures. While standard databases are designed to work with data stored on disk, Redis is a high-performance in-memory database, which means that data is stored in RAM. Therefore, it does not make sense to use Redis to store large amounts of data that is not planned to be used directly.
Folder structure
redis-demo/
├── index.js
├── package.json
├── package-lock.json
Monitoring Your Redis Cache in Production
There are several common mistakes that can lead to improper use of Redis with Node.js in the beginning:
The failure to properly handle connection errors that may arise when trying to connect to the Redis server. If the connection is not established and the application tries to continue to function, it may have serious problems since an error in one of the essential modules can lead to improper functioning of the entire application. In addition, it is necessary to exclude the possibility of complete loss of data when interacting with external services since Redis was designed as a caching layer, and not as a basic database.
Caching of incorrect data. The most common example of the wrong use of caching is an attempt to store data in the cache even if the request to the source of this data ended with an error. This leads to the fact that any subsequent requests will receive erroneous data until the end of the time period set for the life of the cache.
Inability to invalidate data in a timely manner. When changes are made to the source of information, all related data must be removed from the cache so that subsequent requests to it bring the correct data. This problem occurs when a person changes some of the data on the server, but the application continues to receive old information from the cache until the end of the time period previously set for its life.
Using Redis as a database, not as a cache. Although Redis is indeed suitable for use as a database, this practice is not recommended since it can lead to unexpected results due to the use of unsuitable data structures. While standard databases are designed to work with data stored on disk, Redis is a high-performance in-memory database, which means that data is stored in RAM. Therefore, it does not make sense to use Redis to store large amounts of data that is not planned to be used directly.
Conclusion
In conclusion, we’ve explored the powerful world of cache optimization in Node.js with Redis. By incorporating Redis as a caching solution, you can significantly boost the performance of your Node.js applications, reducing database loads and response times. We’ve learned how to set up Redis, implement caching strategies, and leverage it to store and retrieve frequently used data efficiently. Optimizing cache is not just a technical choice; it’s a strategy that can greatly enhance user experiences, minimize resource utilization, and improve the scalability of your applications. With Redis and the knowledge you’ve gained in this blog, you are well-equipped to take your Node.js projects to the next level. Happy coding and optimizing!