
- 1 Salesforce Flow helps to manage tasks in the organizational processes by means of automating the processes, improving interactiveness and efficiency of the process flow.
- 2 Proper and efficient planning when using Salesforce Flows as well as integrating them guarantees that errors are reduced and business requirements are met.
- 3 The knowledge of Salesforce Flow provides the competitive advantage ensuring the increase of the workflow effectiveness and its integrated application into the different fields.
This guide unlocks the potential of Salesforce Flow to streamline and optimize your business processes. We prioritize data privacy and security while providing insights into custom software solutions tailored to your industry’s unique requirements. As you delve into this comprehensive resource, you’ll gain a competitive edge in banking software development and various sectors, achieving a new level of workflow efficiency and integration.
Creating a Salesforce Flow and integrating it with your application involves several steps. Here’s a comprehensive guide to help you achieve this:
Step 1: Understand the Basics
Salesforce Flow is a powerful tool that allows you to automate processes and collect data in Salesforce without writing code. Salesforce Flows are visual automation tools that streamline processes without coding. Comprising elements like Record Create, Update, Decisions, and Screens, they automate tasks, collect data, and guide users through steps. Flows enhance user experience by enabling user interactions and condition-based actions. Variables store temporary data, aiding manipulation. Activation triggers initiate flow execution. Integrating Flows involves embedding URLs, APIs, or Salesforce UI components. Testing ensures functionality, while monitoring and maintenance guarantee continued effectiveness. Flows empower users to accomplish tasks efficiently, making them essential for workflow optimization in Salesforce applications.
Types of Salesforce Flows Explained
Salesforce contains different types of flows, and it is essential to choose the right one before building. Screen Flow helps users perform complex processes by guiding them through the necessary steps and allowing them to enter or view information. It is intended to use when the user interaction is required. On the other hand, Autolaunched Flow is designed to perform a set of actions without any user interaction.
An Autolaunched Flow can be started by record changes, a schedule, or another process. Record-Triggered Flow is a type of Autolaunched Flow that is triggered by creating, updating, or deleting a record. It is usually used to check the validity of the records or update other records when changes are made to the primary one. In addition, a Scheduled-Triggered Flow will start performing on a schedule. It helps to send an email to a user if a record is not opened in a specific period. Choosing the wrong type of the flows leads to difficulties in their functioning, and their type should be detected by analyzing the process they should perform.
Flow Elements: A Closer Look
The existing overview mentions elements like Record Create, Update, Decisions, and Screens, but a few others are worth understanding before building a flow of any complexity. A Get Records element retrieves data from Salesforce based on specified criteria, making that data available for later steps in the flow — this is typically the first element in a flow that needs to check or display existing information before acting on it.
An Assignment element sets or changes the value of a variable partway through a flow, separate from updating an actual Salesforce record. A Loop element repeats a set of actions for each item in a collection, useful when a flow needs to process multiple records the same way rather than one at a time. A Subflow element calls a separate, already-built flow from within the current one, which allows a commonly repeated sequence of steps to be built once and reused across multiple flows rather than duplicated.
Understanding which element does what before opening the Flow Builder canvas tends to save significant rework, since flows built without this understanding often end up using a Decision element to accomplish what a Loop or Subflow would have handled more cleanly.
Step 2: Plan Your Flow
Before you start building the flow, define its purpose and the data it will work with. Planning your Salesforce Flow is pivotal. Break down complex processes into manageable steps. Identify decision points and necessary data manipulations. Visualize user interactions through screens, and determine conditions for branching. Consider variables to store data within the flow. Define integration points with your application. A well-thought-out plan ensures efficient execution, minimizes errors, and aligns the flow with business needs. It serves as a roadmap for constructing a functional and effective automation solution, enhancing user experience, and optimizing processes within Salesforce.
Step 3: Build the Flow
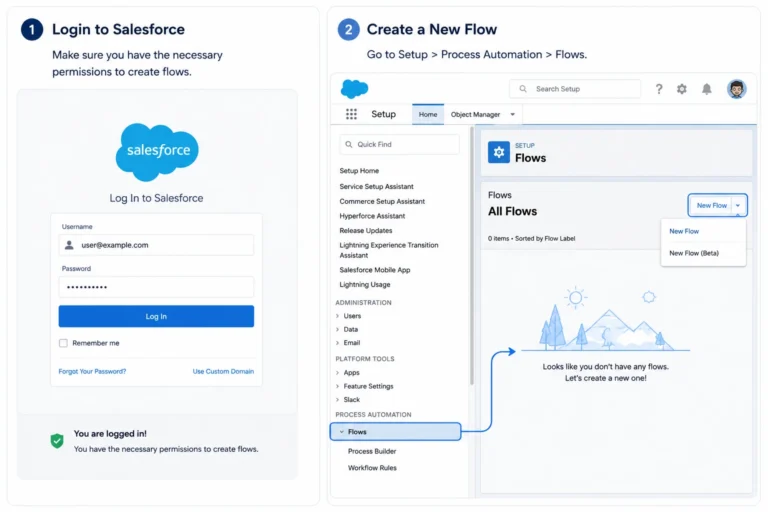
- Login to Salesforce:
- Make sure you have the necessary permissions to create flows.
- Create a New Flow:
- Go to Setup > Process Automation > Flows.
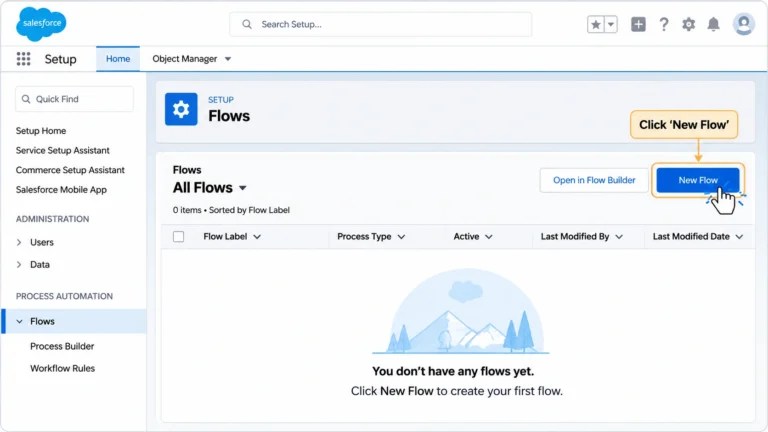
- Click the “New Flow” button.
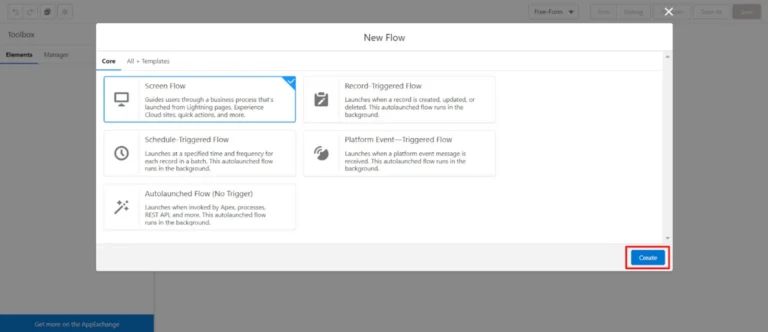
- Choose the type of flow you want to create:
- Screen Flow
- Autolaunched Flow
- Add Elements:
- Add elements onto the canvas.
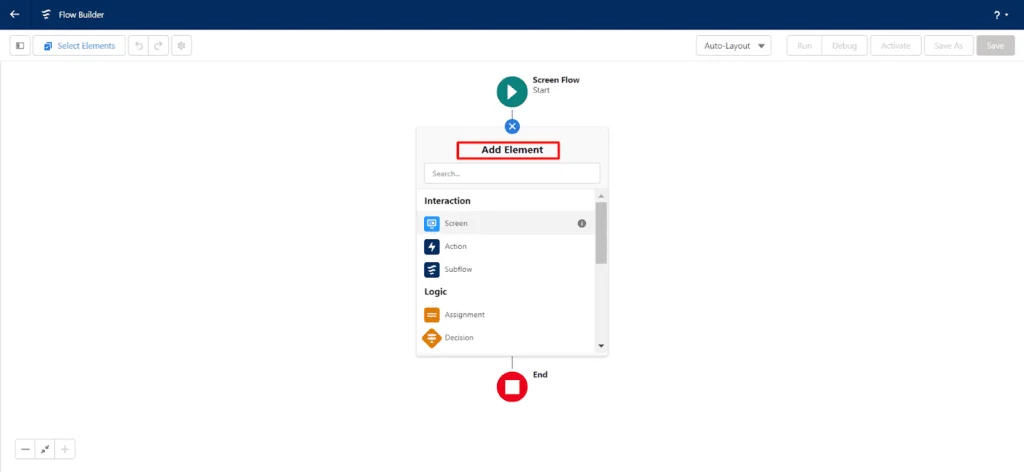
- Elements include Record Create, Record Update, Decision, Assignment, Screen, and more.
- Configure Elements:
- Double-click an element to configure its properties.
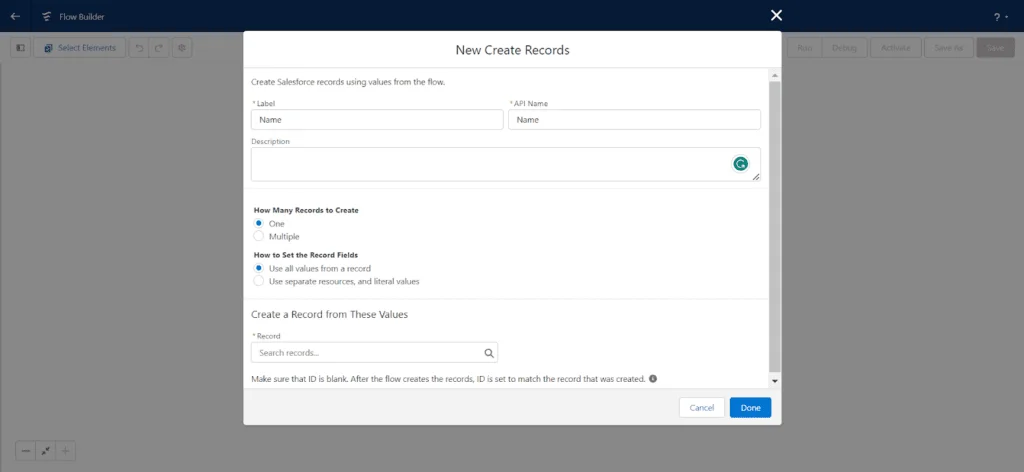
- Define conditions, set field values, and specify criteria.
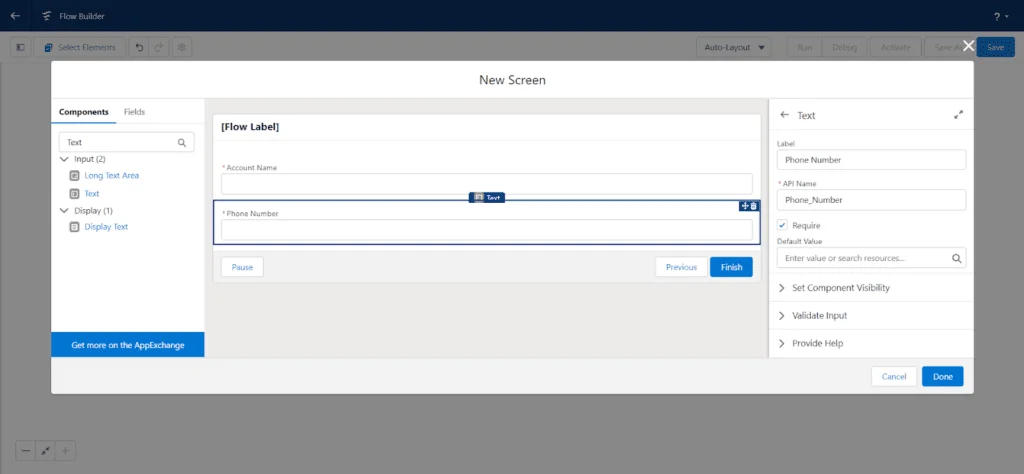
- Add Screens (for Screen Flows):
- Screens allow user interaction within the flow.
- Create screens with fields, text, and choices.
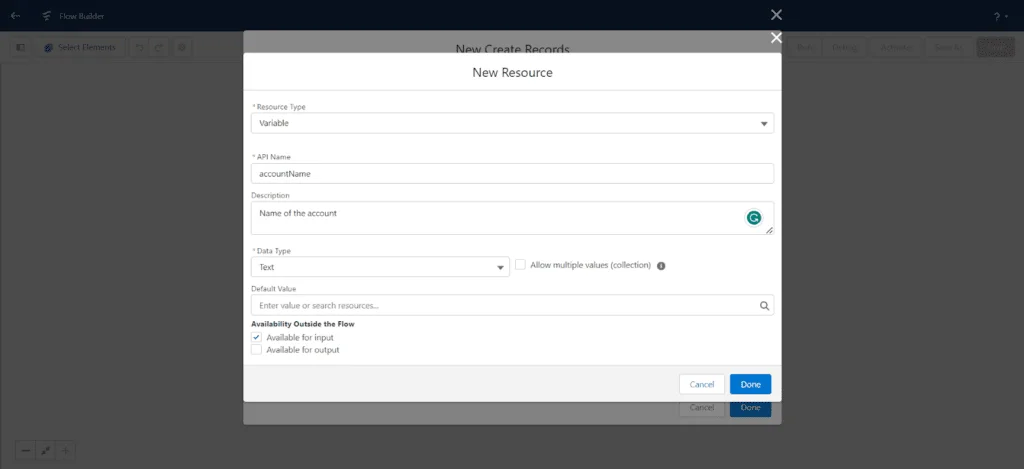
- Add Variables (if needed):
- Variables store and manipulate data within the flow.
- Create variables to hold data you want to use.
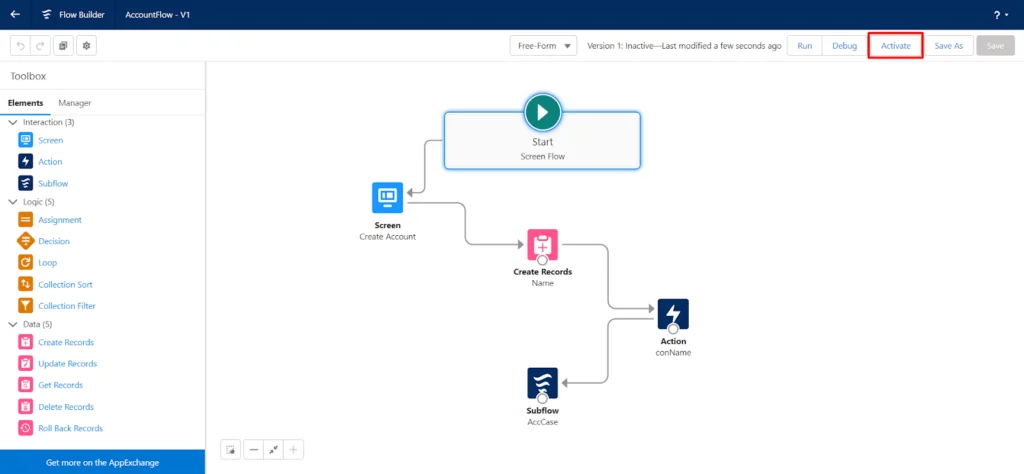
- Connect Elements:
- Use arrows to connect elements and define the flow’s logic.
- Configure decision elements to determine branching.
- Activate the Flow:
- Once you’re done building, activate the flow to make it functional.
Step 4: Integrate with Your Application
To integrate the Salesforce Flow with your application, you have several options:
- Flow URL:
- After activating the flow, you can get a URL that triggers the flow.
- You can embed this URL in your application’s buttons, links, or other UI elements.
- APIs:
- You can use Salesforce APIs to start the flow from your application.
- The Flow API allows you to create and update flow interviews programmatically.
- Web Services (if applicable):
- If your application has an API, you can trigger the flow through API calls.
Integration Steps:
- Identify Integration Points:
- Determine where in your application’s workflow you want to trigger a Salesforce Flow.
- Generate Flow URL:
- After creating and activating the Flow in Salesforce, you can obtain a unique URL that triggers the Flow.
- Embed URL in Application:
- In your application’s UI, create buttons, links, or other interactive elements. These elements will contain the generated Flow URL. When users click them, the Flow will be triggered.
- User Interaction:
- When a user interacts with the element in your application, it sends a request to the Flow URL.
- Flow Execution:
- The Flow starts executing in Salesforce. It can involve processes like creating records, updating data, sending emails, or interacting with users through screens.
- Data Exchange:
- The Flow can fetch or push data from/to your application’s database or external sources.
- Completion and Response:
- Once the Flow execution is complete, Salesforce can send a response indicating success or failure.
Step 5: Test and Debug
Thoroughly test the integration to ensure it works as expected. Use sample data and real-world scenarios to verify the flow’s behavior. Debug any issues you encounter by reviewing the flow’s logic, element configurations, and data handling.
Common Errors and How to Resolve Them
A handful of errors show up repeatedly for teams building their first several flows. A “Flow Error: An unhandled fault has occurred” message typically means a Record Create or Record Update element failed, often because a required field wasn’t populated or a validation rule on the object blocked the operation. Checking the target object’s validation rules against what the flow is actually setting is usually the fastest way to resolve this.
Flows that appear to run successfully but don’t produce the expected result are often a sign that a Decision element’s conditions weren’t configured the way the builder intended — a common cause is comparing a text field to a value with different capitalization or extra whitespace, which fails an exact-match condition without raising an error at all. Reviewing the flow’s debug run log, available directly in Flow Builder, shows exactly which path a Decision element took and why, which is usually faster than guessing from the final outcome alone.
Governor limit errors, though less common in flows than in Apex, can occur in flows that process very large numbers of records inside a loop without bulkification in mind. Testing with realistic data volumes rather than a handful of sample records tends to surface this before it becomes a production issue.
Step 6: Monitor and Maintain
Regularly monitor the flow’s performance and effectiveness. If your application or Salesforce configuration changes, ensure that the flow remains compatible and functional. Make updates as necessary.
Security Considerations When Building Flows
Flows run with either system context or user context, and the choice has real security implications that are easy to overlook while focused on getting the automation working. A flow running in system context bypasses the running user’s object and field-level permissions entirely, which can mean a flow inadvertently exposes or modifies data a user wouldn’t normally have access to through the standard interface.
For flows triggered by user action, particularly Screen Flows, running in user context — respecting the same sharing rules, field-level security, and object permissions the user already has — is generally the safer default unless there’s a specific reason the flow needs elevated access. When elevated access genuinely is necessary, such as a flow that needs to update a field most users can’t edit directly, that decision should be deliberate and documented, not the result of leaving a setting at its default.
It’s also worth auditing who can edit and activate flows in the first place, since a flow with system-level access that’s editable by too broad a group of administrators creates a security gap that has nothing to do with the flow’s logic and everything to do with who can change it.
Step 7: Documentation
Document the flow’s purpose, logic, integration points, and any troubleshooting steps. This documentation will be valuable for both current and future team members.
Remember that this is a high-level guide, and the specifics may vary based on your application’s architecture, Salesforce instance, and requirements. Always refer to the latest Salesforce documentation for detailed instructions and best practices.
Conclusion:
In conclusion, mastering Salesforce Flow empowers you to streamline and automate workflows. This comprehensive guide is invaluable in various industries, such as financial services and healthcare, where efficient custom software solutions are critical. It prioritizes data privacy and security, ensuring your workflows are optimized. From banking software development to diverse sectors, you’ll gain a competitive edge by enhancing workflow efficiency and integration in your organization.