Ionic Appflow Live Updates lets Capacitor apps deliver web-layer updates without requiring a new app store release. The process involves installing the Live Updates SDK, configuring a deployment channel, creating a web build in Appflow, and choosing how updates should be applied. With autoUpdateMethod: 'none', developers can control updates programmatically using LiveUpdates.sync() and LiveUpdates.reload(). This provides more control over when updates are downloaded and applied while keeping the native application unchanged.
- 1 API Security Essentials: Securing APIs is paramount help because the work of APIs is to transact data. Adopting measures such as putting on of Helmet to enhance safety. and, js and encryption guarantees that the data is safe from records and usual strikes.
- 2 Helmet. js Integration: Helmet. js improves security on Node through the following ways; js applications by setting up some standard HTTP headers and protecting from such dangers as XSS and click-jacking, together with making it way more complicated for the attackers to exploit the common configurations of Express.
- 3 Crypto-JS for Security: By including crypto-js as part of the API requests, there is confirmation and encryption of the communication. It also prevents unauthorized users from accessing resources limiting interaction between the clients and the servers.
What is API Security ?
Software programs can communicate with one another through an Application Programming Interface (API). It is an essential component of contemporary software architectures like microservices architectures for REST API.
The process of shielding APIs from attacks is known as API security. Attackers are increasingly focusing their efforts on APIs due to their widespread usage and ability to access confidential software and data.
A crucial element of contemporary web application security is API security. Vulnerabilities in Rest API include failed authorization and authentication, no rate limiting, and code injection. Companies need to test REST API frequently in order to find vulnerabilities and fix them with security best practices.
Importance of API Security
Data transferred through APIs, usually between clients and servers connected over public networks, must be secured. This is known as API security.
APIs are used by businesses to connect services and move data. Encrypted, exposed, or compromised Rest APIs may reveal financial information, private information, or other sensitive data. For this reason, security is a crucial factor to take into account when creating RESTful and other APIs.
Security flaws in backend systems can affect APIs. Attackers may potentially compromise all API functionality and data if they manage to breach the API provider. If an API is not properly coded and protected, it may also be exploited by malicious requests.
Secure API using Helmet
Helmet.js stands as a robust, open-source JavaScript library designed to fortify your Node.js applications by seamlessly configuring essential HTTP headers. Functioning as an adept middleware for Express and its counterparts, Helmet takes the reins in automatically incorporating or eliminating HTTP headers to align with stringent web security standards.
While it’s crucial to acknowledge that Helmet isn’t a cure-all, it significantly raises the bar for potential attackers seeking to exploit known vulnerabilities. Its role is pivotal in shielding Node.js Express applications from prevalent security threats, including but not limited to Cross-Site Scripting (XSS) and the ever-persistent menace of click-jacking attacks. Helmet emerges as a stalwart guardian, making the task of compromising your application’s security notably more challenging for would-be malicious actors.
Why Helmet is Important?
Without Helmet, private data is exposed by default headers returned by Express, leaving your Node.js application open to attack by hostile parties. By using Helmet in Node.js, on the other hand, you can defend your application against vulnerabilities in the Content Web API Security Policy, XSS attacks, and other security threats.
Let’s use an example to further investigate this query. We’ll set up an Express application for Node.js and examine the security provided by its default HTTP headers.
Steps to Integrate the Helmet In Backend Applications
Step 1:
Setup Project
mkdir secure-api-demo
cd secure-api-demo
npm i init-y
npm i express cors helmet
Step 2:
Create server.js file and add code.
const express = require('express');
const cors = require('cors');
const app = express();
const port = 5000;
// Use the cors middleware with specific configuration
app.use(cors({
    origin: '*',
    methods: 'GET,HEAD,PUT,PATCH,POST,DELETE',
    credentials: true,
    optionsSuccessStatus: 204,
}));


// Define a middleware to handle CORS errors
app.use((err, req, res, next) => {
    if (err.name === 'CorsError') {
        res.status(403).json({ error: 'CORS error: ' + err.message });
    } else {
        next();
    }
});


app.get('/data', (req, res) => {
    const data = [
        { id: 1, name: 'Item 1' },
        { id: 2, name: 'Item 2' },
        { id: 3, name: 'Item 3' },
        { id: 4, name: 'Item 4' }
    ];
    res.json(data);
});


app.listen(port, () => {
    console.log(`Server is running on http://localhost:${port}`);
});
Step 2.1: (Optional)
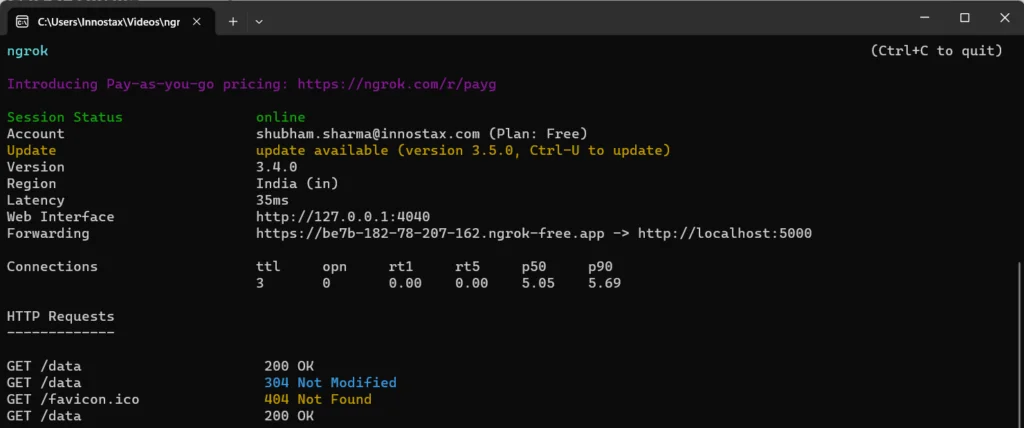
Download ngrok, extract it, and open the folder in the terminal. Then, launch the following command to host your local server with ngrok
Step 3:
Integrating Helmet into your Node.js Express app is simple. In case of problems, follow the official guide.
In your server.js file, import helmet with the following command:
const helmet = require("helmet")
Now, register helmet in your Express application with the below:
app.use(helmet())
The Response Headers will contain the following headers
Content-Security-Policy: default-src 'self';base-uri 'self';font-src 'self' https: data:;form-action 'self';frame-ancestors 'self';img-src 'self' data:;object-src 'none';script-src 'self';script-src-attr 'none';style-src 'self' https: 'unsafe-inline';upgrade-insecure-requests
Cross-Origin-Embedder-Policy: require-corp
Cross-Origin-Opener-Policy: same-origin
Cross-Origin-Resource-Policy: same-origin
X-DNS-Prefetch-Control: off
X-Frame-Options: SAMEORIGIN
Strict-Transport-Security: max-age=15552000; includeSubDomains
X-Download-Options: noopen
X-Content-Type-Options: nosniff
Origin-Agent-Cluster: ?1
X-Permitted-Cross-Domain-Policies: none
Referrer-Policy: no-referrer
X-XSS-Protection: 0
Content-Type: application/json; charset=utf-8
Content-Length: 15
ETag: W/"f-pob1Yw/KBE+3vrbZz9GAyq5P2gE"
Date: Fri, 20 Jan 2023 18:15:32 GMT
Connection: keep-alive
Keep-Alive: timeout=5
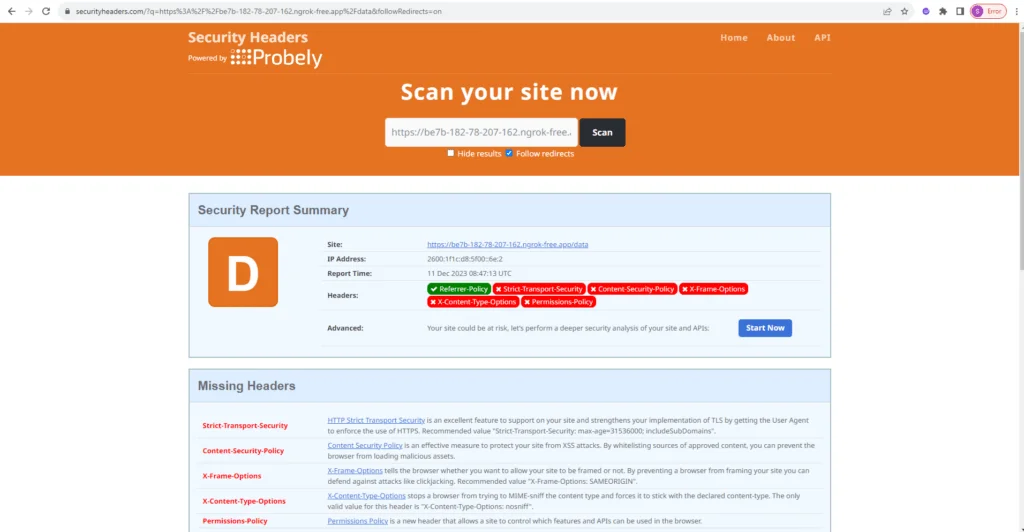
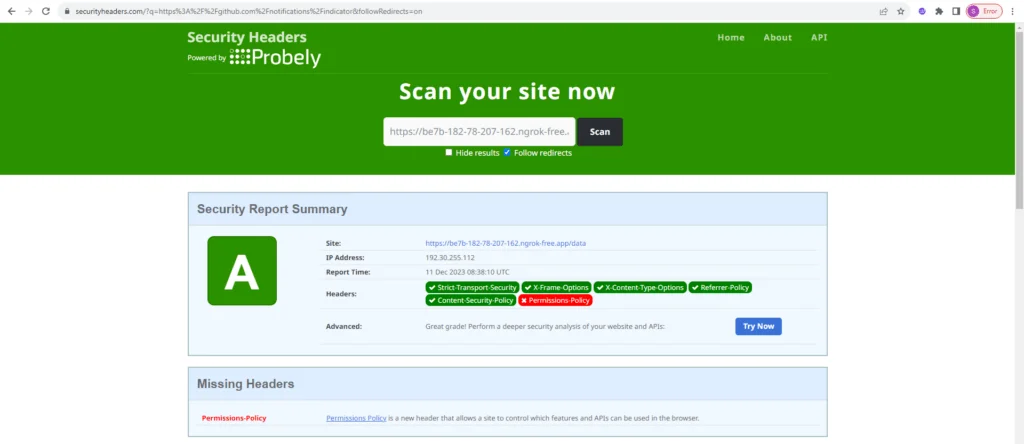
Before Helmet
After Helmet
Step 4:
Configuring security headers in Helmet
Content-Security-Policy
// overriding "font-src" and "style-src" while
// maintaining the other default values
helmet.contentSecurityPolicy({
  useDefaults: true,
  directives: {
    "font-src": ["'self'", "external-website.com"],
    // allowing styles from any website
    "style-src": null,
  },
})
Referrer-Policy
// setting "Referrer-Policy" to "no-referrer"
app.use(
  helmet.referrerPolicy({
    policy: "no-referrer",
  })
)
Strict-Transport-Security
app.use(
  helmet.hsts({
    // 60 days
    maxAge: 86400,
    // removing the "includeSubDomains" option
    includeSubDomains: false,
  })
 )
X-Content-Type-Options
app.use(
  // not loading the noSniff() middleware
  helmet({
    noSniff: false,
  })
)
X-Frame-Options
app.use(
  // not including the frameguard() middleware
  helmet({
    frameguard: false,
  })
)
If you want to omit the X-Frame-Options header entirely, you can disable the frameguard() middleware with the following:
app.use(
  // not including the frameguard() middleware
  helmet({
    frameguard: false,
  })
)
Secure API Using X-referer
Step 1: Frontend
For React:
Install Dependency
npm i crypto-js
create file generateClientToken.js and Add code
const generateReferrerID = () => {
    const expirationTimeSeconds = 6;
    const secretKey = 'myKey';
    try {
        const expirationTimestamp = Math.floor(Date.now() / 1000) + expirationTimeSeconds;
        const combinedKey = secretKey + "." + expirationTimestamp;
        const encryptedKey = CryptoJS.AES.encrypt(combinedKey, secretKey).toString();
        const finalKey = encryptedKey + "." + CryptoJS.AES.encrypt(expirationTimestamp.toString(), secretKey).toString();
        return finalKey;
    } catch (error) {
        console.error(error);
    }
};
Update the headers for API calls
headers: {
      'Content-Type': 'application/json',
      'Authorization': `Bearer ${apiKey}`, // Add this line if your REST API requires an authorization token
      'X-Referer': generateReferrerID()
  },
For HTML:
Add Dependencies for crypto-js
<head>
    <meta charset="UTF-8">
    <meta name="viewport" content="width=device-width, initial-scale=1.0">
    <title>Frontend Example</title>
    <!-- Include CryptoJS from jsDelivr CDN -->
    <script src="https://cdn.jsdelivr.net/npm/crypto-js@3.3.0/crypto-js.js"></script>
</head>
Body
<body>
  <button onclick="getData()">Get Data</button>
  <!-- Container to display the data -->
  <div id="dataContainer"></div>
  <script>
    const generateReferrerID = () => {
      const expirationTimeSeconds = 6;
      const secretKey = 'myKey';
      try {
        const expirationTimestamp = Math.floor(Date.now() / 1000) + expirationTimeSeconds;
        const combinedKey = secretKey + "." + expirationTimestamp;
        const encryptedKey = CryptoJS.AES.encrypt(combinedKey, secretKey).toString();
        const finalKey = encryptedKey + "." + CryptoJS.AES.encrypt(expirationTimestamp.toString(), secretKey).toString();
        return finalKey;
      } catch (error) {
        console.error(error);
      }
    };

    function getData() {
  // Replace 'http://localhost:5000/data' with the actual API endpoint
      const apiUrl = 'http://localhost:5000/data';
      // Replace 'your-api-key' with the actual API key if required
      const apiKey = 'your-api-key';
      // Get the container element
      const dataContainer = document.getElementById('dataContainer');
      // Make a GET request using Fetch API with headers
      fetch(apiUrl, {
        method: 'GET',
        headers: {
          'Content-Type': 'application/json',
          'Authorization': `Bearer ${apiKey}`, // Add this line if your API requires an authorization token
          'X-Referer': generateReferrerID()
        },
      }).then(response => {
        if (!response.ok) {
          throw new Error('Network response was not ok');
        }
        return response.json();
      }).then(data => {
        // Clear previous content in the container
        dataContainer.innerHTML = '';
        // Iterate through the data and append it to the container
        data.forEach(item => {
          const listItem = document.createElement('p');
          listItem.textContent = `ID: ${item.id}, Name: ${item.name}`;
          dataContainer.appendChild(listItem);
        });
      }).catch(error => {
        // Handle errors during the API call
        console.error('Error during API call:', error);
      });
    }
  </script>
</body>
Step 2: Backend
Create a getValidateClient.js file.
const CryptoJS = require('crypto-js');
const secretKey = 'myKey'
const expirationTimeSeconds = 6;

const validateKeyAndExpiration = (key) => {

    try {
        const [encryptedKey, encryptedTimestamp] = key.split('.');
        const decryptedKey = CryptoJS.AES.decrypt(encryptedKey, secretKey).toString(CryptoJS.enc.Utf8);
        const decryptedTimestamp = CryptoJS.AES.decrypt(encryptedTimestamp, secretKey).toString(CryptoJS.enc.Utf8);
        const expirationTimestamp = parseInt(decryptedTimestamp, 10);
        const isValid =
            decryptedKey === secretKey + '.' + expirationTimestamp &&
            Math.floor(Date.now() / 1000) < expirationTimestamp;
        return isValid;
    } catch (error) {
        console.error(error);
        return false;
    }
};
const validateClient = async (req, res, next) => {

    const {
        headers
    } = req
    const key = headers['x-referer'] || ''
    const isValidHost = validateKeyAndExpiration(key);
    if (!isValidHost)
        return res.status(401).json({
            error: "You don't have permission to access this resource"
        });
    else next();
};
module.exports = validateClient;
Update server.js code to add middleware to handle validate the client
const express = require('express');
const cors = require('cors');
const helmet = require('helmet'); // Add this line

const validateClient = require('./getValidateClient');
const app = express();
const port = 5000;

// Use the helmet middleware to enhance your app's security
app.use(helmet());

// Use the cors middleware with specific configuration
app.use(cors({
    origin: 'http://127.0.0.1:5500',
    methods: 'GET,HEAD,PUT,PATCH,POST,DELETE',
    credentials: true,
    optionsSuccessStatus: 204,
}));

// Define a middleware to handle CORS errors
app.use((err, req, res, next) => {
    if (err.name === 'CorsError') {
        res.status(403).json({
            error: 'CORS error: ' + err.message
        });
    } else {
        next();
    }
});
// Integrate the validateClient middleware for the /data endpoint
app.get('/data', validateClient, (req, res) => {
    const data = [
        { id: 1, name: 'Item 1' },
        { id: 2, name: 'Item 2' },
        { id: 3, name: 'Item 3' }
    ];
    res.json(data);
});

app.listen(port, () => {
    console.log(`Server is running on http://localhost:${port}`);
});
Step 3
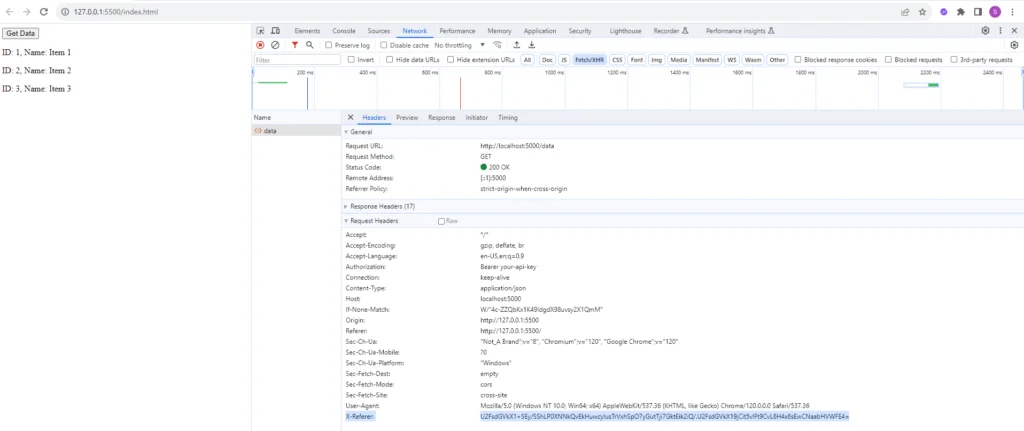
Make API call from FE
Console for BE

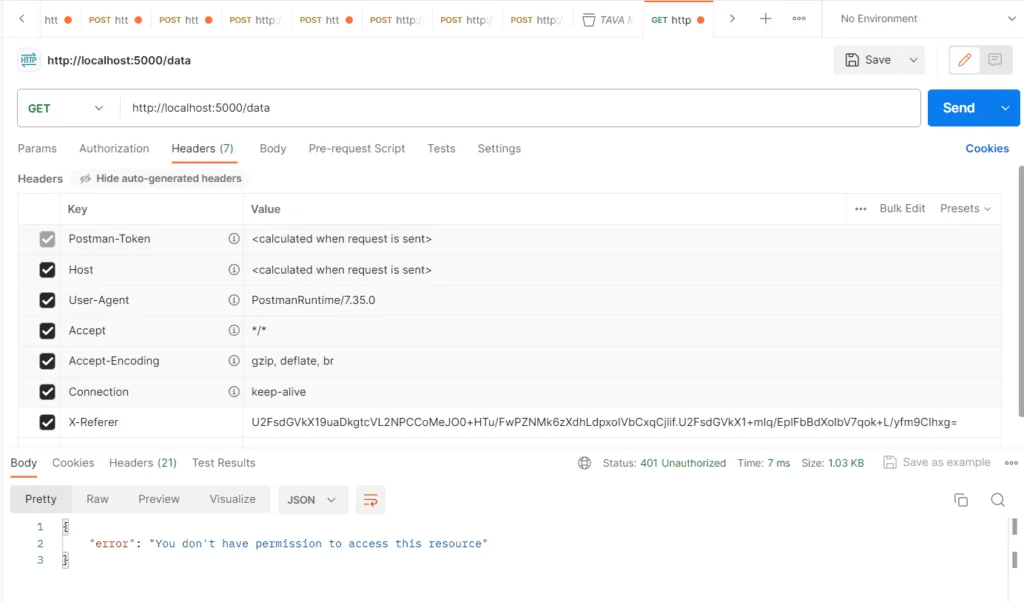
Testing via Postman
Preparing Your App for Live Updates
Before turning on Live Updates, it is vital to configure the Capacitor application correctly to install the required software development kit (SDK). It is critical to ensure the application has a distribution channel to control the delivery of a specific web build correctly.
In addition, developers should identify how and when the application shall receive updates. It depends on the nature of the product and the extent to which the changes are expected. For instance, an application that anticipates frequent graphical-end user interface (GUI) would be set to update automatically in the background. On the other hand, the project with a higher level of control would choose to use the SDK API directly to distribute the software.
Finally, it may be worthwhile to test the created channel to ensure builds are correctly delivered and updated. A separate route should be used to verify software’s viability and ensure the application reloads the new set of instructions. It can save time and effort in case of a configuration problem in the primary release.
Choosing the Right Update Strategy
The update strategy’s choice depends on the application’s nature and how much the users need changes to happen in their current sessions. Background updates serve best when the user wants to update without disrupting the current activities. The user can continue working with the current version while the new version prepares for deployment.
The Always Latest approach helps make users closer to the latest web build. The application checks for an update while running and reloads it when the user closes or interacts with it again.
The Force Update technique is best applied when immediate changes are necessary, but it might slow down the initial launch of the application. None gives developers full control over the update flow by calling the Live Updates API themselves.
Testing these strategies with the application flows will help select the appropriate approach in the application’s context. All the strategies can be compared by the balance between the update speed and disruption to the user.
Managing Builds and Channels
Managing builds and deployment channels is an important part of using Live Updates with Appflow. A channel acts as the destination that an application listens to when checking for a new web build. This makes it possible to control which version is delivered to different groups of users.
For example, development and production applications can use separate channels. A new web build can first be tested in a development channel before being assigned to the production channel. This provides an additional step for checking the application before the update reaches a wider audience.
When creating a build in Appflow, developers can select the required commit, choose the web platform, and assign the build to a channel. Once the deployment is available, devices configured for that channel can receive the update according to the application’s update strategy.
Keeping channels and deployments organized also makes it easier to manage multiple versions during ongoing development.
Testing Live Updates Before Production
Testing of Live Updates before their release in production is an important step that eliminates potential problems with their implementation. Thus, an update that has passed the testing stage should not interfere with the operation of the application by downloading additional files and changing the current web version.
Developers can begin by creating a test build and assigning it to a separate channel. The application can then be installed with that channel configured and tested through the complete update process. This includes checking whether sync() detects the new deployment and whether reload() activates the downloaded version at the expected time.
It is also useful to test scenarios where no update is available, an update is downloaded while the app is active, and the user leaves and returns to the application. These checks help confirm that the update logic behaves consistently.
Once the process works as expected, the same approach can be applied to the production channel with greater confidence.
Handling Failed or Incomplete Updates
Live Updates should also handle cases where an update cannot be downloaded or applied successfully. Network issues, unavailable deployments or configuration problems might prevent an update from completing successfully, and application should be able to gracefully fall back to running its current version, instead of leaving the user with a broken application.
The Live Updates API gives developers fine-grained control over this scenario, by allowing them to make the decision to reload the app in case of an error. Checks for updates can be done on application launch or resume, and their results can be saved and used later to determine if a reload is needed.
It is also significant to test the failures of updates during the development process. The developers can make the application lose the connection to the server or remove any available deployment. Thus, it can simulate the failure of an update and check whether the app can provide a stable experience despite the issue.
Monitoring Live Update Deployments
After Live Updates are enabled, monitoring deployments becomes an important part of maintaining the application. Developers need to know which web build is being delivered, which channel it belongs to, and whether updates are reaching the intended users.
Appflow acts as a central hub to manage builds and deployments and helps in tracking the version that is assigned to which channel. This feature comes especially helpful when the dev, test, and production channels have varying requirements for updates.
A structured deployment process can also reduce the risk of releasing an incorrect build. Teams can first test changes through a development or testing channel and move the verified build to production afterward. Keeping deployment channels organized makes troubleshooting easier and provides better control over future updates.
Regularly reviewing builds and update behavior can help teams identify configuration issues early and maintain a more reliable Live Updates workflow.
Best Practices for Live Updates
Several best practices emerging from the previous recommendations could be implemented in order to configure Live Updates correctly and safely in a production environment. First of all, it is critical to make sure that the development and production environments are isolated from one another in order to ensure that software builds are deployed only when they have been sufficiently tested. Another best practice is to utilize channels in order to isolate different applications or application versions from one another.
It is also important to keep the update logic simple and handle cases where an update is not available. The application should continue working normally if a sync fails or the device has no network connection. Before releasing an update, test the complete process on supported devices to make sure the new web build loads correctly.
Besides ensuring a continuous delivery process, groups should also track the deployed versions and update configuration. This will facilitate the recognition of issues, the rollback of erroneous releases, and the improvement of the overall quality of the experience as the application continues to develop.
Benefits of Using Live Updates
Live Updates can make application maintenance more efficient by reducing the need to release a new native build for every web-layer change. Developers can update application content, fix certain issues, and deliver improvements through the configured deployment channel.
This approach can also reduce the friction for the users since they do not necessarily have to go to the application store to get web-layer modification. They can be downloaded in the app, depending on the chosen strategy, with updates available in the background as the previous version of the application is still in use.
Live Updates are especially useful for applications that receive frequent content changes, interface improvements, or minor bug fixes. Instead of waiting for the full app store review and release process, teams can deliver eligible web-layer updates more quickly. This can help resolve issues sooner and allow users to benefit from improvements without manually installing a new version.
For development teams, this provides greater flexibility when managing frequent improvements. Changes can be tested through separate channels before being promoted to production. Teams can also use staged deployments to verify an update with a smaller group of users before making it widely available.
Conclusion
“Now equipped with an understanding of Helmet.js and its pivotal role in securing Node.js applications, let’s delve into the vulnerability inherent in default Express apps due to the absence of security HTTP headers.
Express APIs, lacking these headers by default, leave applications exposed to potential security threats. Fortunately, Helmet offers a streamlined solution. With just one line of code, seamlessly integrate Helmet into your Node.js application, establishing a formidable security layer. This not only addresses vulnerabilities in default Express apps but also shields your system from prevalent cyber threats.
Our exploration extends to the application of crypto-js for enhanced REST API for web api security. Utilizing crypto-js fortifies the protection of both API calls and the backend, thwarting unauthorized access attempts. This cryptographic library provides versatile tools, enabling the implementation of secure communication channels and data encryption. For organizations seeking expertise in custom financial software development, healthcare software development, and software development for financial services, our services cover a broad spectrum. Whether you’re in need of an iOS mobile app development company, cross-platform mobile app development services, or QA software testing services, we cater to diverse requirements.