- 1 Comprehensive Imaging Solution: Cloudinary is one of the leading cloud solution platforms that help in image optimization, management, and even in storage. It works well with NodeJS; thus, it is perfect for developers who would wish to improve their application imaging abilities.
- 2 Enhanced Performance and Security: Cloudinary is a fast image delivery and storage solution, which includes such key features as global content delivery and dynamic image transformations. It also helps to have fast loading and secured images, while this advanced option can be utilized to its full potential only if you have loads of images.
- 3 Easy Integration and Practical Use: Integrating Cloudinary with NodeJS involves simple steps like installing the SDK, configuring API credentials, and using the API for image uploads and optimization. This integration can significantly improve application performance and user experience.
If you are searching for an excellent cloud-based solution for your imaging needs, you may consider Cloudinary. This is a powerful platform that allows you to edit, optimize, and store your media files with ease. Moreover, this service integrates with such a utility as NodeJS to ensure that you can improve the performance of your application and leverage additional features.
In this article, we will take a closer look at Cloudinary’s introduction, features, and integration steps in NodeJS. Besides, we will give an example of using it in practice. This article will be helpful both for those who are starting to work with Cloudinary and those who have already made a choice in its favor.
What is Cloudinary?
Cloudinary is an image management platform that provides end-to- end solutions for developers.
With Cloudinary, you can upload your images to a cloud-based service, edit and optimize them, and deliver them to end-users. It also enables you to build e-commerce sites and applications that have an exceptional user experience.
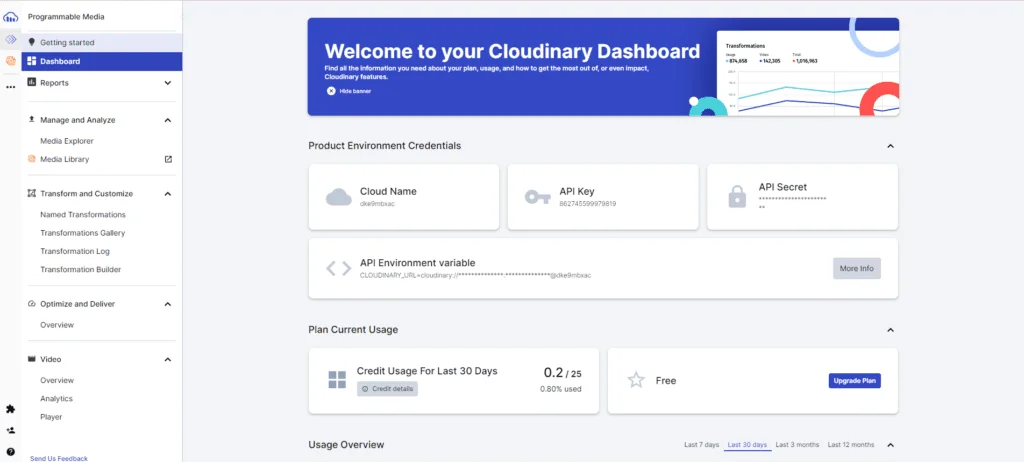
Benefits of using Cloudinary
Cloudinary offers several benefits to developers, including:
- Efficient image optimization: Cloudinary offers a highly efficient image optimization option without compromising on the quality of the images thus ensuring faster loading of the application.
- Secure image storage: Cloudinary has the best image storage system that is safe from any external attacks since they employ the best security measures to protect images in their servers.
- Flexible image manipulation: Cloudinary offers flexible image manipulation features that allow cropping, resizing and watermarking among others to fit application needs.
- Integration with development tools: It is easy to integrate Cloudinary with development tools such as NodeJS hence easier application development.
How Cloudinary can improve your app development
Cloudinary is a great tool for your application development. By integrating this service into your development process, you can make your customers’ experience better and improve image management in your projects. Cloudinary can help you to deliver your application’s quality and performance.
“Cloudinary is a game-changer for developers looking to optimize their image-related tasks. With its powerful features and flexible integration options, developers can streamline their workflow and improve user experience effortlessly.”
Main Features of Cloudinary
Cloudinary has multiple tools that are helpful for improving your application and working with images. Below are some of the features that can be very useful for your app development.
Image Manipulation
Cloudinary provides developers with an API to perform image manipulations such as resizing, cropping, rotating, and adjusting colors. The API also allows developers to edit an image’s format, including JPEG, PNG, and WebP.
Secure Storage and Delivery
Cloudinary guarantees the secure storage and delivery of images using its secure private cloud storage. In addition, the service also has a global CDN (Content Delivery Network) that ensures faster delivery of images to end-users.
Video Manipulation
The service also enables developers to manipulate videos using its API. Developers can also resize, crop, and transcode videos. The service allows the use of multiple video formats such as MP4, AVI, and MOV.
Metadata Extraction
Cloudinary can extract the metadata of an image, including the camera specifications of images. This feature is useful when creating applications that require image analytics or search.
These are some of the features that Cloudinary offers. Developers stand to gain by using this service to improve their application’s imaging capabilities.
Choosing the Right Plan of Cloudinary for Your Project
One of the questions that appears in front of you as a creator after the trial period is which subscription plan to choose for your project. And, in order to avoid any problems with the allocation or overutilization, it is essential to analyze your requirements in advance.
Firstly, you should estimate the number of transformations per month to allocate the required plan. Many miss this point, as they believe that the amount of data stored is more important than the number of transformations and bandwidth. In fact, the latter is even more significant. For example, a website with tens of thousands of photos and only a few transformations applied cannot reach the same level of utilization as a social network with one thousand pictures but modified in dozens of ways.
Moreover, video content requires a separate analysis since it usually involves more transformations and is processed differently. Many companies tend to ignore this aspect because they have only videos on their websites or mobile applications. At the same time, you need to add up the amount of transformations for both media types, which may complicate the calculation.
In addition, it is critical to take into account your application’s traffic patterns. For example, organizations with highly seasonal traffic can see their utilization peak at unexpected times of the year. Therefore, studying the peculiarities of your business and the trends in user behavior is important to avoid issues.
Finally, it is also vital to revise the plan once the product hits the market. For instance, a company may choose the cheapest option for proof-of-concept purposes. But as the customer base grows, it may be necessary to switch to a higher plan to maintain the quality of service. Actually, analyzing the statistics and utilization every month is required to be done on a regular basis to see the trends and prepare for upcoming changes in advance.
Overall, it is important to choose the appropriate plan for your business in order to provide the best value for your customers. But, considering the details and nuances of the situation may appear to be a difficult task. That is why you should request more information and consult with specialists in the field to make the correct decision.
Integrating Cloudinary with NodeJS
Integrating Cloudinary with NodeJS is a seamless process. Use the following step-by-step guide to integrate Cloudinary with NodeJS.
Step 1: Install Cloudinary SDK
The SDK (Software Development Kit) can be installed by running the following command in the terminal:
npm install cloudinary --saveThis command installs the cloudinary package and saves it to your dependencies.
Step 2: Configure Cloudinary API Credentials
The API credential can be configured using the code below. Kindly replace the values with the ones generated on the Cloudinary dashboard.
cloudinary.config({
cloud_name: 'your_cloud_name',
api_key: 'your_api_key',
api_secret: 'your_api_secret'
});
This code connects your application to your Cloudinary account.
Step 3: Upload Image to the Cloudinary account
The following code below will help upload images to the Cloudinary account:
cloudinary.uploader.upload('your_image.jpg', function(result) {
console.log(result)
});
This code uploads an image to your Cloudinary account and logs the result to the console.
Step 4: Show the Uploaded Image in the web page
The following code below will help display the uploaded image in the web page:
<img src='<%= result.url %>'>
This code displays the uploaded image on your webpage using the URL returned by the Cloudinary API.
By following the simple integration steps in NodeJS above, one can enhance application’s imaging capabilities using Cloudinary.
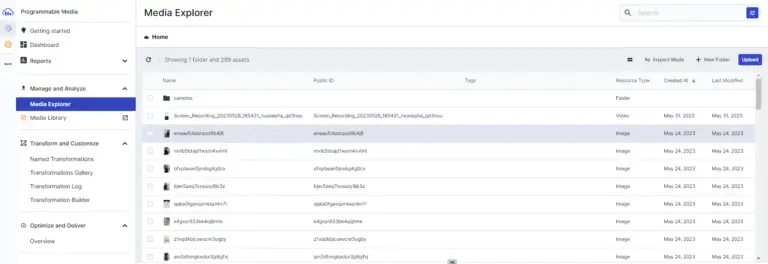
Usage Example
An example of using Cloudinary in a NodeJS application would be a website that requires users to upload images and wants to optimize the images for faster loading. In this case, Cloudinary’s image optimization feature can be used.
The first thing to do would be to follow the integration steps mentioned above. Once the integration has been done successfully, one can start using the features in their application.
For this example, we will optimize the image by reducing the file size while still maintaining the image quality. This can be achieved through the code snippet below:
// Install the Cloudinary package using npm
npm install cloudinary --save
// Require the Cloudinary package and configure
const cloudinary = require('cloudinary').v2;
cloudinary.config(
cloud_name: 'your cloud name',
api_key: 'your api key',
api_secret: 'your api secret'
);// Use the uploader method to optimize the image
cloudinary.uploader.upload(
'path/to/your/image.jpg',
{
width: 800, // Desired width of the image
height: 600, // Desired height of the image
crop: 'fill',
quality: 'auto:best'
},
function(error, result) {
console.log(result);
}
);Using the code snippet above, we have optimized our uploaded image using the image manipulation feature of Cloudinary. The resulting image will have a reduced file size which will load faster on our website.bsite.
Some of the other features that Cloudinary offers are image delivery and secure storage of images. One can refer to the documentation of Cloudinary to know more about the features available.
Best Practices
Despite the ease of using the Cloudinary service and its features, several practical tips should be put into practice to avoid some of the common mistakes that may easily happen by developers who are new to the service.
Use responsive transformations. Instead of hard-coding image width and height values, try using Cloudinary’s responsive breakpoints feature. This allows you to set a maximum size and aspect ratio and automatically generates appropriately sized images for different display sizes. This technique helps reduce unnecessary bandwidth by not delivering images larger than needed, especially for mobile devices.
Automate format selection. Avoid manually selecting image formats. Instead, take advantage of Cloudinary’s automatic format detection (f_auto) and quality optimization (q_auto) features. These ensure each visitor receives the most appropriate image type and compression level based on their browser capabilities, without extra configuration.
Organize folders and tags early. As your project grows, keep your media organized by developing a consistent folder structure and tagging system from the beginning. This ensures easier media discovery and reduces the complexity of managing assets as your application or team scales.
Monitor usage limits. Keep an eye on your Cloudinary usage analytics to stay within the limits of your plan. Sudden spikes in bandwidth consumption, such as from inefficient transformation requests, can occur unexpectedly – especially if you’re on a free tier.
Cache transformed images. Cloudinary generates image transformations on demand, and transformed image URLs remain valid indefinitely. By configuring appropriate caching headers, you can optimize CDNs and browsers so repeated views of the same transformed image don’t result in unnecessary processing or bandwidth usage.
Test transformations in the Media Library UI. Before building transformation code directly into your application, take advantage of Cloudinary’s UI to experiment with transformation options. This allows you to fine-tune parameters without having to write and modify code for every adjustment.
Following these best practices enables developers to make the most of Cloudinary, avoiding wasted resources and maximizing the performance gains the platform is known for.
Common Issues
Despite theCloudinary service being fairly simple to use, some issues may arise from time to time which may hinder the development process.
Upload requests failing.
This problem is mostly caused by poor configuration such as wrong API keys or API secret. It is also caused by wrong environment variables especially when working with NodeJS. To solve this issue, check if the environment file is loaded before the cloudinary configuration runs.
Images uploading but not displayed.
The issue may arise due to secure URL mismatch especially when the website uses HTTPS. This can be solved by ensuring that the secure URL is matched with the image URL.
Uploads are failing for large files.
Sometimes uploads fail especially when dealing with large files due to timeout settings. This problem can be solved by using chunk upload feature in Cloudinary.
Transformation error.
Sometimes images are not transformed as expected. This may be caused by incorrect transformation order. For example, a crop transformation performed after a resize will yield a different result than if the transformations were applied in the opposite order.
Bulk operations hitting rate limits.
When uploading existing image libraries, hundreds or thousands of individual image uploads may be required to migrate content to Cloudinary. This can cause issues if your code attempts to upload all images simultaneously and exhausts Cloudinary’s API rate limits. Distributing these requests with sufficient concurrency limits will avoid this issue.
Inconsistent visual quality across devices.
When using variable quality transformations, images may appear to display at different levels of visual quality depending on the device being used. This is a frequent occurrence when mixing manual and automatic quality transformations and should be avoided.
These are some of the common issues encountered when using the Cloudinary service.
Conclusion
From the discussion above, it is clear that Cloudinary is a powerful cloud-based imaging solution that can be integrated into NodeJS to enhance imaging capabilities. Cloudinary is easily configurable and provides developers with powerful features such as image manipulation, optimization, and secure storage and delivery of images.
Cloudinary can also be tailored to meet the needs of different industries for example financial software development and healthcare. Furthermore, Cloudinary enables cross-platform app development with optimal performance and user experience on all devices, making QA testing much more comfortable.
In conclusion, Cloudinary is a powerful cloud-based imaging solution that can be integrated into applications to enable developers to optimize, manipulate and deliver images with ease. So go ahead and explore this amazing service to level up your application development.