Blog Articles
Streamlining Gladly Task Creation with Apex Code
Table of Contents
Introduction
In the realm of modern work dynamics, efficient task management is the linchpin of heightened productivity. Gladly, an adept task management platform, opens new avenues for seamless task integration through its robust API. This guide zeroes in on the intricacies of crafting Gladly tasks using Apex, Salesforce’s formidable programming language. Whether you’re a seasoned developer or just embarking on your coding journey, this tutorial is your compass to elevate your workflow by harnessing the full potential of Gladly.
What is a Gladly Task?
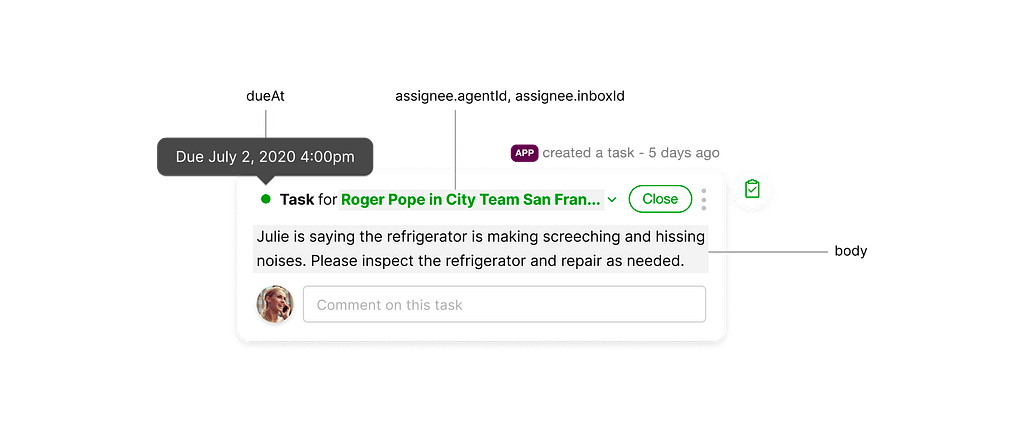
A task is a way to create and do internal follow-up work for a customer within Gladly. Tasks have a due date, an assignee, a description of what is needed for a customer, and can be commented on. These can be created through the API to assign items to work within Gladly and through the its dashboard.
How to create a Gladly task?
To add tasks to the timeline for a customer specified by identifying information, the user can use a post request. Also, If the customer doesn’t exist, a new customer profile is created by default.
In this guide I will be using Apex to create Gladly Tasks through the POST API endpoint.
1. REQUEST BODY SCHEMA: application/json
|
1 2 3 4 5 6 7 8 9 10 11 12 13 |
{ "id": "pOVVdzweSumI4bFxjlT8LA", "assignee": { "inboxId": "NFpDZtfqhk2pI6fjaVDlFf", "agentId": "zGaHXjD4SR-moMR9LbULDa" }, "body": "Create task to reschedule appointment", "dueAt": "2020-03-15T06:13:00.125Z", "customer": { "mobilePhone": "+16505551987" } } |
|
1 2 3 4 5 6 7 8 9 10 11 12 13 14 15 16 17 18 19 |
id String <= 50 characters Specifies the id of the task assignee required object (Assignee) Inbox and agent assignee for a task body required string <= 10000 characters Text to describe what task to complete. Constrained HTML Rich Content is supported. dueAt required string <RFC3339> Time when the task will be due. This must be set to a time in the future. Customer required object (Customer Specification) Specifies the customer a task belongs to. You must provide exactly one of the values. |
2. Let’s Create some Apex Wrapper Classes for Task Management
|
1 2 3 4 5 6 7 8 9 10 11 12 13 14 15 16 17 18 19 20 21 22 23 24 25 26 27 28 29 30 31 32 33 34 35 36 37 38 39 40 41 |
public class TaskWrapper { public String id; public AssigneeWrapper assignee; public String body; public DateTime dueAt; public CustomerWrapper customer; public TaskWrapper(String id, AssigneeWrapper assignee, String body, DateTime dueAt, CustomerWrapper customer) { this.id = id; this.assignee = assignee; this.body = body; this.dueAt = dueAt; this.customer = customer; } } public class CustomerWrapper { public String emailAddress; public CustomerWrapper(String email) { this.emailAddress = email; } } public class AssigneeWrapper { public String inboxId; public String agentId; public AssigneeWrapper(String inboxId) { this.inboxId = inboxId; } public AssigneeWrapper(String inboxId, String agentId) { this.inboxId = inboxId; this.agentId = agentId; } } |
3. Create a method to construct the request body with required parameters.
|
1 2 3 4 5 6 7 8 9 10 11 12 13 14 15 16 17 18 19 20 21 22 23 24 25 |
public static void createTaskToRescheduleAppointment(String customerEmail, String previousDate, String newDate) { String taskBody = '<strong>Appointment Rescheduled:</strong> <br>Your appointment has been rescheduled to ' + newDate + ' from <strong>' + previousDate+ '</strong>.<br/>'; try { // Implement logic to get the inbox ID according to your needs. String inboxId = getInboxId(); AssigneeWrapper assignee = new AssigneeWrapper(inboxId); CustomerWrapper customer = new CustomerWrapper(customerEmail); // Either Create a method to get the dueAt date for the new task or use any value directly for the due date according to your requirement. DateTime dueAt = getRescheduleDueDate(); TaskWrapper task = new TaskWrapper(null, assignee, taskBody, dueAt, customer); createTask(task); } catch (Exception e) { // handle the catch block according to your requirement. } } |
4. Create the createTask method to handle the post request.
|
1 2 3 4 5 6 7 8 9 10 11 12 13 14 15 16 17 18 19 20 21 22 23 24 25 26 27 28 29 30 31 32 33 34 35 36 37 |
public static void createTask(TaskWrapper task) { if (task != null) { createTaskOnGladly(task); } } private static HttpResponse createTaskOnGladly(TaskWrapper gladlyTaskWrapper) { String requestBody = JSON.serialize(gladlyTaskWrapper); String GLADLY_ENDPOINT = '<organization>.gladly.com/api/v1/tasks'; HttpRequest req = new HttpRequest(); req.setEndpoint(GLADLY_ENDPOINT); req.setMethod('POST'); req.setHeader('Content-Type', 'application/json;charset=UTF-8'); req.setBody(requestBody); HttpResponse response = (new Http()).send(req); // Get the status code of the API request and handle additional features if (response.getStatusCode() == {Status Code to check}) { } return response; } |
Conclusion
In conclusion, this guide has unveiled the power of Apex in simplifying the creation of Gladly tasks. By delving into the code intricacies, you’ve gained the tools to seamlessly integrate Gladly into your workflow, leveraging the capabilities of Apex. As you implement these insights, you’re not just writing code; you’re sculpting a more efficient work environment. Cheers to unlocking the synergy between Apex and Gladly for a productivity boost in your day-to-day tasks with the expertise of Innostax.

Get a Fast Estimate on Your Software Development Project
We are committed to delivering high-quality IT solutions tailored to meet the unique needs of our clients. As part of our commitment to transparency and excellence, we provide detailed project estimations to help our clients understand the scope, timeline, and budget associated with their IT initiatives.
Share


