

- 1 AWS Serverless Framework eases the process of serverless application development on AWS and makes it easier to work with functions, utilization of AWS Lambda, API Gateway, and CloudWatch.
- 2 The AWS credential and IAM roles are among the requirements that require configuration before deploying using the Serverless Framework. It allows one to configure each of the components appropriately to allow for easy integration and control of the serverless functions.
- 3 Extending and releasing JavaScript functions with Serverless Framework entails describing functions in a serverless. yml file, database connectivity, and AWS service use, making it fairly easy to design and create cloud based applications that are easily scalable.
What is a Serverless Framework?
The Serverless Framework stands as a robust instrument, streamlining the intricate chore of deploying and orchestrating serverless applications on diverse cloud platforms, among which Amazon Web Services (AWS) is notable. In this guide, our goal is to provide you with a comprehensive walkthrough of harnessing the Serverless Framework’s capabilities. We’ll demonstrate how to effortlessly deploy a basic JavaScript function onto AWS Lambda, make it accessible through API Gateway, and institute monitoring through AWS CloudWatch.This knowledge can prove invaluable, whether you are in the field of custom financial software development, healthcare software development, cross-platform mobile app development, software testing services, or any other domain where modern and efficient cloud-native applications are essential. By mastering the Serverless Framework, you’ll have a powerful tool at your disposal to create and deploy innovative solutions that cater to the evolving demands of your industry.
Purpose and Scope of the Guide
The aim of this guide is to furnish you with a comprehensive, step-by-step tutorial on the deployment of a serverless JavaScript function within AWS, facilitated by the Serverless Framework. Whether you’re exploring serverless computing for the first time or looking to enhance your current skill set, this tutorial aims to provide you with the following capabilities:
- Setting Up Prerequisites: We’ll guide you through the essential prerequisites, including configuring your AWS account.
- Creating a Serverless Project: Learn how to initiate a new serverless project using the Serverless Framework.
- Connect your database: In this section, you’ll discover how to establish a connection between your serverless application and a database, a vital element for storing and retrieving data in serverless architectures.
- Writing JavaScript Functions: Dive into crafting JavaScript functions that will ultimately find their home on AWS Lambda.
- Configuring with serverless.yml: Understand the process of defining serverless configurations within a `serverless.yml` file.
- Deployment Process: Discover how to deploy your JavaScript functions and set up an API Gateway for interaction.
- Testing and Validation: Explore testing methods for your deployed API using tools such as cURL or Postman.
By the conclusion of this article, you’ll have a firm grasp of harnessing the Serverless Framework’s capabilities to efficiently deploy and oversee serverless applications on the AWS platform. Furthermore, you’ll gain hands-on experience in deploying serverless functions and exposing them through API endpoints, laying the foundation for the development and scalability of serverless applications within your projects.
Why Choose Serverless Over Traditional Server Architectures?
Before diving into the setup steps, it’s worth being clear about what serverless computing actually solves, since the term gets used loosely and the benefits aren’t always obvious to teams used to managing their own servers.
With a traditional server-based approach, a business provisions and maintains servers — whether physical or virtual — that run continuously, whether or not they’re actively handling requests. That means paying for capacity around the clock, and it means someone on the team is responsible for patching operating systems, managing scaling when traffic spikes, and handling the server itself failing or needing replacement. None of that work adds direct value to the application; it’s overhead that exists purely to keep the infrastructure running.
Serverless computing, despite the name, still runs on servers — the difference is that AWS manages them, not the development team. A function like the ones built in this guide only runs when it’s actually invoked, and AWS handles provisioning the underlying compute resources, scaling automatically as request volume changes, and taking the server layer entirely out of the development team’s responsibility. Billing follows the same model: rather than paying for a server that sits idle overnight, a serverless function is typically billed based on actual invocations and execution time, which can mean substantial cost savings for applications with irregular or unpredictable traffic patterns.
This tradeoff isn’t free, and it’s worth understanding the downsides alongside the benefits. Functions that haven’t run recently can experience a delay on their first invocation — a topic covered in more detail later in this guide — and debugging a distributed system built from many small functions can be more involved than debugging a single, traditional application. Serverless architectures also tend to work best for workloads that are naturally event-driven or intermittent; a service that needs to maintain a persistent, always-on connection, for example, isn’t always a natural fit for this model. For the kind of API being built throughout this guide, though — a straightforward set of HTTP-triggered functions handling create, read, update, and delete operations — serverless is a genuinely strong fit, which is a large part of why it’s become such a common pattern for this type of workload.
Serverless Framework vs. Other AWS Deployment Tools
The Serverless Framework, which is used in this guide, is not the only option when it comes to deploying applications such as the one described in this guide. Serverless Framework’s position within the overall list of potential options ought to be established before choosing it for a serious project.
AWS SAM (Serverless Application Model) represents AWS’s take on the matter, which is also aimed at developing and deploying applications, but with a focus on AWS-specific tools and features such as CloudFormation. It is perhaps the closest alternative to the Serverless Framework, and represents a natural choice for those exploring options within the AWS sphere. The framework described in this guide, in turn, is designed to be agnostic in terms of the infrastructure provider, and is aimed at supporting a single configuration across multiple platforms such as AWS, Azure, Google Cloud, and others. This approach is better for those who seek flexibility in terms of the infrastructure provider or have to work with multiple ones.
Another alternative, AWS CDK, uses an altogether different approach by allowing the user to define their infrastructure through familiar programming language constructs. This approach is better for teams that want to use the same tooling and coding practices (such as code reviews) for their infrastructure code compared to conventional YAML-based approaches such as the serverless.yml file used in this guide. However, it requires a higher barrier to entry in terms of learning the tool and the underlying concepts.
As far as the project described in this guide is concerned, the approach described in this guide is probably better in terms of speed of development. A project of moderate complexity, which involves several functions and a small amount of overall infrastructure to support, does not benefit from the extra overhead of tools such as SAM or CDK. For larger projects, or projects that involve extensive use of AWS-specific tools, each of these frameworks has its strengths and weaknesses, and the choice between them should be made on a case-by-case basis.
Setting Up Prerequisites for Serverless Framework
To follow along with this tutorial, you’ll need the following:
- An AWS account.
- The AWS CLI (Command Line Interface).
- The Serverless Framework.
How to Configure the AWS CLI
You’ll need to set the AWS credentials for the AWS CLI if you have not done that already. You’ll be using it along with the Serverless Framework to deploy the resources on AWS.
You can create the AWS credentials file by entering the following command in the terminal:
cat <<EOF > ~/.aws/credentials
    [default]
    aws_access_key_id = <REPLACE_WITH_YOUR_SECRET_KEY>
    aws_secret_access_key = <REPLACE_WITH_YOUR_ACCESS_KEY>
  EOF

  cat <<EOF > ~/.aws/config
    [default]
    region = eu-west-1
    output = json
 EOF
How to Create the IAM Role
The Serverless Framework utilizes the IAM role to deploy resources on AWS. Enter the following command to create the role:
aws iam create-role --role-name serverlessLabs --assume-role-policy-document '{
  "Version": "2012-10-17",
  "Statement": [
    {
      "Effect": "Allow",
      "Principal": {
        "Service": "lambda.amazonaws.com"
      },
      "Action": "sts:AssumeRole"
    }
  ]
}'
This policy enables the role to be utilized by the AWS Lambda service.
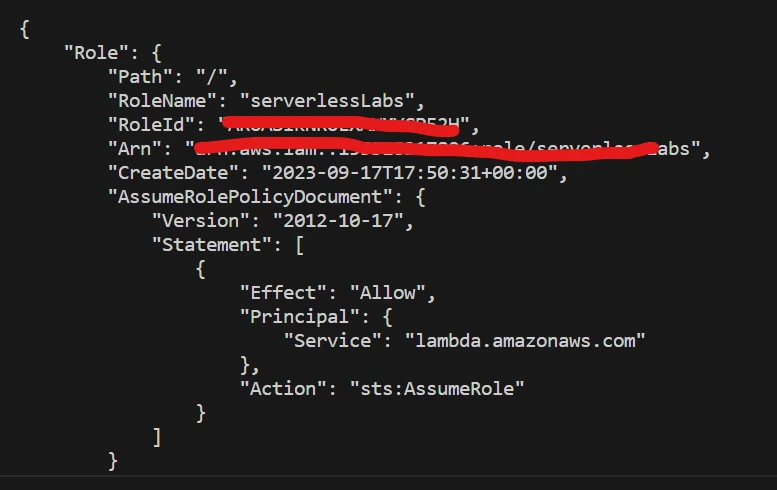
Enter the following command to attach the AWSLambdaBasicExecutionRole policy to the role:
aws iam attach-role-policy --role-name serverlessLabs --policy-arn arn:aws:iam::aws:policy/AWSLambda_FullAccessTo confirm the successful creation of the role, you can execute the following command to retrieve information about the IAM role:
aws iam get-role --role-name serverlessLabsHere’s what the information should look like:

Creating a Serverless Project
The Serverless Framework is utilized to deploy this project, which consists of a straightforward JavaScript function deployed to AWS Lambda, API Gateway, and CloudWatch.
An HTTP GET request triggers the function, and it returns a basic string. The deployment of the function is in the eu-west-1 region.
First, install Serverless Framework using npm:
mkdir node-crud
cd node-crud
Next, install a serverless package project using the npm serverless command and then follow the prompt:
npm install -g serverless
npm i prisma
Run below command in project directory
npx prisma initThis command does two things:
- creates a new directory called prisma that contains a file called schema.prisma, which contains the Prisma schema with your database connection variable and schema models
- It generates the .env file in the project’s root directory, serving the purpose of defining environment variables, such as your database connection.
Connect your database
prisma/schema.prisma

datasource db {
provider = "postgresql"
url = env("DATABASE_URL")
}
.env
DATABASE_URL="postgresql://<username>:<password>@<hosted dbURL>:5432/mydb?schema=public"
prisma/schema.prisma

model Users {
  id           String  @id @default(uuid())
  name         String? @db.VarChar(255)
  email        String? @db.VarChar(255)
}
Run commands
npx prisma format
npx prisma generate
npx migrate devWrite the JavaScript Function
Create handler.js file in root directory
const { PrismaClient } = require("@prisma/client");
const prisma = new PrismaClient();

module.exports.create = async (event) => {
  try {
    const { body } = event;
    const { name, email } = JSON.parse(body);
    const newUser = await prisma.Users.create({
      data: { name, email },
    });

    return { statusCode: 200, body: JSON.stringify(newUser), };
  } catch (error) {
    return {
      statusCode: 500, body: JSON.stringify({
        error: "Failed to create user: " + error.message,
      }),
    };
  }
};

module.exports.read = async () => {
  try {
    const users = await prisma.Users.findMany();

    return { statusCode: 200, body: JSON.stringify(users) };
  } catch (error) {
    return {
      statusCode: 500, body: JSON.stringify({ error: "Failed to fetch users: " + error.message, }),
    };
  }
};

module.exports.update = async (event) => {
  try {
    const { id } = event.pathParameters;
    const { body } = event;
    const { name, email } = JSON.parse(body);

    const updatedUser = await prisma.Users.update({
      where: { id: parseInt(id), },
      data: { name, email, },
    });

    return { statusCode: 200, body: JSON.stringify(updatedUser), };
  } catch (error) {
    return {
      statusCode: 500, body: JSON.stringify({
        error: "Failed to update user: " + error.message,
      }),
    };
  }
};

module.exports.delete = async (event) => {
  try {
    const { id } = event.pathParameters;
    const deletedUser = await prisma.Users.delete({
      where: { id: parseInt(id) },
    });

    return {
      statusCode: 200, body: JSON.stringify({
        message: "User deleted successfully",
        deletedUser,
      }),
    };
  } catch (error) {
    return {
      statusCode: 500, body: JSON.stringify({
        error: "Failed to delete user: " + error.message,
      }),
    };
  }
};
Folder structure
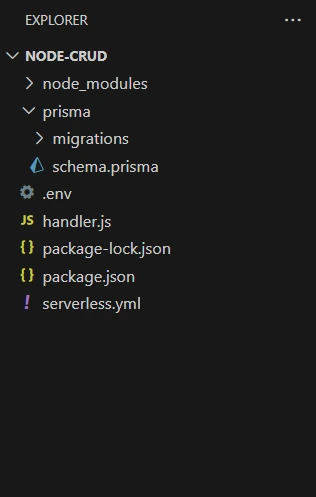
Define Serverless Configuration
To start with the configuration, open the serverless.yaml file and delete all of its content and paste the following YAML code to define the microservice you will deploy:
service: postgres-crud-api
provider:
  name: aws
  runtime: nodejs18.x
functions:
  create:
    handler: handler.create
    events:
      - http:
          path: create
          method: post
  read:
    handler: handler.read
    events:
      - http:
          path: read
          method: get
  update:
    handler: handler.update
    events:
      - http:
          path: update/{id}
          method: put
  delete:
    handler: handler.delete
    events:
      - http:
          path: delete/{id}
          method: delete
provider defines the AWS provider for your service. It specifies various configuration settings for AWS Lambda functions and other AWS resources.
- name: aws specifies that you are using AWS as your cloud provider.
- runtime: nodejs14.16 sets the runtime for AWS Lambda functions to nodejs14.16
- Service: Specifies the name of the service, in this case, “postgres-crud-api.”
- Provider: Specifies the cloud provider and runtime for your functions. In this case, you’re using AWS as the provider and Node.js 18.x as the runtime.
- Functions: This section defines the AWS Lambda functions that will be part of your service. You have four functions defined: create, read, update, and delete.
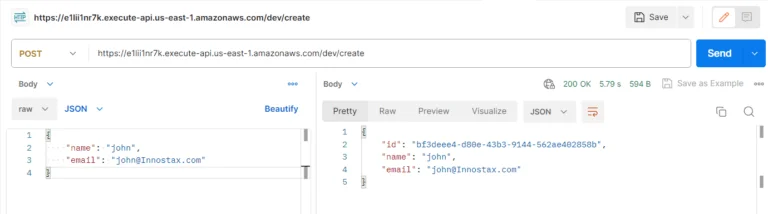
- Create: This function creates data and is linked to an HTTP POST request at the /create endpoint. The code executed when this endpoint is hit is within the handler.create function.
- Read: This function reads data and is linked to an HTTP GET request at the /read endpoint. The code executed when this endpoint is hit is within the handler.read function.
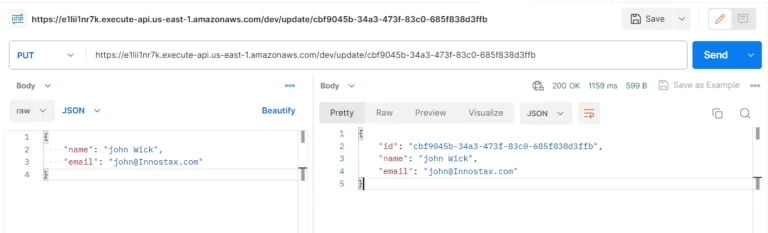
- Update: This function updates data and is linked to an HTTP PUT request at the /update/{id} endpoint, where {id} serves as a placeholder for the identifier of the data you intend to update. The code executed when this endpoint is hit is within the handler.update function.
- Delete: This function deletes data and is associated with an HTTP DELETE request at the /delete/{id} endpoint, where {id} serves as a placeholder for the identifier of the data you wish to delete. The code executed when this endpoint is hit is within the handler.delete function.
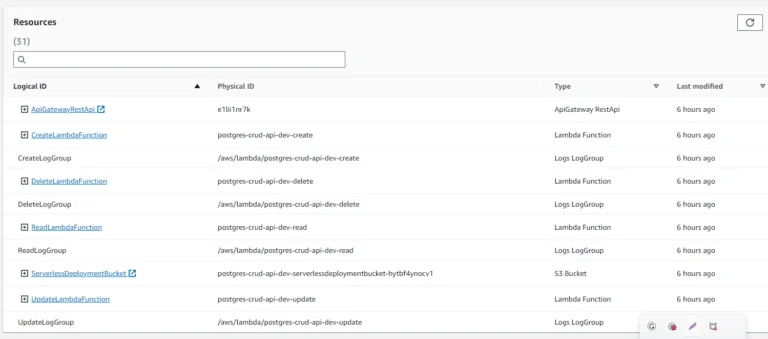
How to Deploy the JavaScript Function
You can use the command below to deploy the microservice on AWS:After a while, the deployment will be completed and you can see information like the endpoint, hosted on API Gateway, to trigger the function you just deployed.
sls deployApplications

Functions

Resources
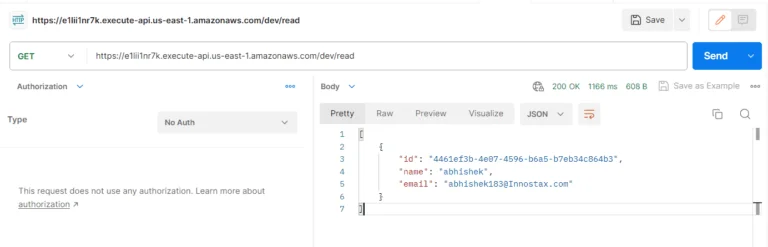
How to Test the API
From the deployment, you have a single function named firstFunction, and a single HTTP GET endpoint.
You can call the function by using the GET endpoint, which is generated in the terminal after deploying it, in your browser.
The image above shows the functionality created in the deployed function running in the browser.
command.
Read
Create
Update
Delete

Common Deployment Mistakes to Avoid
A handful of mistakes come up often enough in real Serverless Framework projects that they’re worth understanding before deploying anything beyond a tutorial project.
Granting overly broad IAM permissions, as briefly noted earlier, is one of the most common issues. It’s tempting to attach a broad policy during initial setup just to get a project working without fighting permission errors, but a production Lambda function should generally only be granted the specific permissions it actually needs — reading from one particular database, writing to one particular queue — rather than broad access across an entire AWS service. The security risk isn’t hypothetical: a function with excessive permissions becomes a much more valuable target if it’s ever compromised through an unrelated vulnerability, since an attacker who gains control of the function inherits whatever access it was granted.
Ignoring function timeout and memory configuration is another frequent oversight. AWS Lambda functions have a default timeout and memory allocation that work fine for simple examples but often aren’t well suited to real workloads. A function handling a database query, like the ones defined earlier in this guide, needs enough time and memory to reliably complete that query, including realistic worst-case scenarios like a slow network connection to the database — not just the time it takes under ideal test conditions.
Deploying without separate environments for development, staging, and production is a mistake that tends to cause real problems down the line. The Serverless Framework supports deploying to distinct named stages, which keeps testing and experimentation from ever touching production data or production infrastructure. Skipping this and testing directly against a single production deployment is a common shortcut early on that becomes increasingly risky as an application handles real user data.
Finally, insufficient error handling and logging — beyond the basic try/catch blocks shown in the handler functions earlier in this guide — tends to make debugging production issues far harder than it needs to be. Logging enough context around a failure, without logging sensitive data like full user records or credentials, is worth deliberately designing for rather than treating as an afterthought once something has already gone wrong in production.
Managing Environment Variables
Environment variables are often used in serverless apps for the database connection string, API keys, and configuration information. It is important to keep these values out of the code for ease of configuration of the application.
For example, the database connection string is already stored in the .env file:
DATABASE_URL=”postgresql://<username>:<password>@<hosted dbURL>:5432/mydb?schema=public”
In lieu of explicitly coding sensitive values in the application code, they can be specified in the Serverless Framework configuration settings.
For example:
provider:
name: aws
runtime: nodejs18.x
environment:
DATABASE_URL: ${env:DATABASE_URL}
The environment variable is accessible to the application through the Lambda function as follows:
const databaseUrl = process.env.DATABASE_URL;
The environment variable is available to the program by utilizing the Lambda function as follows:
const databaseUrl = process.env.DATABASE_URL;
Furthermore, with the use of environment variables, it becomes easier to create varied configurations depending on the development environment, testing environment, and production environment.
It is very important that the sensitive information like database password is not included in the repository directly.
Lambda Function Monitoring Using AWS CloudWatch
Once the serverless application starts operating, it becomes necessary to monitor the Lambda functions for their performance issues and others.
Lambda function is automatically connected to Amazon CloudWatch and there you will find logs about the performance of your function.
Example of adding logging to Lambda function:
module.exports.read = async () => {

  try {

    console.log("Fetching users");

    const users = await prisma.Users.findMany();

    console.log("Users fetched successfully");

    return {

      statusCode: 200,

      body: JSON.stringify(users),

    };

  } catch (error) {

    console.error("Failed to fetch users:", error);

    return {

      statusCode: 500,

      body: JSON.stringify({

        error: "Failed to fetch users",

      }),

    };

  }

};
Such logs can be analyzed using CloudWatch Logs.
The following problems can be diagnosed by developers using CloudWatch:
- Lambda execution errors
- Function timeouts
- Slow-running functions
- Unexpected application behavior
- Frequent function failures
As an example, when the API returns a 500 error, then it might be necessary for the developers to look at the logs associated with the particular Lambda in CloudWatch.
Lambda monitoring helps get more information about the serverless app in production.
Conclusion
Serverless computing represents a dynamic paradigm for crafting and launching cloud-native applications. Throughout this guide, we’ve dived into the vast potential of serverless computing and illustrated the process of constructing and deploying serverless applications using the Serverless Framework and AWS.

You’ve embarked on your serverless journey, commencing with the setup of your development environment and progressing to the deployment of a fundamental JavaScript function, powered by AWS Lambda. Along this path, we’ve imparted knowledge about monitoring and logging through AWS CloudWatch.