
- 1 The Importance of Unit Testing: Unit testing helps to detect the bugs at an early stage of the application development, hence provides the necessary confidence on code quality and maintainability. It promotes modularity and scalability of the codes as it creates the foundation for surety in modifying the codes which in extension devaluates the quality of the software being developed.
- 2 JUnit in Java Testing: JUnit is a core reliable testing tool for Java and makes test creation and execution quite easy. This is why JUnit has annotations and assertions that guarantee code purity besides making it possible to automate the testing and to detect the existing defects within a short span of time.
- 3 Advanced Testing Techniques: In addition to such basics, usage of things, such as parameterized tests, Mockito for mocking, and test suites in JUnit maximizes test coverage, reduces the range of necessary dependencies, and most importantly, helps create targeted, well-structured testing.
Unit testing is a crucial practice in software development, serving as the bedrock for ensuring code reliability, maintainability, and overall system robustness. By isolating and testing individual units or components of code in isolation, developers can identify and fix bugs early in the development process, preventing them from cascading into more complex issues later on. Unit testing creates a safety net, enabling developers to confidently make changes or additions to the codebase, knowing that they do not compromise existing functionalities.
It promotes a modular and scalable approach to development, fostering code that is not only error-free but also adaptable to evolving project requirements. In essence, unit testing is an integral part of the software development lifecycle, contributing significantly to code quality, reducing the likelihood of defects, and ultimately enhancing the overall reliability of software applications.
Java testing landscape and the role of JUnit
JUnit, a robust Java testing framework, ensures software reliability. It’s fundamental for unit testing, providing structure and efficiency. Beyond code verification, JUnit automates testing, swiftly detects defects, and maintains code integrity. This introduction sets the stage for exploring unit testing art. JUnit, with annotations and assertions, becomes crucial for robust Java apps.

Understanding Unit Testing
Unit Testing
In unit testing, developers test individual units or components of a software application in isolation, forming a key part of the software testing methodology. A “unit” refers to the smallest testable part of an application, such as a function, method, or procedure. The primary objective is to validate that each unit performs as intended, ensuring that the individual parts of the codebase function correctly on their own.
Purpose for Unit Testing
The purpose of unit testing is to validate the correctness of each unit of code in isolation. This methodology serves several key purposes in the software development process:
JUnit stands as a cornerstone in the Java testing landscape, widely embraced for its simplicity, efficiency, and robust features. This testing framework is specifically tailored for Java, offering a structured and standardized approach to unit testing. Its popularity stems from its ease of integration, versatility, and the comprehensive support it provides for creating and executing tests.

Early Bug Detection
Unit testing helps identify and address bugs or defects in the code early in the development cycle, reducing the cost and complexity of fixing issues later in the process.

Code Refactoring
Unit tests provide a safety net for developers to refactor or modify existing code with confidence. If a change introduces a regression, the associated unit test will fail, signaling that the modification has affected the expected behavior.

Facilitates Continuous Integration
Unit tests are often integrated into continuous integration pipelines, allowing for automated and frequent testing. This ensures that changes made to the codebase do not introduce unintended side effects or break existing functionality.

Enhances Code Quality
The practice of writing unit tests encourages developers to create modular, loosely coupled, and easily maintainable code. It promotes adherence to best coding practices and design principles.
Explanation of Annotations and Assertions in JUnit:
- Annotations:
- @Test: The fundamental annotation marking a method as a test case. JUnit runs methods annotated with @Test and considers them as individual test cases.
- @Before and @After: Annotations used to denote methods that are executed before and after each @Test method, facilitating setup and cleanup operations.
- @BeforeClass and @AfterClass: Annotations marking methods that run once before and after all test methods in a class. Useful for one-time setup or teardown tasks.
- Assertions:
- assertEquals(expected, actual):This assertion compares the expected and actual values, triggering a failure if they are not equal.
- assertTrue(condition): Checks if the given condition is true; the test fails if the condition is false.
- assertFalse(condition): This assertion verifies that the specified condition is false; the test fails if the condition is true.
- assertNotNull(object): This assertion asserts that the provided object reference is not null.
- assertNull(object): Asserts that the provided object reference is null.
- assertSame(expected, actual): Ensures that the expected and actual references point to the same object.

Writing Your First Unit Test
Step 1: Setup for JUnit Testing
Open your Java Integrated Development Environment (IDE) of choice (e.g., IntelliJ, Eclipse, or Visual Studio Code). Create a new Java project or open an existing one.
Step 2: Add JUnit to the Project
Include the JUnit library in your project. For Maven projects, add the JUnit dependency to the pom.xml file. For other build tools or manual setups, download the JUnit JAR files and add them to your project’s classpath.
Step 3: Create a Test Class
Right-click on the source folder or package where you want to create the test class. Choose “New” > “Java Class” and name the class with a Test suffix, e.g., MyClassTest.
Step 4: Annotate the Test Class
Add the @RunWith annotation to specify the JUnit runner. The default is BlockJUnit4ClassRunner
import org.junit.runner.RunWith;
import org.junit.runners.JUnit4;

@RunWith(JUnit4.class)
public class MyClassTest {
    // Test methods will go here
}
Step 5: Write Test Methods
Add methods annotated with @Test to represent individual test cases.
import org.junit.Test;

public class MyClassTest {
    @Test
    public void testAddition() {
        // Test logic goes here
    }
}
Step 6: Add Assertions
Inside each test method, use JUnit assertions to validate expected outcomes.
import static org.junit.Assert.assertEquals;

public class MyClassTest {
    @Test
    public void testAddition() {
        int result = MyClass.add(2, 3);
        assertEquals(5, result);
    }
}
Step 7: Run the Tests
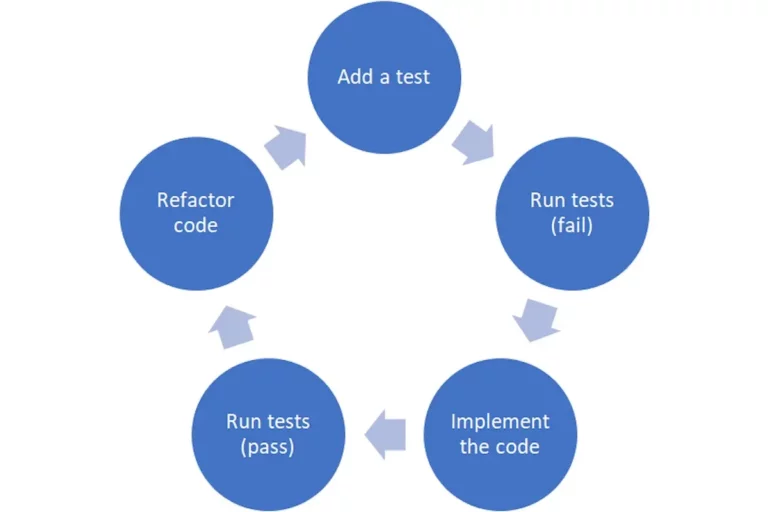
Right-click on the test class or individual test methods. Select “Run” to execute the tests. Observe the test results in the IDE’s test runner. Green indicates successful tests, while red signifies failures or errors. Inspect the output to identify specific issues in failed tests.
Beyond JUnit: Advanced Unit Testing Techniques
1. Parameterized Tests
- Parameterized tests in JUnit provide a powerful mechanism to run the same test logic with multiple sets of input values, enabling developers to enhance test coverage and identify potential issues across a range of scenarios. Instead of writing separate test methods for each input variation, parameterized tests use annotations such as
@ParameterizedTestto specify input parameters, and the test logic is executed iteratively for each parameterized set. - This approach streamlines the testing process, promotes code reusability, and ensures that the functionality under test behaves consistently across diverse inputs. By leveraging parameterized tests, developers can achieve a more thorough validation of their code, leading to robust and reliable software that handles a variety of scenarios gracefully
2. Mocking with Mockito
Mockito for Mock Objects in Unit Tests
- Mockito is a popular Java framework used for creating and managing mock objects in unit tests. Mock objects are simulated representations of real objects, allowing developers to isolate and test specific components without relying on the entire system. Mockito simplifies the process of creating these mocks and provides a set of tools for defining their behavior and verifying interactions.
- In unit testing, developers often encounter scenarios where testing an object involves collaborating with other objects. Mockito comes into play by creating mock versions of these collaborators, ensuring that tests focus on the target object’s behavior without invoking actual dependencies. This introduction sets the stage for understanding how Mockito facilitates the creation and management of mock objects, enhancing the effectiveness and efficiency of unit testing practices.
Implementing Mock Behavior and Verifying Interactions with Mockito
Mockito offers a straightforward syntax for defining the behavior of mock objects and verifying their interactions with the tested components. Key concepts include:
- Mock Creation: Use
Mockito.mock()to create a mock object for a given class or interface.
MyService myServiceMock = Mockito.mock(MyService.class);
- Mock Behavior: Define the behavior of mock methods using
when()andthenReturn()orthenThrow()constructs.
when(myServiceMock.someMethod()).thenReturn(expectedResult);
- Stubbing Multiple Calls: For methods called multiple times, specify different return values for each invocation.
when(myServiceMock.someMethod())
    .thenReturn(firstResult)
    .thenReturn(secondResult);
- Verifying Interactions: Use
verify()to confirm if a specific method was called on the mock object.
verify(myServiceMock).someMethod();
- Matching Arguments: Mockito provides various argument matchers (e.g.,
any(),eq()) to match method arguments during verification.
verify(myServiceMock).someMethod(eq(expectedArgument));
Mockito aids in managing dependencies, simulating scenarios for focused component behavior. It fosters isolated testing, defect identification, and unit reliability within software systems.
3. Test Suites and Categories
Creating test suites in JUnit allows developers to group related tests and categorize them for selective execution, providing a structured approach to managing and organizing test cases. Test suites are particularly useful when dealing with larger codebases where tests can be logically grouped based on functionalities or components. In the following code snippet, a test suite is created using @RunWith and @Suite annotations, where individual test classes are included. Additionally, the @Category annotation is employed for categorizing tests, allowing developers to execute specific groups of tests based on their designated categories. This approach enhances test organization, improves code readability, and facilitates targeted testing.
Conclusion
In conclusion, unit testing stands as a cornerstone in the pursuit of maintaining code quality, offering developers a robust mechanism for early bug detection, code documentation, and facilitating seamless code modifications. By systematically validating individual units, developers can fortify their codebase against potential issues, ensuring a resilient foundation for larger software systems. This practice not only elevates the reliability of the software but also instills confidence in developers to navigate complex code with agility. It becomes an integral part of a proactive approach toward software development, fostering a culture of excellence and continuous improvement.
To truly harness the power of unit testing, developers are encouraged not only to embrace fundamental practices but also to explore advanced techniques beyond JUnit. Leveraging tools like Mockito for effective mock object creation, diving into parameterized tests to cover diverse input scenarios, and integrating testing into continuous integration pipelines propels testing efforts to new heights. As developers delve into these advanced techniques along with Assertion, they not only enhance their ability to write effective tests but also deepen their understanding of code behavior in various contexts.
Common Unit Testing Mistakes and How to Avoid Them
Writing unit tests is easy. Writing tests that truly find bugs and remain useful as a changes is a different skill. Several common mistakes appear often in projects so it is worth learning about them before they become habits.
Testing implementation details of behavior is probably the most common trap. It is tempting to write a test that checks how a method does something inside but tests written this way break every time the implementation changes, even when the actual behavior stays correct. Focusing tests on inputs and expected outputs, than internal mechanics means refactoring code does not require rewriting the tests along with it.
Writing tests that depend on the order they run is another problem that often shows up at the possible moment. A test suite that only passes when tests run in a sequence usually means one test is leaving behind state that another test relies on. This could be a field, a shared mock or leftover data, from previous runs. Every test should set up its environment and clean up after itself. It’s important to use @After methods intentionally instead of assuming the test environment starts fresh every time.
Over-mocking is another danger. Mockito makes it easy to mock anything but a test that mocks too much of its surrounding context no longer tests real interactions between components. It does not give confidence even if it passes reliably. Mocking external dependencies, such as a database or a network call makes sense. Mocking internal collaborators that could just be used directly often does not help.
Skipping edge cases in favor of testing the happy path leaves real gaps in coverage. Parameterized tests, mentioned earlier are especially good for closing this gap because they let you check conditions, null inputs and unexpected values together with the usual case without writing a separate method for each one.
Finally letting test suites grow slowly without addressing it quietly erodes a teams testing discipline over time. If a full test run takes enough that developers start skipping it before commits the safety net that unit testing is supposed to provide stops working as intended. Keep unit tests fast by mocking external calls and avoiding real I/O and reserve slower integration‑style tests for a separate suite. This keeps the fast feedback loop that makes unit testing valuable, in the place.