

- 1 Leverage Apex to integrate Gladly tasks seamlessly into your workflow by creating robust wrapper classes and handling API requests efficiently, boosting productivity through automated task management.
- 2 Utilize POST API endpoints to manage tasks in Gladly, including task creation and assignment, by defining a structured request body and integrating necessary parameters such as due dates and customer details.
- 3 Implement error handling and customization in your Apex methods for task creation, ensuring smooth integration with Gladly's API while tailoring the solution to specific needs like rescheduling appointments and managing tasks.
Examine how Gladly task creation with Apex code integration can help you make your processes more efficient. Streamline your workflows and improve your application’s functionality with Innostax.
Why This Integration Matters
Let’s be honest for a second. Integrating third-party customer service platforms into a massive Salesforce instance can feel like solving a Rubik’s cube blindfolded. There are countless endpoints to manage. Authentication tokens need rotating. JSON schemas need constant validation.
When I first started working with the Gladly API, I bounced constantly between their documentation and my developer console. I was trying to figure out the best way to architect the connection — without creating a fragile mess of spaghetti code. The good news? Once you understand the core patterns, it becomes intuitive and powerful.
It’s About the Agent Experience, Not Just the Data
Here’s a mindset shift many developers need to make. You aren’t just writing code to move data from point A to point B. You’re actively designing the daily experience for dozens — maybe hundreds — of customer service agents.
If your Apex integration is slow, throws silent errors, or forces agents to double-check data across two systems, you haven’t solved the problem. The real goal is invisible automation. When an agent clicks a button in Salesforce, or a trigger fires, a Gladly task should appear instantly. It should already have the right context — with no agent ever needing to think about the HTTP requests happening behind the scenes.
Why Task Management Matters More Than Ever
Efficient task management is the linchpin of productivity today. Gladly is a capable task management platform that opens new doors through its robust API. This guide walks through creating Gladly tasks using Apex — Salesforce’s core programming language. Whether you’re an experienced developer or just starting out, this tutorial will help you get the most out of Gladly.
If you’ve ever been buried under support tickets, customer inquiries, and internal follow-ups, you already know: a reliable task system isn’t optional. Customer service tools have come a long way. We’ve moved from email chains and sticky notes to smart, API-first platforms. Gladly stands out because it treats customers as people — not just ticket numbers.
To unlock Gladly’s full power alongside Salesforce, you need these two systems talking to each other smoothly. That’s where Apex comes in.
What is a Gladly Task?
A task is how you create and track internal follow-up work for a customer inside Gladly. Every task includes:
- A due date
- An assignee
- A description of what’s needed
- The ability to add comments
Tasks can be created two ways: through the Gladly dashboard, or through the API.
Think of a Gladly task like a digital sticky note that never gets lost. It always alerts the right person at the right time — and carries the customer’s full history with it.
Why Manual Task Creation Doesn’t Scale
Imagine an agent on a call with a frustrated customer who needs a specialized technical review. The agent can’t put them on hold for three hours. Instead, they create a task. It gets routed automatically to a tier-2 inbox, assigned an SLA deadline, and tagged with useful metadata.
This works fine for a handful of interactions. But once your business handles thousands of customer journeys a day, manual task creation becomes a serious bottleneck. That’s why automating task creation from your backend is a game-changer for operational efficiency.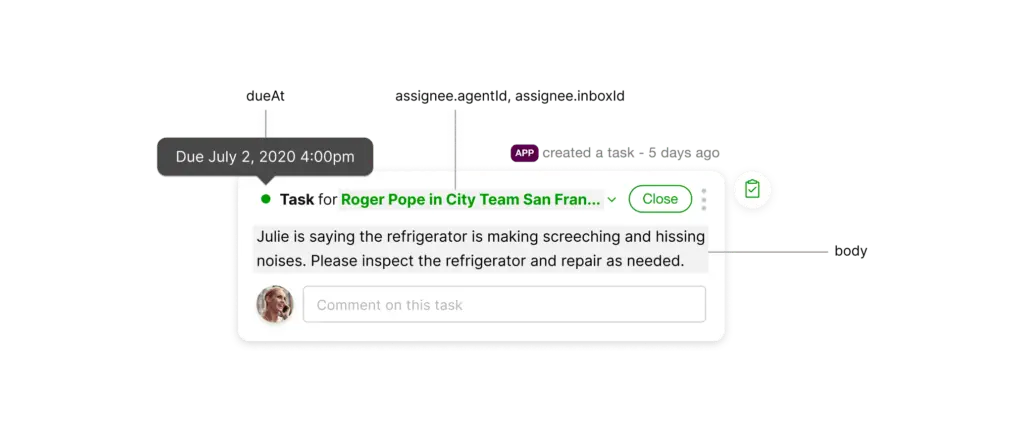
How to create a Gladly task?
To add a task to a customer’s timeline, you send a POST request with identifying customer information. If the customer doesn’t already exist, Gladly creates a new profile automatically.
In this guide, we’ll use Apex to create Gladly tasks through the POST API endpoint.
Understanding the POST Request
Before diving into code, it helps to understand how REST APIs work. A POST request is essentially a digital envelope containing instructions and data, formatted as JSON.
When Salesforce sends this envelope to Gladly, it’s saying: “Here’s the information — please create a task record, and let me know if it worked.”
Gladly handles missing data gracefully. If you assign a task to an email Gladly has never seen, it won’t throw an error and crash your process.
Instead, it creates a stub customer profile on the fly and attaches the task to it. This one feature saves developers hours of writing “check if customer exists, then create them, then get the ID, then create the task” boilerplate.
1. REQUEST BODY SCHEMA: application/json
Understanding the precise JSON schema required by an external API is arguably the most critical step in integration development. If your keys are misspelled, if you pass a string where an integer is expected, or if your date-time strings are not formatted exactly like ISO 8601, the receiving server will reject your request. Let’s take a close look at the required payload structure for a Gladly task.
{
  "id": "pOVVdzweSumI4bFxjlT8LA",
  "assignee": {
    "inboxId": "NFpDZtfqhk2pI6fjaVDlFf",
    "agentId": "zGaHXjD4SR-moMR9LbULDa"
  },
  "body": "Create task to reschedule appointment",
  "dueAt": "2020-03-15T06:13:00.125Z",
  "customer": {
    "emailAddress": "michelle.smith@example.org",
    "mobilePhone": "+16505551987"
  }
}
id
String <= 50 characters
Specifies the id of the task
assignee
required
object (Assignee)
Inbox and agent assignee for a task
body
required
string <= 10000 characters
Text to describe what task to complete. Constrained HTML Rich Content is supported.
dueAt
required
string <RFC3339>
Time when the task will be due. This must be set to a time in the future.
Customer
required
object (Customer Specification)
Specifies the customer a task belongs to. You must provide exactly one of the values.Notice how the schema strictly specifies an RFC3339 formatted date string for the ‘dueAt’ field; this is a common pitfall for many Salesforce developers as Apex handles date-times slightly differently internally. You will need to make sure that whatever DateTime object you generate in Salesforce is correctly serialized into this exact string before transmitting the payload. The ‘assignee’ object illustrates how tasks can be flexibly routed to either a general team inbox or directly to a specific agent’s personal queue, giving you granular control over workload distribution directly from your Apex code.
2. Let’s Create some Apex Wrapper Classes for Task Management
While you could technically construct your JSON payload by manually concatenating strings, I strongly advise against it. Manual string concatenation is highly prone to syntax errors, escaping issues, and makes your code incredibly difficult to read and maintain. The absolute best practice in Salesforce development is to use strongly-typed Apex Wrapper Classes. By defining classes that mirror the expected JSON structure you can leverage JSON.serialize() method to do all the heavy lifting for you.
 public class TaskWrapper {
        public String id;
        public AssigneeWrapper assignee;
        public String body;
        public DateTime dueAt;
        public CustomerWrapper customer;


        public TaskWrapper(String id, AssigneeWrapper assignee, String body, DateTime dueAt, CustomerWrapper customer) {
            this.id = id;
            this.assignee = assignee;
            this.body = body;
            this.dueAt = dueAt;
            this.customer = customer;
        }
    }


    public class CustomerWrapper {
        public String emailAddress;


        public CustomerWrapper(String email) {
            this.emailAddress = email;
        }
    }


    public class AssigneeWrapper {
        public String inboxId;
        public String agentId;


        public AssigneeWrapper(String inboxId) {
            this.inboxId = inboxId;
        }
        public AssigneeWrapper(String inboxId, String agentId) {
            this.inboxId = inboxId;
            this.agentId = agentId;
        }
    }
These wrapper classes are elegant and self-documenting. By using overloaded constructors (like we did with the AssigneeWrapper class), you give yourself the flexibility to instantiate these objects in different ways depending on your specific business logic. If you only know the inbox ID, you can use the single-parameter constructor. If you know both the inbox and the specific agent, you use the two-parameter constructor. This keeps your main execution logic clean and concise, pushing the structural complexity down into these blueprint classes.
3. Create a method to construct the request body with required parameters.
Now that we have our data structures constructed, it is time to put them to work. The following method acts as the orchestrator. It gathers the dynamic inputs (like the customer’s email and appointment dates), formats a rich HTML string for the task body, instantiates our newly created wrapper classes, and finally passes the fully assembled object down the chain to be transmitted.
 public static void createTaskToRescheduleAppointment(String customerEmail, String previousDate, String newDate) {
        String taskBody =
             '<strong>Appointment Rescheduled:</strong> <br>Your appointment has been rescheduled to ' +
             newDate +
             ' from <strong>' +
             previousDate+
             '</strong>.<br/>';

         try {
             // Implement logic to get the inbox ID according to your needs.
             String inboxId = getInboxId();

            AssigneeWrapper assignee = new AssigneeWrapper(inboxId);
            CustomerWrapper customer = new CustomerWrapper(customerEmail);

            // Either Create a method to get the dueAt date for the new task or use any value directly for the due date according to your requirement.
             DateTime dueAt = getRescheduleDueDate();

            TaskWrapper task = new TaskWrapper(null, assignee, taskBody, dueAt, customer);

            createTask(task);
         } catch (Exception e) {
             // handle the catch block according to your requirement.
         }
     }
Notice the try-catch block wrapping execution logic. In enterprise sf environments, robustness is key. When dealing with external API callouts, things will inevitably go wrong at some point. The external server might be down, the network connection might time out, or the authentication token might expire. By encapsulating your logic in a try-catch block you ensure that a failure in this background task creation does not crash the entire Salesforce transaction, potentially disrupting a user’s workflow or corrupting related database records.
4. Create the createTask method to handle the post request.
This is where the magic finally happens. The actual HTTP call is constructed and executed here. We take our elegant Apex wrapper object and use Salesforce’s native JSON serialization to instantly convert it into a perfectly formatted JSON string, set our headers, and fire it off into the ether towards Gladly’s servers.
public static void createTask(TaskWrapper task) {
    if (task != null) {
        createTaskOnGladly(task);
    }
}

private static HttpResponse createTaskOnGladly(TaskWrapper gladlyTaskWrapper) {
    String requestBody = JSON.serialize(gladlyTaskWrapper);
    String GLADLY_ENDPOINT = '<organization>.gladly.com/api/v1/tasks';

    HttpRequest req = new HttpRequest();
    req.setEndpoint(GLADLY_ENDPOINT);
    req.setMethod('POST');
    req.setHeader('Content-Type', 'application/json;charset=UTF-8');
    req.setBody(requestBody);

    HttpResponse response = (new Http()).send(req);

    // Get the status code of the API request and handle additional features
    if (response.getStatusCode() == {Status Code to check}) {
    }

    return response;
}
An extremely important detail in this code snippet is the setup of the HttpRequest headers. Setting the ‘Content-Type’ to ‘application/json;charset=UTF-8’ is absolutely mandatory. If you forget this line, the receiving server will likely interpret your carefully crafted JSON string as plain text and reject it with a 400 Bad Request error. Furthermore, always remember to handle the HttpResponse object carefully. Checking the status code allows your code to verify if the creation was actually successful (usually a 201 Created status), allowing you to log any error messages returned by Gladly if something went wrong, making debugging easier down the road.
Conclusion
Before wrapping up, it’s worth appreciating how much boilerplate these few dozen lines of Apex save your team. We’ve built a standardized, structured way to turn internal Salesforce events into actionable Gladly tasks. By using strongly-typed wrapper classes and native JSON serialization, you dramatically reduce the risk of malformed payloads breaking your production pipeline.
This guide has walked through how Apex simplifies Gladly task creation. With these tools, you can integrate Gladly into your workflow and get the most from Apex’s capabilities. As you apply these techniques, you’re not just writing code — you’re building a more efficient work environment. Here’s to unlocking the synergy between Apex and Gladly, with a productivity boost powered by Innostax.
Bridging a robust CRM like Salesforce with a modern platform like Gladly is what separates good engineers from great ones. Mastering these integration techniques cuts down on manual data entry, freeing your agents to focus on what matters most: helping customers.
Don’t be afraid to build on this foundation. Try expanding your wrapper classes to support custom attributes, dynamic SLAs, or automated tagging based on Salesforce triggers. Once your core connectivity is in place, the possibilities for process optimization are wide open.