

Container image support in Lambda solves a real problem, dependency size limits and inconsistent local testing, but it comes with trade-offs around cold start latency and image size discipline that traditional ZIP-based Lambda deployments don’t have. Getting this right means understanding the Lambda Runtime Interface Client, keeping images lean, and knowing when a container image is actually the right call versus overkill for a simple function.
- 1 Enhanced Development Efficiency: Through Dockerizing the Lambda functions, developers are able to mimic the environment in the LAMBDA locally, which makes the development process to be faster, debugging to be easier and in most of the cases a developer has more control with the environment where the application will be run.
- 2 Versatile Integration: This technique complements a vast spectrum of services; from healthcare to finance, mobile application development and QA testing with an unerring foundation to development and deployment.
- 3 Improved Flexibility and Security: The luggage of writing Lambda function code using Docker containers results in consistency, security, and flexibility and is beneficial to a custom software service, enterprise development, offshore development.
Overview
A Dockerized Lambda function packages a serverless app into a Docker container. This gives developers more control over the environment their code runs in.
Normally, AWS Lambda runs your code on managed infrastructure you don’t control directly. Dockerizing it changes that. You can:
- Replicate the Lambda runtime environment on your own machine
- Speed up development
- Debug issues more easily, before deploying anything
This approach is especially useful for teams building complex applications — for example, in healthcare, fintech, or other regulated industries where a consistent, testable environment matters.
Planning Your Dockerized Lambda
Here’s the high-level plan:
- Create your application files and a Dockerfile.
- Create an ECR repository, build your Docker image, and push it to ECR.
- Create a Lambda function from that ECR image.
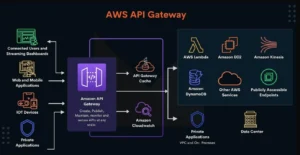
- Set up triggers for the Lambda function using AWS API Gateway.
- Deploy and test your APIs.
Let’s walk through each step.
Step 1: Create Application Files and a Dockerfile
Start with an index.js file that follows the standard Lambda function structure. Use the event object to read the request’s path, protocol, and HTTP method (GET, POST, PATCH, DELETE).
Your Dockerfile needs to copy files into /var/task/, since that’s where AWS Lambda expects them. Here’s a sample:
FROM public.ecr.aws/lambda/nodejs:14
COPY index.js package.json package-lock.json /var/task/
RUN npm install --production
CMD ["index.handler"]
Here’s the index.js file. It uses DynamoDB for basic CRUD operations, which keeps the example focused on architecture rather than SQL connection logic.
const AWS = require('aws-sdk');
AWS.config.update( {
  region: 'ap-south-1'
});
const dynamodb = new AWS.DynamoDB.DocumentClient();
const dynamodbTableName = 'product-inventory';
const healthPath = '/health';
const productPath = '/product';
const productsPath = '/products';

exports.handler = async function(event) {
  console.log('Request event: ', event);
  let response;
  switch(true) {
    case event.httpMethod === 'GET' && event.path === healthPath:
      response = buildResponse(200);
      break;
    case event.httpMethod === 'GET' && event.path === productPath:
      response = await getProduct(event.queryStringParameters.productId);
      break;
    case event.httpMethod === 'GET' && event.path === productsPath:
      response = await getProducts();
      break;
    case event.httpMethod === 'POST' && event.path === productPath:
      response = await saveProduct(JSON.parse(event.body));
      break;
    case event.httpMethod === 'PATCH' && event.path === productPath:
      const requestBody = JSON.parse(event.body);
      response = await modifyProduct(requestBody.productId, requestBody.updateKey, requestBody.updateValue);
      break;
    case event.httpMethod === 'DELETE' && event.path === productPath:
      response = await deleteProduct(JSON.parse(event.body).productId);
      break;
    default:
      response = buildResponse(404, '404 Not Found');
  }
  return response;
}

async function getProduct(productId) {
  const params = {
    TableName: dynamodbTableName,
    Key: {
      'productId': productId
    }
  }
  return await dynamodb.get(params).promise().then((response) => {
    return buildResponse(200, response.Item);
  }, (error) => {
    console.error('Do your custom error handling here. I am just gonna log it: ', error);
  });
async function getProducts() {
  const params = {
    TableName: dynamodbTableName
  }
  const allProducts = await scanDynamoRecords(params, []);
  const body = {
    products: allProducts
  }
  return buildResponse(200, body);
}

async function scanDynamoRecords(scanParams, itemArray) {
  try {
    const dynamoData = await dynamodb.scan(scanParams).promise();
    itemArray = itemArray.concat(dynamoData.Items);
    if (dynamoData.LastEvaluatedKey) {
      scanParams.ExclusiveStartkey = dynamoData.LastEvaluatedKey;
      return await scanDynamoRecords(scanParams, itemArray);
    }
    return itemArray;
  } catch(error) {
    console.error('Do your custom error handling here. I am just gonna log it: ', error);
  }
}

async function saveProduct(requestBody) {
  const params = {
    TableName: dynamodbTableName,
    Item: requestBody
  }
  return await dynamodb.put(params).promise().then(() => {
    const body = {
      Operation: 'SAVE',
      Message: 'SUCCESS',
      Item: requestBody
    }
    return buildResponse(200, body);
  }, (error) => {
    console.error('Do your custom error handling here. I am just gonna log it: ', error);
  })
}

async function modifyProduct(productId, updateKey, updateValue) {
  const params = {
    TableName: dynamodbTableName,
    Key: {
      'productId': productId
    },
    UpdateExpression: `set ${updateKey} = :value`,
    ExpressionAttributeValues: {
      ':value': updateValue
    },
    ReturnValues: 'UPDATED_NEW'
  }
  return await dynamodb.update(params).promise().then((response) => {
    const body = { Operation: 'UPDATE',
      Message: 'SUCCESS',
      UpdatedAttributes: response
    }
    return buildResponse(200, body);
  }, (error) => {
    console.error('Do your custom error handling here. I am just gonna log it: ', error);
  })
}

async function deleteProduct(productId) {
  const params = {
    TableName: dynamodbTableName,
    Key: {
      'productId': productId
    },
    ReturnValues: 'ALL_OLD'
  }
  return await dynamodb.delete(params).promise().then((response) => {
    const body = {
      Operation: 'DELETE',
      Message: 'SUCCESS',
      Item: response
    }
    return buildResponse(200, body);
  }, (error) => {
    console.error('Do your custom error handling here. I am just gonna log it: ', error);
  })
}
const errorObj = {apiError : "Might be issue with DB connection JUST TESTING"}
function buildResponse(statusCode, body) {
  if(!body){
    return {
      statusCode: statusCode,
      headers: {
        'Content-Type': 'application/json',
        "Access-Control-Allow-Origin" : "*",
        "Access-Control-Allow-Credentials" : true
      },
      body: JSON.stringify(errorObj)
    }
  }
  else{
    return {
      statusCode: statusCode,
      headers: {
        'Content-Type': 'application/json',
        "Access-Control-Allow-Origin" : "*",
        "Access-Control-Allow-Credentials" : true
      },
      body: JSON.stringify(body)
    }
}
Once your files are ready, generate package.json and package-lock.json. Then build the Docker image locally and run it in a container to confirm everything works.
Step 2: Create an ECR Repository
ECR (Elastic Container Registry) is AWS’s service for storing Docker images. You’ll use it to store the image your Lambda function will run.
- Search for “ECR” in the AWS console and click Create Repository.
- Name your repository and click Create Repository again.
- Your new repo will show up in the repository list.
- Open the repo and find the push commands — you’ll need these to upload your image.
Run the push commands from your terminal (or EC2 instance) in this order:
- Log in to Docker using the first command ECR gives you.
- Build your Docker image.
- Tag the image.
- Push the image to your ECR repo.
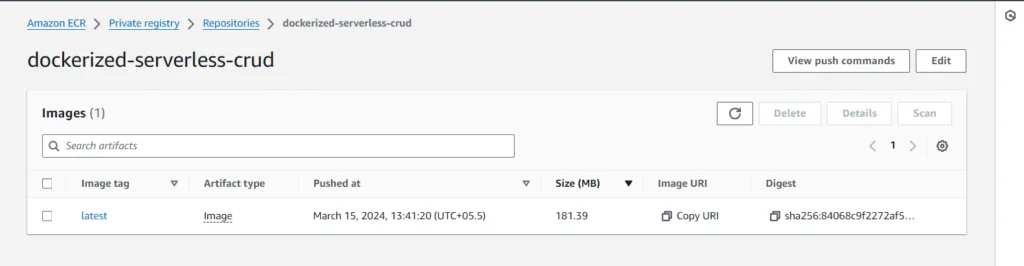
Once complete, you’ll see your image listed in the repository.

- IMG
- Give a name to repository and click “Create Repository”
- The created Repo on ECR will be shown in the list
Now to the repo and you will find the “push commands”. Go through the highlighted/marked buttons as below.
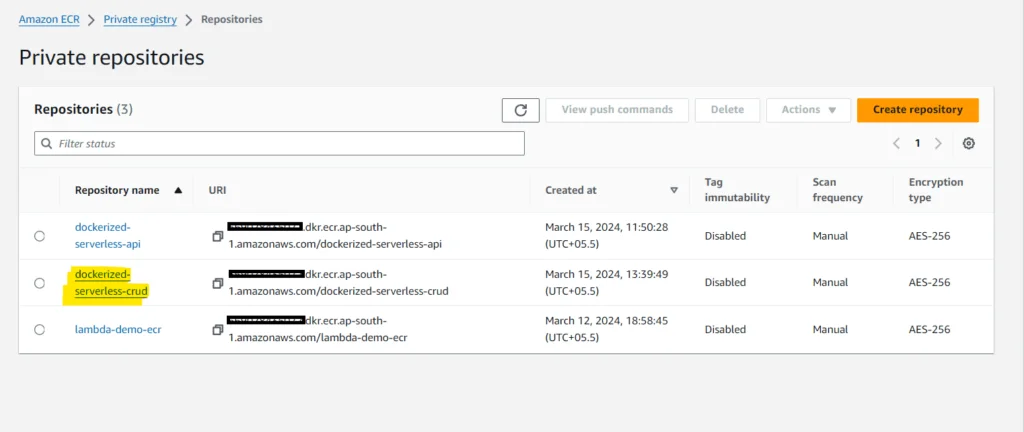
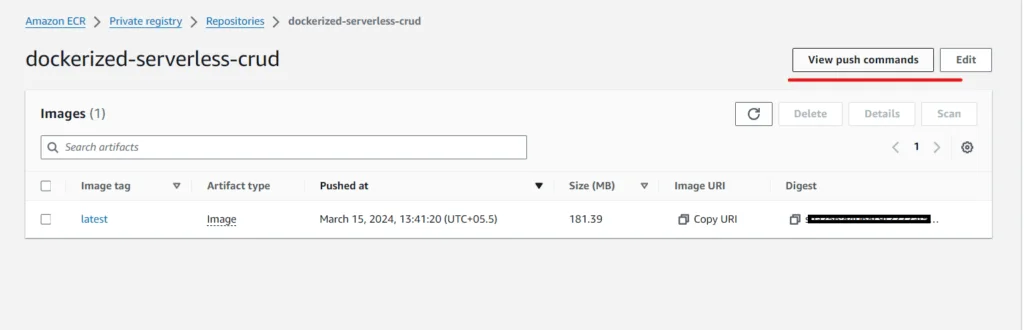

These commands we need to execute when pushing the docker Image to our created repo at ECR.
You can follow the below image to check how files are uploaded on the EC2 and then how the docker image is created.
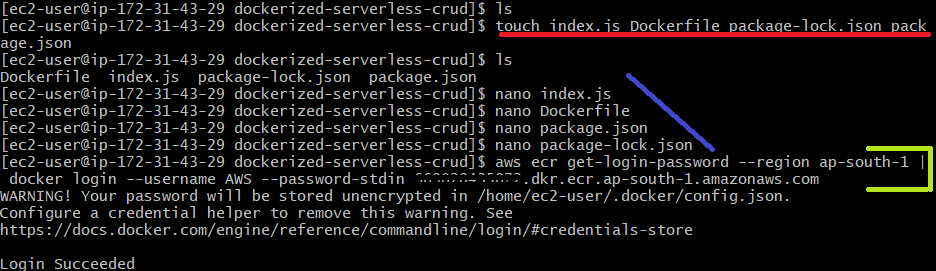
- RED LINE : Creating file in the directory
- BLUE LINE : Writing content in the files
- YELLOW LINE : Executing the first push command we got from ECR. For login into the docker.
Now we will be executing rest of the push commands as given by ECR

Now our image is pushed on our ECR repo, as shown below
Step 3: Create a Lambda Function from the ECR Image
- Go to AWS → Lambda → Create Function.
- Select Container image.
- Name your function. (Tip: match this name to your ECR repo name for consistency.)
- Paste in the Image URI from your pushed ECR image.
- Click Create Function.
Once it’s created, open the function and click Test to confirm it runs correctly.
If the test passes, you’re ready to connect it to API Gateway.
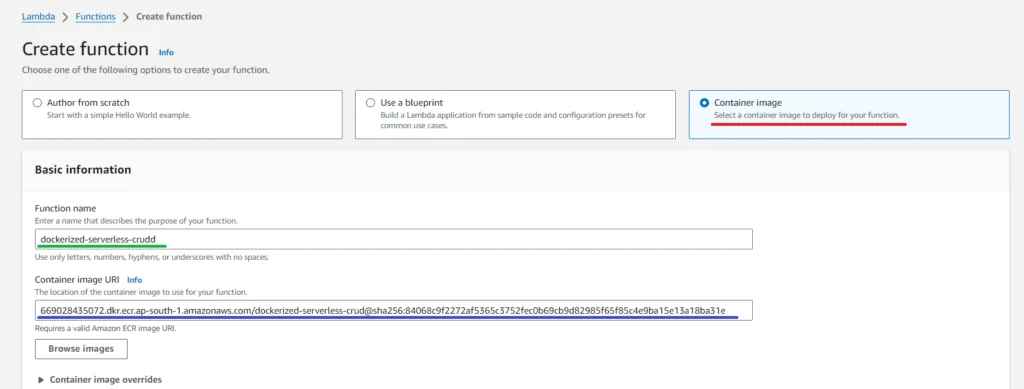
- RED LINE : Select container image.
- GREEN LINE : Give a name to the function (Remember that name of lambda should match with the name of REPO)
- BLUE LINE : Paste the Image URI from the ECR Repo pushed image.
And then click on create function
Go the Lambda Function created and Click on test to check if its working fine :
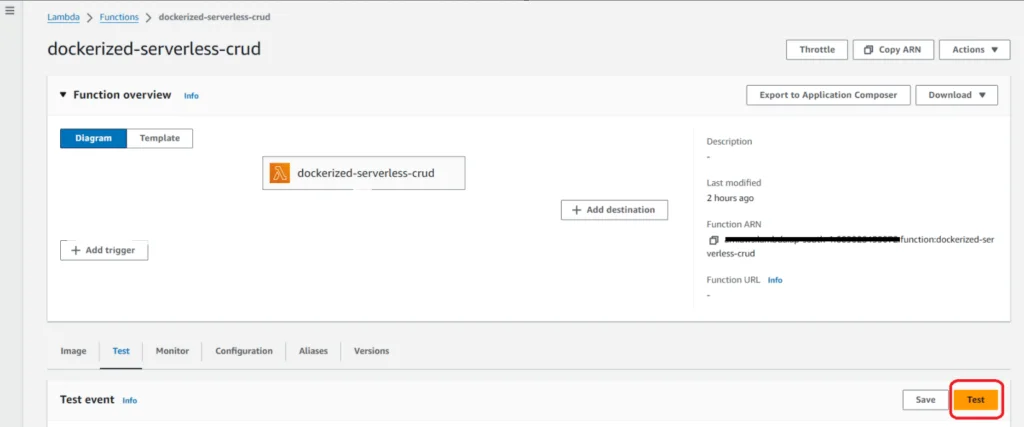
If everything works fine, lets go and create trigger for this lambda from API gateway.
Step 4: Create a Trigger with API Gateway
- Go to API Gateway → Create API → REST API.
- Name your API and click Create API.
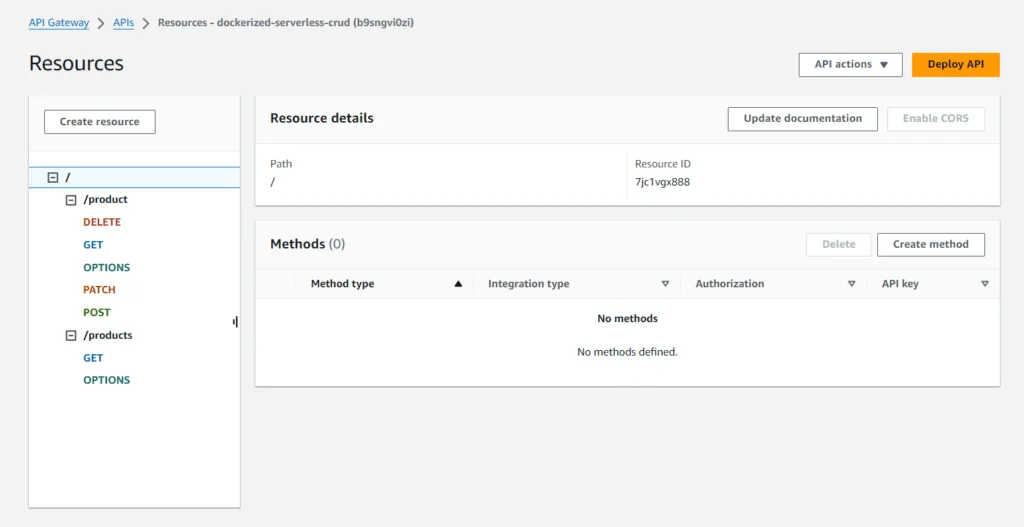
- Create resources matching the paths used in your
index.jsfile. For example, this guide uses/productsand/product. - Add methods for each resource:
/products→ GET/product→ GET, POST, PATCH, DELETE
Important: Turn on Lambda Proxy Integration. This avoids the need to manually map the event object in your code.
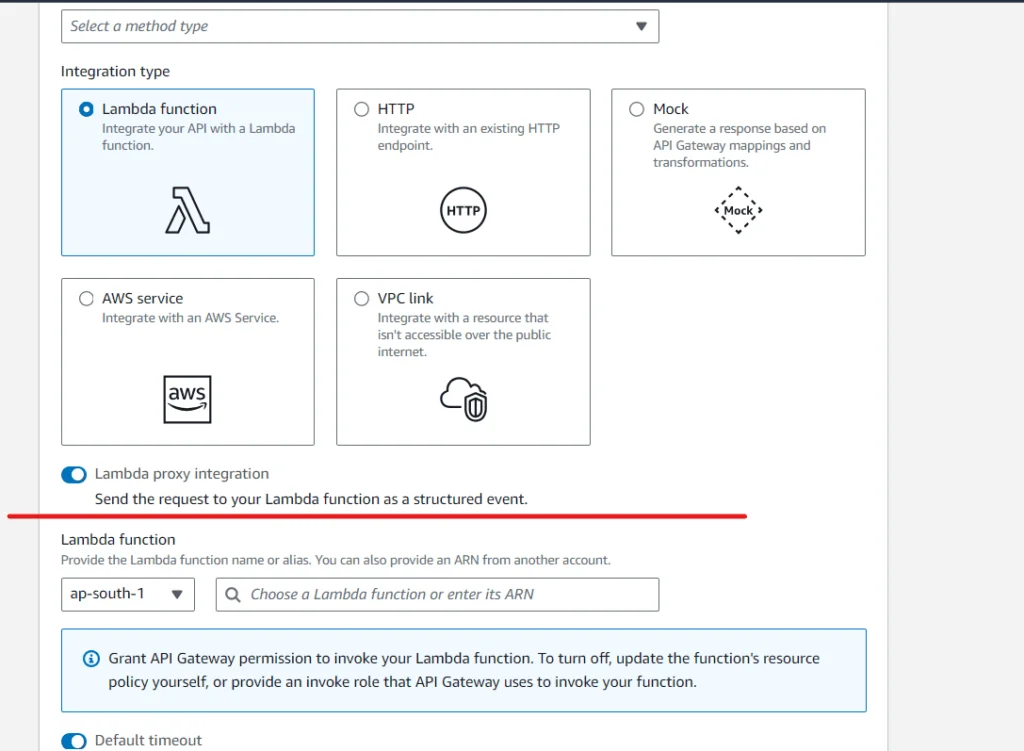

Now just create a resources with a path as handled in the application (see index.js file)
Like in the below image you can see I have created 2 resources “products” and “/product”.
After creating resource create method for the resources, like for “/products” I have created GET method and for the “/product”, 4 methods are created GET, POST, PATCH and DELETE.
NOTE : Turn on the “Lamda Proxy Integration”, in order to avoid mapping of event object in your code.
Step 5: Deploy and Test Your APIs
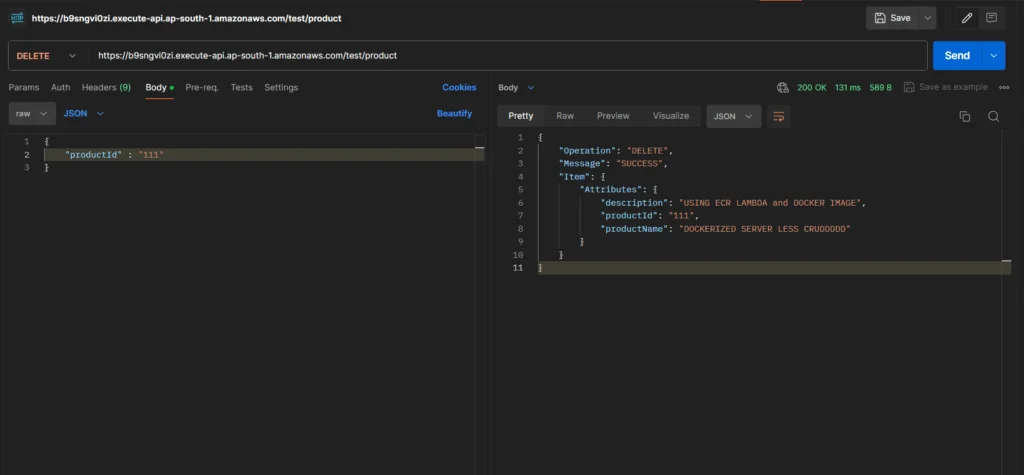
Test each endpoint using a tool like Postman.
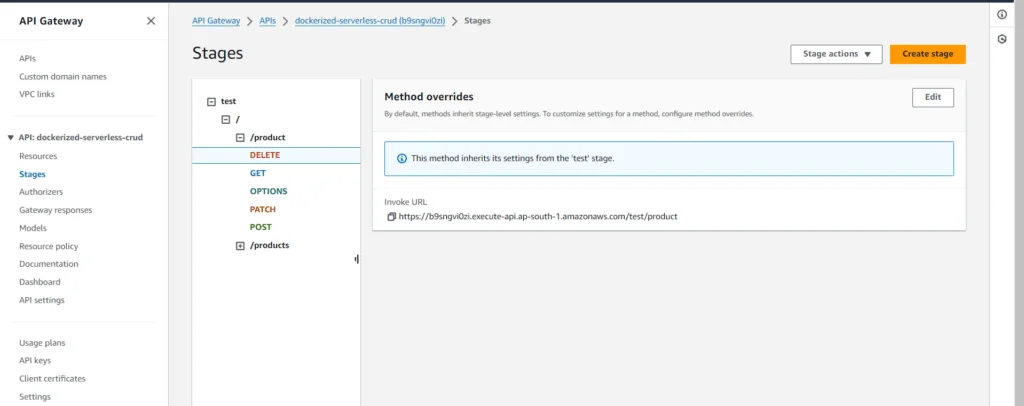
Deploy your API and note the invoking URL.
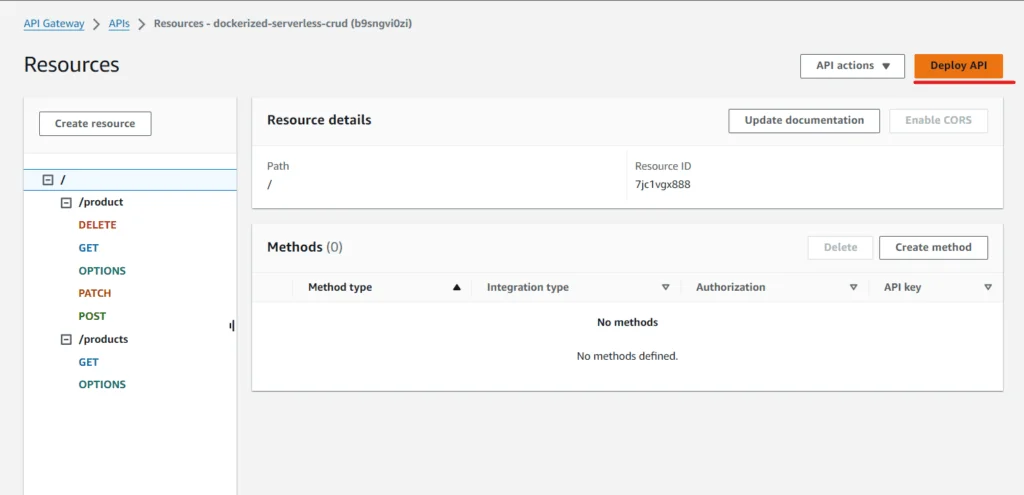
Note the invoking URL :
Below are the APIs tested via POSTMAN :
SUMMARY :
The above steps can be imagined as below :
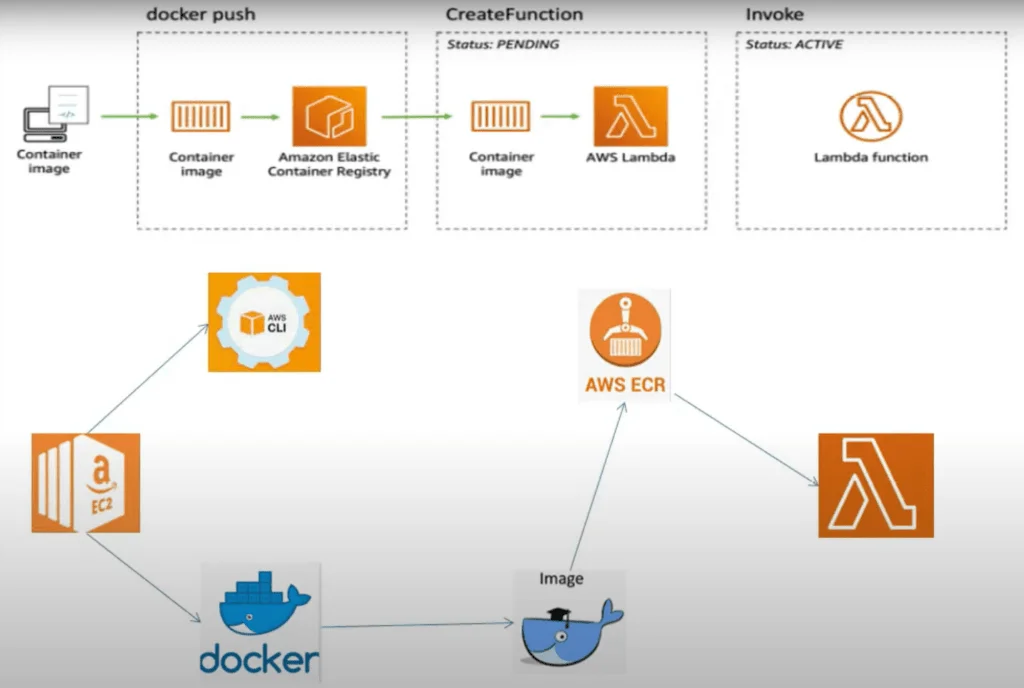
+ API Gateway integration
Why Container Images Exist for Lambda
Before Lambda supported container images, deployment packages were capped at 250MB unzipped. That’s generous for most functions — but not for everything.
Bundling a machine learning model with its dependencies, or a native binary built for a specific system architecture, can quickly blow past that limit. At that point, you’re fighting the packaging format instead of building your actual feature.
Container images raise that limit to 10GB. That’s the real reason this feature exists — not because containers are inherently “better” for Lambda, but because some workloads genuinely need the extra room:
- Image processing with heavy native libraries
- Large ML frameworks
- Dependency trees too big to fit cleanly into a ZIP file
If your function is a simple CRUD API — like the example in this guide — you likely won’t hit that ceiling. For simple APIs, the real benefit of using containers is environment consistency and easier local testing, not extra space.
The Lambda Runtime Interface Client: What Makes It Different
This part trips people up the first time they build one of these images. A Dockerized Lambda function isn’t just “your app in a container.” It has to speak a specific protocol that the Lambda service understands — and that’s the job of the Runtime Interface Client (RIC).
- AWS’s official base images (like
public.ecr.aws/lambda/nodejs:14, used above) already include the RIC. That’s why your Dockerfile can pointCMDdirectly at your handler — you don’t need to write any server code yourself. - If you build from a non-AWS base image — say, a slim Debian image because you need a specific OS package — you’ll need to install the RIC yourself and wire up the entry point manually. Skip this, and your container will run fine locally but fail mysteriously the moment Lambda tries to invoke it.
AWS also provides the Runtime Interface Emulator (RIE), which lets you test your container locally. It works by sending curl requests to a local endpoint that mimics a real Lambda invocation.
Testing locally with the RIE catches broken handler logic right away — for free — saving you from digging through CloudWatch logs after a failed deployment.
Conclusion
Certainly! Here’s the conclusion with the highlighted keywords:
In conclusion, Dockerized Lambda functions presents significant advantages for custom financial software development, iOS mobile app development companies, and software development for healthcare. By encapsulating Lambda function code and its dependencies within Docker containers, developers in healthcare custom software development and cross-platform mobile app development services gain greater control, flexibility, and efficiency throughout the development lifecycle.
This approach offers benefits across various domains including QA software testing services, Android apps development companies, and iOS development services. Furthermore, it enhances banking software development companies‘ capabilities and facilitates custom enterprise software development for financial services. Travel software development companies and SaaS application development services also benefit from the flexibility and reliability provided by Dockerized Lambda functions.
Incorporating Dockerization into software development processes ensures consistency and security for medical software development companies, while also improving efficiency for custom software services and Android application development services. Additionally, it supports Java software development companies, Ruby on Rails development services, and Python software development companies in delivering high-quality solutions.
For businesses seeking offshore software development, Dockerizing Lambda functions provides a reliable approach. It facilitates the hiring of offshore development teams and the engagement of dedicated offshore developers for software development services. Moreover, it streamlines the process of hiring a software development team and ensures efficient software outsourcing.
In essence, Dockerizing Lambda functions empowers software development companies, software development agencies, and application development companies to deliver robust solutions across diverse industries. Whether it’s web development services or software application development, Dockerization enhances the capabilities of software development firms and contributes to their success in the competitive marketplace.