Integrating RabbitMQ with a Node.js Application
Integrating RabbitMQ with a Node.js for robust message queuing. Enhance your app's communication and scalability with our guide.
Himanshu Pant
Integrating RabbitMQ with a Node.js for robust message queuing. Enhance your app's communication and scalability with our guide.
RabbitMQ, a pivotal tool for asynchronous communication, integrates seamlessly with Node.js applications. This integration is particularly beneficial for custom financial software development, healthcare software development, and cross-platform mobile app development services. It enhances scalability and is vital for building distributed systems across industries like banking software development and healthcare custom software development. In this blog, we will explore how to integrate RabbitMQ with a Node.js application using a set of code components specifically designed for this purpose.
Before we start, make sure you have the following prerequisites in place:
Let’s dive into the code components that will help you integrate RabbitMQ with your Node.js application:
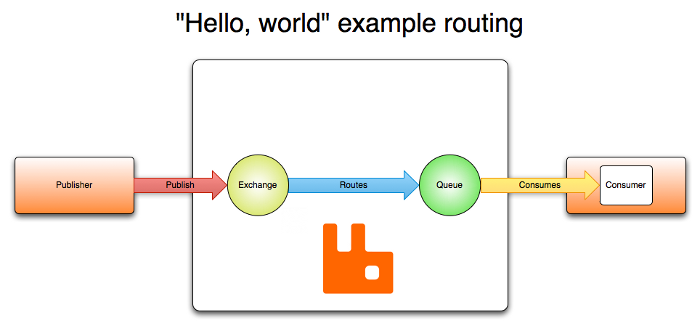
The RabbitMQClient class is responsible for managing the connection to RabbitMQ. It is implemented as a Singleton to ensure that there is only one instance of the RabbitMQ client throughout your application.
Here’s a breakdown of what this class does:
Here’s the client class code:
1 2 3 4 5 6 7 8 9 10 11 12 13 14 15 16 17 18 19 20 21 22 23 24 25 26 27 28 29 30 31 32 33 34 35 36 37 38 39 40 41 42 43 44 45 46 47 48 49 50 51 52 53 54 55 56 57 58 59 60 61 62 63 | const { connect } = require("amqplib"); const EventEmitter = require("events"); const Consumer = require("./consumer"); const Producer = require("./producer"); const serverUrl = process.env.RABBITMQ_SERVER; class RabbitMQClient { constructor() { this.isInitialized = false; this.replyQueueName = ""; this.eventEmitter = new EventEmitter(); this.channel = null; } static getInstance() { if (!this.instance) { this.instance = new RabbitMQClient(); } return this.instance; } async initialize() { if (this.isInitialized) { return; } try { this.connection = await connect(serverUrl); this.channel = await this.connection.createChannel(); const { queue: replyQueueName } = await this.channel.assertQueue("", { durable: false, }); this.replyQueueName = replyQueueName; this.producer = new Producer( this.channel, replyQueueName, this.eventEmitter ); this.consumer = new Consumer( this.channel, replyQueueName, this.eventEmitter ); this.consumer.consumeMessages(); this.isInitialized = true; this.connection.on("error", (error) => { this.initialize(); console.error("RabbitMQ connection error:", error.message); }); } catch (error) { console.error("rabbitmq error during initialization...", error); return new Error({ error: { statusCode: 503, message: error.message } }); } } async produce(data) { if (!this.isInitialized) { await this.initialize() } return this.producer.produceMessages(data); } } module.exports = RabbitMQClient.getInstance(); |
The Producer class is responsible for sending messages to RabbitMQ. It generates a unique correlation ID for each message, sends the message to the specified queue, and listens for a response on the reply queue.
Key points about the Producer class:
Here’s the Producer class code:
1 2 3 4 5 6 7 8 9 10 11 12 13 14 15 16 17 18 19 20 21 22 23 24 25 26 27 28 29 30 31 32 33 34 35 36 37 38 39 40 41 42 43 44 45 | const { randomUUID } = require("crypto"); class Producer { constructor(channel, replyQueueName, eventEmitter) { this.channel = channel; this.replyQueueName = replyQueueName; this.eventEmitter = eventEmitter; } async produceMessages({ data, queueName }) { const uuid = randomUUID(); try { this.channel.sendToQueue(queueName, Buffer.from(JSON.stringify(data)), { replyTo: this.replyQueueName, correlationId: uuid, expiration: 1000, }); return new Promise((resolve, reject) => { const timeoutId = setTimeout(() => { reject({ error: { statusCode: 502, message: `Message delivery to queue "${queueName}" timed out`, }, }); }, 10000); this.eventEmitter.once(uuid, (value) => { clearTimeout(timeoutId); const reply = JSON.parse(value.content.toString()); resolve(reply); }); }); } catch (error) { await this.connection.close(); console.error( `Error sending message to queue "${queueName}":`, error.message ); return new Error({ error: { statusCode: 404, message: error.message } }); } } } module.exports = Producer; |
The Consumer class is responsible for listening to the reply queue and emitting events when a response is received. It uses the correlation ID to match incoming responses with the corresponding request.
Here’s the Consumer class code:
1 2 3 4 5 6 7 8 9 10 11 12 13 14 15 16 17 18 19 20 21 22 23 24 25 26 27 | class Consumer { constructor(channel, replyQueueName, eventEmitter) { this.channel = channel; this.replyQueueName = replyQueueName; this.eventEmitter = eventEmitter; } async consumeMessages() { console.log("Ready to consume messages..."); this.channel.consume( this.replyQueueName, (message) => { console.log("the reply is..", JSON.parse(message.content.toString())); this.eventEmitter.emit( message.properties.correlationId.toString(), message ); }, { noAck: true, } ); } } module.exports = Consumer; |
To integrate RabbitMQ into your Node.js application using these code components, follow these steps:
1 2 3 4 5 6 7 8 9 10 11 12 13 14 15 16 17 | const rabbitMQClient = require('./client'); (async () => { // Initialize the RabbitMQ client await rabbitMQClient.initialize(); // Example: Sending a message to a queue and receiving a response const data = { message: 'Hello, RabbitMQ!' }; const queueName = 'your_queue_name'; try { const response = await rabbitMQClient.produce({ data, queueName }); console.log('Received response from RabbitMQ:', response); } catch (error) { console.error('Error sending/receiving message:', error); } })(); |
Customize Queue Names: Replace ‘your_queue_name’ in the example above with the actual name of the RabbitMQ queue you want to use.
In summary, the integration of RabbitMQ into your Node.js application provides robust asynchronous messaging capabilities, offering significant benefits for technical domains like custom financial software development, healthcare software development, and beyond. Businesses seeking to harness the power of Node technologies can benefit from specialized Node.js consulting services, ensuring optimized and scalable solutions for their development needs. It’s an invaluable asset for enhancing cross-platform mobile app development services, custom software solutions, and various software development requirements. RabbitMQ empowers efficient inter-component communication, scalability, and reliability, making it a versatile choice to elevate the technical aspects of your applications across diverse industries.


Web Development Services in the United States